Monday, September 10, 2012

Surreal Infrared

Petrofka Trucks IR 2 2012 Flickr
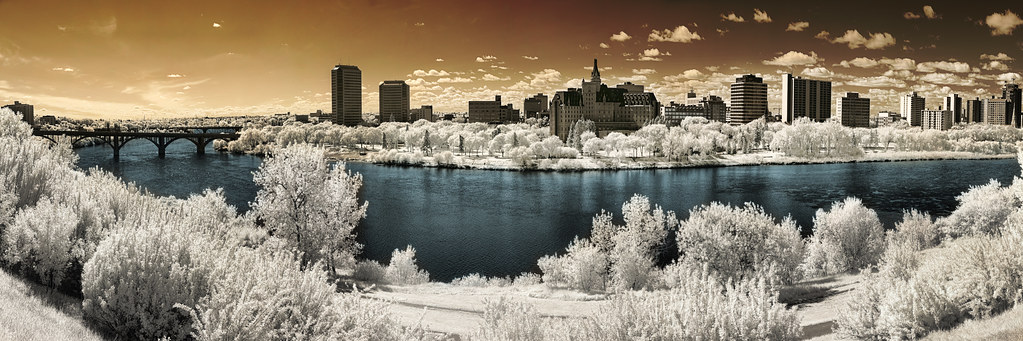
Near Petrofka bridge on the way to Blaine Lake Saskatchewan

A little while back I snuck away for the day, grabbed my newly IR converted 10D, and hit the road with a friend to shoot some of cool views my Saskatchewan backyard has to offer. In my last post I talked mainly about the neat little pinhole camera I also took along but since I hadn't finished editing my IR shots I split it up into two posts. This is the second one.

For those who live elsewhere and aren't familiar with Saskatchewan, it's in a word ... huge. You could fit the entire UK within the province of Saskatchewan... twice over... and then some. Needless to say I've lived here all of my 30+ years and still have lots of different places I want to check out. One of those places I was able to check off my list during this trip, that was Saskatchewan's biggest tree (allegedly) but we'll get to that in a bit.

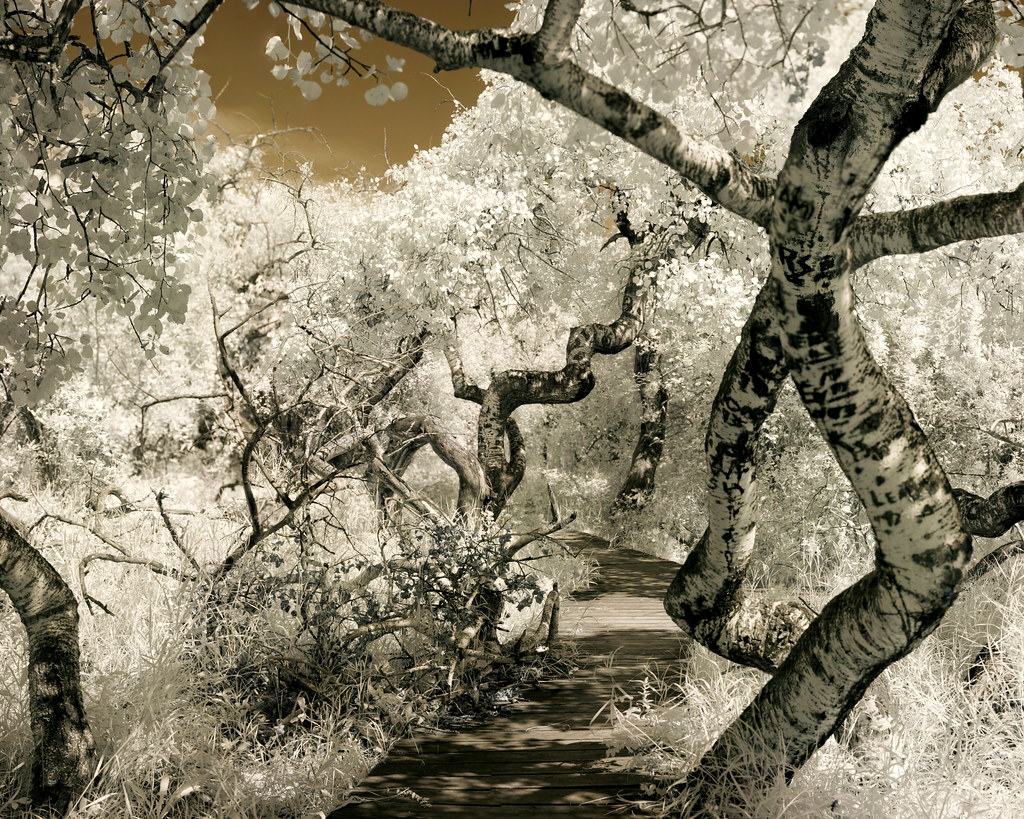
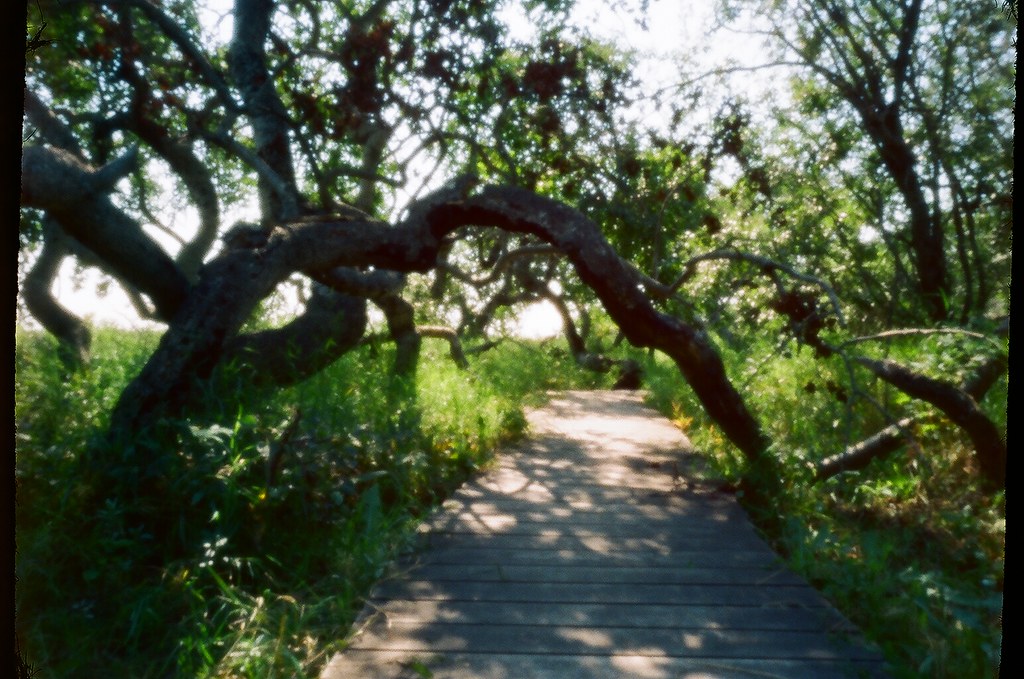
First and primary stop was the crooked trees, a very popular off-the-beaten-path attraction.

Crooked Trees IR  7 24x36 2012
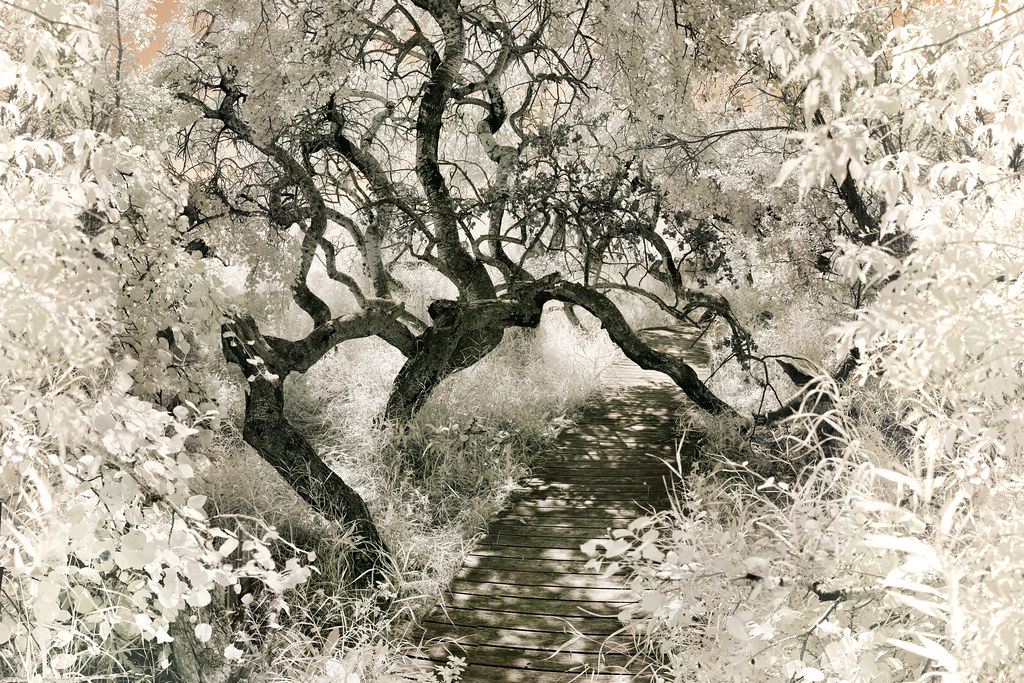
The Crooked Trees aka The Crooked Bush aka The Crooked Trees of Alticane

I encourage everyone that lives in or is travelling through Saskatchewan to try and visit these at some point. With how surreal they look under normal conditions I knew that as soon as I had a chance I was going to get some infrared photos of them. The results look like a fairytale.

Crooked Trees IR  2 2012
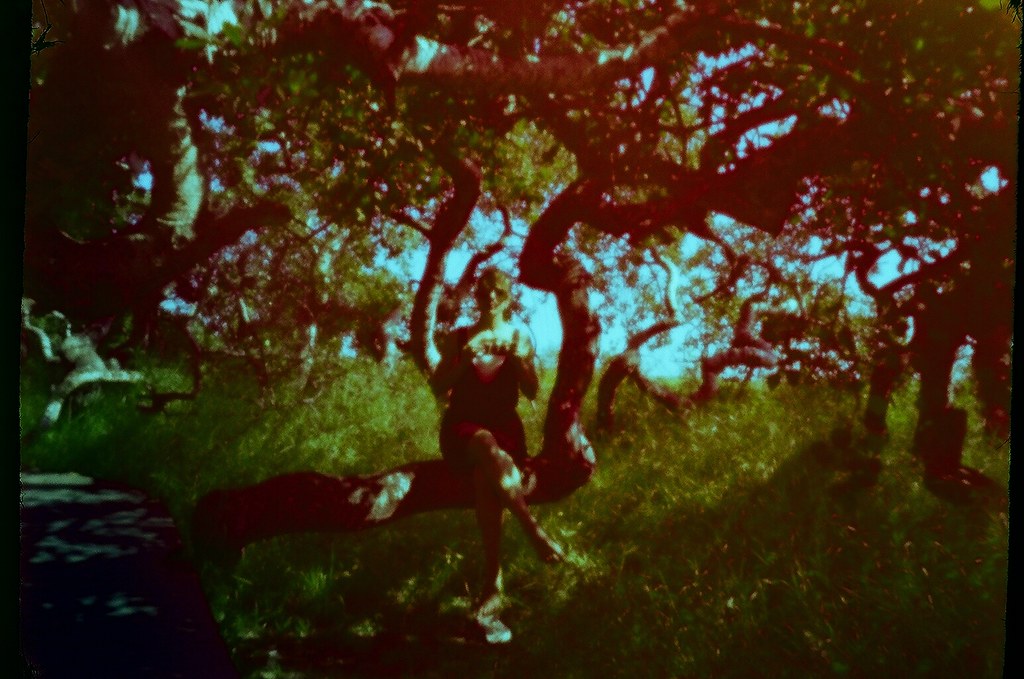
If you stare long enough the tree on the right looks like a person

Jackie IR  
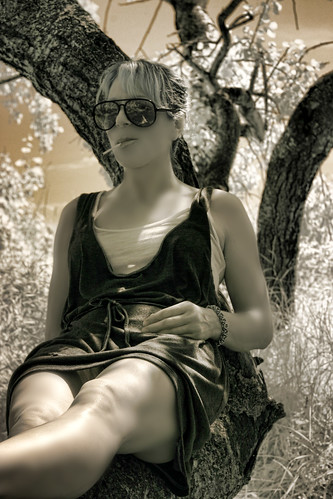
My good friend and flip-flop destroyer (thanks for driving Jackie!)

Just before we got to the crooked trees we had to stop in Hafford SK which is on the way. My friend's flipflop had broken so we were hoping to find a suitable replacement for her at the general store. The store had a "back in 10 minutes" sign up so we stopped by The Sword And Chalice restaurant next door, a very unique little restaurant with a reputation for good food of epic proportions. I suggest making a day trip of it and stopping by for lunch. Unfortunately while Hafford may have aweome Ukrainian street signs and a restaurant that serves a 16lb burger they do not sell flipflops. The search continued.

Crooked Trees directions (from Saskatoon): Head out highway 16, go past Langham and Borden, at Radisson turn north onto highway 340. Follow 340 until you reach Hafford, you'll know it by the street signs that are in both English and Ukrainian. Exit Hafford westbound on highway 40, at "Flint Road" turn right, there should also be a sign saying "Crooked Bush". Drive 16.5km north (seriously make note of your odometer) then turn right and go 2.5km east (there is a very tiny white sign at this turn). 

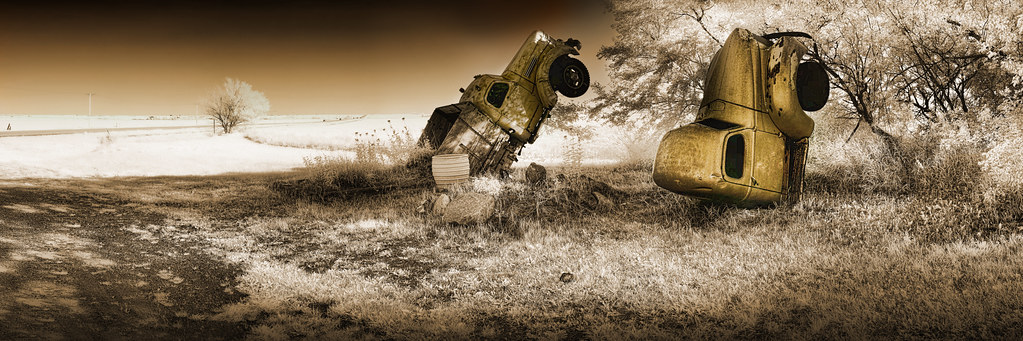
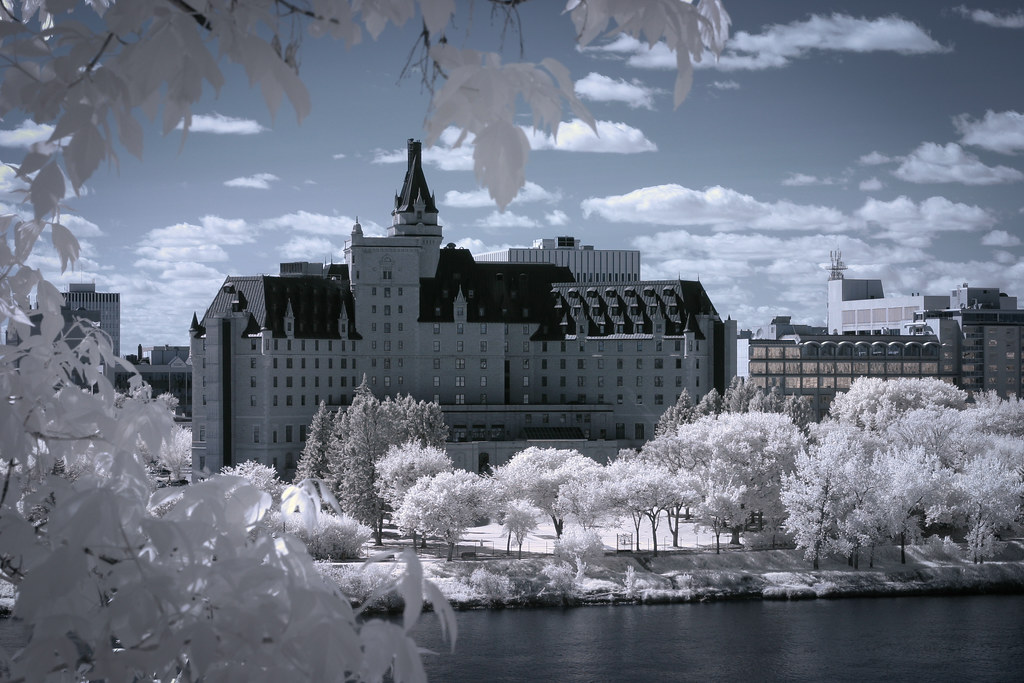
Initially our trip was only supposed to be the crooked trees but my friend hadn't seen the half buried trucks or Saskatchewan's biggest tree so we decided to keep exploring. Heading back on highway 40 we drove through Hafford and kept going to Blaine Lake, a town which I might add sells some very sturdy and reasonably priced flip-flops. With the footware situation fixed we exited Blaine Lake heading south on highway 12. Look for a sign on your left that says "Doukhobor Caves" and turn there onto Tree Road. You still have to drive for a bit but there are signs that will guide you, eventually you'll come upon this:

Biggest Tree IR 2 2012 Flickr
Saskatchewan's Biggest Tree Near Blaine Lake SK
I really kicked myself after for not getting one shot with someone or something in the frame to give a sense of scale. The circumference of the tree is ~5m (just over 16ft for you Americans) and it is apparently a cottonwood/balsam poplar hybrid. Earlier I referred to it as Saskatchewan's biggest tree with allegedly in brackets, that's because we have a boatload of trees and some pretty remote areas. Until someone contests the title though this is Saskatchewan's largest tree. 

In all honesty we actually drove right past Tree Road and wound up stopping at the Petrofka Bridge Orchard to ask directions. We came out with directions, picked carrots, jams etc. I highly recommend stopping in, whether its for directions or not. We also ran into some people that we'd ran into earlier at the crooked trees, for such a huge province its amazing how small it can get some days.

Back on highway 12 heading south, just after you cross the North Saskatchewan River you'll find the Blacktop Diner/Olive Tree Restaurant which is home to the half buried trucks. There should be a more grandiose name for them but there isn't. 
Blacktop Diner IR Pano 2 2012
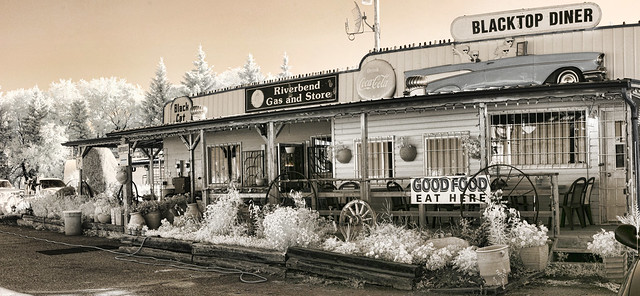
 Blacktop Diner by day, authentic Greek restaurant Olive Tree by night


Petrofka Trucks IR 1 2012


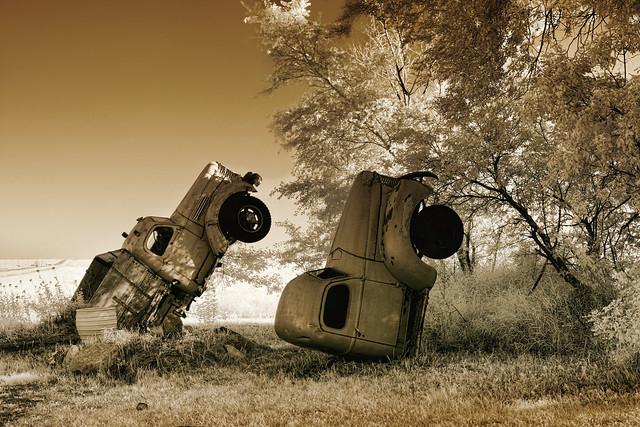
I'd shot these trucks in the past but thought they might look pretty cool in infrared.

Blacktop Pickup IR 1 2012
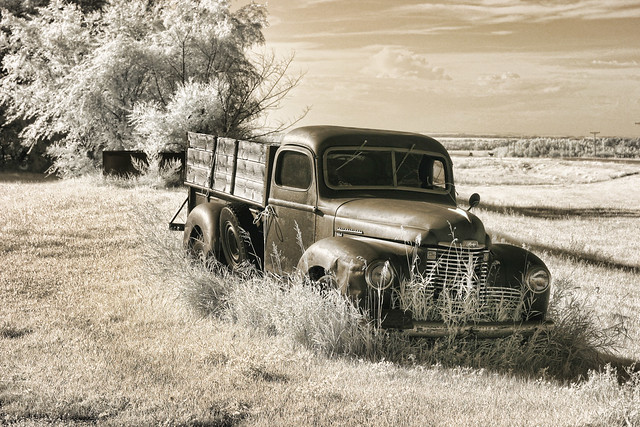
They also had a cool non-buried truck on their property. 

This trip proved to be one of my only summer getaways this vacation but it was definitely one of the highlights of my summer. If you're in the area be sure to check some of them out.

If you'd like to see all the shots from this trip and more of my Saskatchewan Scenes you can view them here.

Tuesday, August 21, 2012

Old school pinhole fun


My customized Dippold pinhole camera

Earlier this year I promised myself I would not let yet another worldwide pinhole day (Apr 29 2012) pass me by. I was on track and managed to get two Dippold pinhole cameras made, however life managed to get in the way yet again and it wasn't until my summer holidays that I was able to take them out for some homemade fun.

Lets back up a little, years ago I had made the Dirkon which is another paper camera and it was really fun to put together. I can't remember why but I didn't have the best luck with it image wise, if I remember correctly the photos came out really blurry. I'm sure that was my fault in either user error or a construction error so don't write off the Dirkon prematurely. My Dirkon still resides in my display case because I did put a lot of time into building it. Given my prior issues and the desire to try something new I thought I'd try the Dippold version instead, it was quite easy to make and I even took it one step further by designing my own "skin" which will hopefully soon be available here or here (its the Pinstamatic skin).
Update: For the time being I'm hosting the skin on my dropbox account, grab yours here. Note: It was hard to fit it all on one sheet so some of the tabs to wrap around and glue are a bit small, the extra "leather" is provided so you can extend the tabs if needed.

One of the most crucial aspects to any pinhole camera is the pinhole itself. I made my own from brass shim stock and a pin. You'll need a very sharp pin and some fine grit sandpaper, 400 or higher should do. For my pin I used a long and narrow bulletin board pushpin (not the short fat style). There are various techniques online but here is what I found worked best for creating very tiny pinholes (I managed to get as small as a 0.14mm pinhole). The trick is you don't actually push all the way through, you press gently and essentially only form a tiny sharp little dent. Then you flip it over and sand the little bump away, flip it over and repeat until you finally break through.This method may be a bit tedious but its the only way I've found to get a very small hole that is very round and free of burrs.

Another solution for those less inclined to DIY is to purchase electron microscope aperture grids which are extremely precise and come in a variety of sizes (listed in microns). Here's a site that stocks them (you'll want the single hole version) but they come in a pack of 100 for ~$26. The Dippold design needs 200 micron apertures and the Dirkon needs 300 micron. Get a few friends and split an order and have enough to last you a lifetime :) I've yet to try these so if anyone does let me know in the comments section and post a link to your pics!

Measuring pinholes that are down to 0.2mm is a bit tricky. Luckily you can get a decent enough measurement by photographing your pinhole beside a ruler using any decent point & shoot camera in macro mode. Once you have the image, crop from the center of each of the mm markings on either side of your pinhole. Next use the measurement tool in either Photoshop or GIMP to determine how many pixels between mm markings and how many pixels across your pinhole is, divide the pinhole width in pixels by the overall width and there is your size in mm.


This pinhole worked out to about 0.32mm

As I wrote the above I realized that I had made a mistake with my pinhole size, initially I planned on making the Dirkon which required a 0.3mm pinhole so that's the size I made them. Later, due to time constraints, I opted to make the Dippold instead which is a lot simpler in its construction but needed 0.2mm pinholes. I'm not sure how much of a difference this made in the final image quality but I might have been able to get a bit sharper images had I used 0.2mm pinholes.
90670005
A pinhole image of the crooked trees near Hafford Saskatchewan (~3-4 second exposure, ISO400).

Enough about construction, more about the actual shoot...

With the last weekend of my holidays approaching I realized if I didn't squeeze a photoshoot in soon I wasn't going to get a chance. My last post was about newly IR converted Canon 10D from lifepixel.com,  aside from a quick "does this really work" shoot I hadn't had time to play with it. I texted a friend quickly to see if she was down for a road trip later in the week and the plans were laid. Initially when I'd made the two pinhole cameras for world pinhole day the second one was intended for her but both of our lives quickly became insanely busy so the sat unused.

90670003 colour corrected
My SK roadtrip buddy :)

One addition I'd made to the Dippold was to glue a 1/4 nut onto the bottom for attaching a tripod. My fellow pinholer however decided she wanted to use trees or the ground to brace her shots so we removed her mount. Without the tripod her results were a little more abstract but that's what pinhole is all about. For most people pinhole is about having fun and being artistic, not tack-sharp images and precision (unless by chance you have one of these).

A shot of me setting up for the first image in this post. Photo by Jackie Kripki

The trip was really fun, met some cool people and saw some interesting stuff along the way. My next post will have more pics from these sweet surreal locations and in infrared!


Monday, May 28, 2012

Canon 10D Infrared Conversion

5063-5115 Alternate Edit Saturated
Saskatoon Skyline, though it looks frigid this was shot in 20°C weather :)

Earlier this year I'd seen a body only Canon 10D posted on Kijiji (similar to Craigslist) for $160 CDN, in its day the 10D was a great camera and marketed at pros. I didn't really have a need for the camera but at that price I was thinking I'd pick it up and leave it in my car so I always had a DSLR with me, at that price point if it got damaged or stolen I'd be disappointed but not distraught. I wound up buying it and was pleased to find it was in near mint shape. Despite being older and only 6.3MP it took very nice photos and I was surprised at the lower than expected ISO noise. My first DSLR was the first Canon Digital Rebel (300D) and since it was also 6.3MP I expected it to be the same but was delighted to find it was better.

At this point I started to think more about what I should do with this camera, I did after all already have a Fuji X100 which I'd picked up primarily as my "take anywhere" camera. Maybe my initial plan for this camera wasn't really a good one. Then I stumbled across an IR photo online somewhere and I remembered about the conversion services offered by a few companies and figured I'd look into it again. Previously it seemed way to pricey, first you had to provide a DSLR which weren't cheap and then pay for the conversion which makes it a dedicated IR camera so its not something you'd do to your main body. The more I read up online the more good things I was hearing about Lifepixel.com, in fact I don't think I read anything negative about them at all. The internet is full of horror stories about people sending their cameras into cheaper "fly by night" operations where some guy was doing these conversions in his basement or garage and was simply substituting the IR blocking filter (aka hotmirror) with Rosco or Lee filters. Since I work in electronics manufacturing and am familiar with some of the various standards I was impressed to learn that they use a Class 5 clean room to ensure they do not introduce any dust into your camera when performing the conversion.

Let me backtrack a little, for those who don't know what this conversion entails I'll explain it here, if you know what this is then feel free to skip ahead. In the old days of film all you needed to do to shoot IR was buy a roll of IR film and away you go. Nowadays all digital cameras have a glass filter installed over top of the sensor that is meant to block out infrared light while allowing visible light to pass through. Without this filter your everyday images would have a pinkish cast to them and generally not look right. The places that offer conversion will take apart your camera, remove the IR filter, also known as a "hot mirror" and replace it with a filter that only lets infrared light through. The thickness of the replacement filter must be the same as the filter they removed, even still the cameras focusing system must be re-calibrated because IR does not focus at the same distance as visible light. The fact that the insides of these modern cameras are crammed with enough electronics and mechanical parts to make Swiss watchmakers wince along with the need for an absolute dust-free environment means you should be wary of who does the conversion. There are DIY instructions available on the web but even if you get the filter installed and you manage to get very little dust in your camera your autofocus still won't work properly. If you want to see just what all is involved (minus the recalibration) Lifepixel has DIY guides though they expressly state they should not be attempted and are purely for educational purposes, here's the step-by-step for my Canon 10D.

What to expect when ordering the service:
Right now the price for converting most DSLR's at Lifepixel with a "standard" IR filter with "standard" re-calibration is $250 +$55 for return shipping and handling (keep in mind I'm in Canada) . I considered paying the extra $50 for the Deep IR filter but after talking to others who had the conversion done I stuck with the standard IR filter. Their standard lens calibration calibrates the camera for the "nifty fifty" 50mm 1.8 EF lens, since I had one kicking around after upgrading to the 50mm 1.4 last summer I stuck with this too. The shipping seems steep but this is because they insure the package decently, if I remember correctly their cost for the shipping was around $40 so they aren't skimming too much. You do have to pay to ship the camera to them as well so I think that cost me under $20 and it was insured for the conversion price and camera replacement. When you order the conversion they send you detailed shipping instructions too. When they receive the camera they notify you, the conversion is supposed to take 5-10 business days from the date they receive the camera. I mailed mine out Apr 27th and they received it May 3rd. They shipped it back May 21st and I received it May 25th, all total about 1 month.

What to expect when you get your camera back:
I did have one small gripe and that was concerning their return packaging. It was well protected and padded but all of the materials were types that generate huge static charges. Maybe its just because I work in electronics and jump through all sorts of hoops to avoid static electricity which can cause serious damage to sensitive electronics, the damage may not be immediate either. When I shipped my camera to them I put it in an antistatic bag that I had leftover from some prior electronics purchase. Anyway I don't know if Canon's packaging is entirely ESD safe either. Ok so when you get the camera back before you can start shooting you should set the custom white balance by shooting some green foilage. After that you're good to go!

A quick note about using other lenses, not all of them will work. Some lenses have special coatings inside to reduce reflections but they are made for visible light, sometimes these coatings in IR appear white and can cause blooming. Blooming is a white haze in the center of the image and is most unwanted. Since my 50mm on the cropped sensor of the 10D behaves more like 79mm I thought I'd try my 35mm 1.4 lens, unfortunately this lens suffers from this bloom effect so I'm going to have to trial and error and figure out which lenses will work. All of the images in this post were shot with the 50mm 1.8 type II lens and turned out great. The pano was shot with this lens too and multiple images digitally stitched together.

Considerations for post production:
Straight out of the camera the shot is going to look like the one below, colourwise at least.
IMG_5166_Edit
 Colour untouched, other processing like levels and sharpening/clarity added.

In your favourite photo editing program you can swap the red and blue channels to yield a shot like the one below:

IMG_5160_edit_blue
Red and blue channels swapped. 

I'm looking forward to heading out and shooting some interesting landscapes this summer with this camera. In the fall hopefully I'll get to go to Scotland where the lush greens will be perfect for IR photography. One added benefit to IR is that there aren't many people shooting it and it can give you an edge especially if you're looking at selling your artwork. The Delta Bessborough Hotel is one of the most photographed landmarks in my city, since everyone and their dog has a photo of it the chances of getting a truly unique shot of it that stands out against the rest is hard, thanks to IR I'm probably one of only a few people in my province that can get this shot digitally.

Monday, May 21, 2012

Urban Guerrilla Shooting Take 3


IMG_9384_Edit
 A dilapidated cage elevator proved an amazing backdrop during my latest shoot

Who needs a studio anyway?
Eventually my basement renos will be done and I will have a proper studio to work in but chances are I'll try to avoid using it in favour of location shoots as much as I can anyway. For my latest shoot I once again set out on an urban exploring mission, shooting wherever the backdrop looked interesting, ducking into cool old buildings and busting off shots until asked to leave. Despite leaving my innocuous X100 in my camera bag this time and touting my 5DMKII in its stead I wasn't hassled once about shooting anywhere. In fact people were apologizing for getting in my way. 

Let me backtrack a little. May 1st my gallbladder decided it was going to throw a temper tantrum, it started becoming unruly about a week after my Cuba trip and landed me in the ER a few times. This time however it really outdid itself and a simple trip to the ER turned into a 3 night stay and date with a scalpel. I then had an unexpected two week holiday to recover. After going stir crazy for a week and a half I was feeling pretty good and since my camera was under my 10lb weight lifting limit I figured I'd set out on a shoot. The very pretty and incredibly photogenic model, Deanna Alyse, had just contacted me through model mayhem wanting to work with me sometime. The timing was perfect so I contacted her and made plans to shoot that upcoming weekend.

I had just had lunch that week with a photographer buddy of mine, Krystian Olszanski, and since our last co-shoot was such a blast I invited him along as well. Shooting with another photographer is great for two reasons: one you have a knowledgeable lighting assistant two: while you're lighting and they're shooting you get to see how another photographer approaches the same subject.

We all met up at a mall downtown and set off without really having a set destination in mind. We happened along a small patio beside a coffeeshop/bistro so I snapped a few quick portraits there just using available light.

Shooting as we go

At this point Krystian mentions that a pub on the next corner actually has a seldom-used (or known about) patio out back and that it might be an interesting location.

As we turn into the back alley  we both notice a nicely painted brick wall with some pallets stacked up which are screaming to be used as a backdrop.


Cutest hobo ever

Lucky for us our model was willing to get a little dirty in order for us to get our shots. Even before we busted out the flash and umbrella the subdued light of the alley was great to shoot under. It was also quite windy that day but it worked and gave some of the shots a nice dynamic.

Below is one of my favourite shots from the whole shoot, something about it just has that vintage pinup vibe to it and her innocent yet coquettish smile just completes the pose. This one was lit with off camera flash, a 580EXII triggered with Cactus V5's shooting through a 48" white umbrella. Krystian acted as my voice activated lightstand.


IMG_9212_Edit
  A definite fave from the shoot.

We probably shot at this location for a good hour, exploring every idea we could think of. While one of us was shooting the other was lighting and constantly coming up with new ideas for when it was their turn again. Often one of us would pose the model in a certain way or shoot from the a unique angle and the other would groan and say "ahhh I was going to do that on my turn". Ultimately though we both have our own style, especially once the images have been processed, so I don't think we overlapped too much.

As I stated this alley was a goldmine, turning 180 degrees the opposing wall was interesting too as you can see below.
 Every part of this alley was dripping with character.

Having tapped this alley for every angle we did eventually make our way to the back patio we'd initially set out for only to find it quite lame photowise.  Just across the street was a building I'd shot in during my last outing, since we had off-camera lighting with us this time I figured we should check it out.

Right off the bat I wanted to try a shot I'd done last time but felt I could improve upon with some added backlighting.

 Krystian lit this from behind while thinking thin thoughts.

I always love shooting in stairwells when I have the chance, there's just something about them that always yields a good shot. In the photo below we had to resort to some rather crazy lighting since we only had the one flash. Krystian stood behind the model at the top of the landing on the camera right, I held a reflector below and left out of frame which he then aimed at. The result actually looks naturally lit as if window light is providing the rimlight with ambient fill. 


IMG_9291_Edit
Strobist Trick Shot. 
While shooting on the main floor I had lamented that it would have been awesome if the elevators were the old-school style ones with the cage and attendant. At one point between poses Krystian disappeared down the stairwell and when he finally resurfaced he had a big grin.  

This is what he'd found:
IMG_9384_Edit
Looks like a scene straight out of Silent Hill

What a cool find! Not only was it a cage style elevator but it had the most amazing grunge texture on the walls from the stripped paint. Shooting with ambient left a little to be desired though, two CFL bulbs lit the elevator, one regular and one daylight balanced. For the above shot I only had to push the ISO to 400 since I was shooting my 50mm at f1.4 but for other shots I pushed the ISO to 1600. Its for this reason that I love the full frame goodness of the 5DMKII though I have to give props to my X100 that handles high ISO nicely too. Its amazing how far cameras have come with respect to ISO noise and in 10 years I'll probably look back and wonder how I ever managed with only being able to push it to 1600 :)


IMG_9481_Edit_Cast
Love cage elevators


The last photo I'm including proved very tricky, I knew I wanted to light through the cage but it was extremely difficult to light the whole face. Initially we were shooting bare flash from a distance to get those nice crisp shadows but eventually wound up using and umbrella quite close to the cage.

I apologize for the extra long blog post (which I tend to do often) but I felt this shoot warranted a full walk through. This was my third "guerrilla shoot" this year and I'm finding them to be an excellent way to shoot. By wandering around and exploring you find new cool locations, push yourself creatively to adapt to each new location, and ultimately wind up with a diverse range of photos from a single shoot. You simply can't do the same thing in the studio.

Wednesday, March 21, 2012

X100 Urban Guerrilla Photography


DSCF8448

 A run down back alley provided a great backdrop with nice soft overhead lighting
Yup that's Guerrilla, not G-oh-rilla, as in Che not Kong. If you remember back to my last outing with the X100 I had originally planned to do this sort of shoot then. Due to a sudden cold snap the last time though outdoor shooting was scrapped and we headed to the local university. Well spring seems to be here now and I'd been meaning to work with this cool little camera slinging hipster I'd met on the plane to Halifax a few years ago. Clare agreed to step in front of the lens for me as we set out downtown to scout around and just shoot at any and all interesting locations we found. I had done something similar to this once before but we stuck to outdoor locations, with the X100 being so inconspicuous I could also sneak into cool buildings without my big dSLR setting off alarms that there is a pro photographer in the building.


DSCF8410

Nobody batted an eye while we hung out in front of these elevators shooting away

The X100 proved to be great for doing this, not only did we not get hassled even once about taking photos we were given cookies :) That's right, while shooting in a stairwell of one of the cities higher end hotels a staff member carrying a tray was approaching us, "that's it" I thought here's where we're going to get kicked out but no instead he lowers the tray which turned out to be covered in cookies and offered us one.


DSCF8503

Taken just minutes before free cookies

I must admit I'm still getting used to the X100, I'm constantly second guessing my focus, especially when shooting at f2. Most times my paranoia proves to be unjustified I just miss that reassuring feeling of the lens shifting and locking into focus that a bigger lens on an SLR body gives you. The other thing is how the camera doesn't automatically cross over into macro when the subject gets closer than a certain distance. I don't even need auto, I'd settle for a button that I can press without having to move the camera from my eye. When doing portraits I seem to be riding this line between macro range and normal range and I missed a few poses as my model relaxed and shifted as I had to enable or disable macro mode, with the moment lost I couldn't re-pose her to get the same look. The next shoot I do I'm going to try to put it in manual focus mode and just do the AF lock trick that Zack Arias mentions in his initial review of the X100. A few other pet peeves I realized were these: Why is there no option to enable Auto ISO from within the ISO menu? I've set my custom function button to bring up ISO yet in order to enable/disable auto ISO I have to scroll through menus. The other isn't so much a peeve as perhaps a design flaw, apparently if you have your camera in macro mode with manual focus enabled then turn the camera off you should not turn the camera back on with the lens cap in place because during the initialization the lens extends, hits the cap, then your camera gives an error telling you to turn the camera off then back on. This had me depositing bricks in my joe-boxers the other night when it happened. Luckily a power cycle cleared this but still its not something I want to repeat. Fuji should do two things, a) forget macro setting when camera is powered off b) return the lens to a known starting point when powered down c) sense via incoming light if a lens cap is on before performing the lens initialization d) not design a lens that extends past the outside of the bezel in the first place. I can live with these issues however and am still stoked on my X100, in a few years maybe I'll upgrade to the X300 or 400 and by then fingers crossed maybe full frame sensors will be more affordable and will be popping up in these.

I broke a few of my own rules during this shoot too, since this shoot was about experimenting as much as it was about finding new locations. Normally I tell everyone that they're crazy to shoot using an in-camera black and white mode, my argument is that you're just limiting what you can do afterwards so you should shoot in colour and convert in post. Going into this shoot I knew I'd be converting to black and white after anyway so I thought I'd try the black and white mode. Since I was doing portraits I chose the bw+g which is black and white with a green filter, this is supposed to give pleasing skin tones for portrait work. One thing I noticed about shooting this way is that it changes the way you compose the images, since you're seeing real time what it looks like in black and white. You're not shifting your angle to block out that nasty yellow building in the background or that puke green car because now they're just pleasing shades of grey. Its the same argument I made about Lensbabies, sure the effect can be done in post but when you're seeing the effect in real time it impacts how you're taking the shots and that matters just as much if not more sometimes.

The other rule I broke was shooting in jpg instead of RAW. I've read lots of X100 reviews where people couldn't say enough good things about the in camera jpg processing and how when shooting RAW and processing in Lightroom they couldn't seem to get as good results as straight from the camera jpgs. On this front I'm not so sure, there were a few times during post where I wished I had the latitude afforded to me that a RAW file would have provided. I was shooting in some dim locations and did wind up underexposing a few times (gotta be checking that histogram!).So a tip for X100 users, if you're shooting jpg make sure you're nailing the exposure (or even just slightly over exposing).

All in all the shoot was really fun and I found a few new locations that I can draw on if needed. There is still many alleys and even more buildings left unexplored so I think there may be quite a few more urban guerrilla shoots in store for this summer, stay tuned!


DSCF8592

You just can't beat window light

Wednesday, February 22, 2012

Poor man's macro really delivers

IMG_8563
Closeup of a new Canadian $100 - Razor thin DOF at f5.6
Click the above photo to see all of my macro shots

The other day I spied a Kijiji ad (like Craigslist) for a Canon EOS3000 film SLR with an EF 35-80mm lens & polarizing filter all for $20! It also just so happened that the seller lived across the street from my parent's house, how random is that? I figured I'd snap it up just for the lens if nothing else so I googled the 35-80 to see if it was any good or not. One thread I found said the lens was a mediocre kit lens, even the newer 18-55mm kit lenses were better, however the person went on to say that with a little hacking the lens could be made into a pretty decent macro lens. After seeing some of the photos other people were taking with the modified 35-80 I was totally sold. When I went to pick up the camera and lens the guy said he thought $20 was too much and gave me $5 back! I told him $20 was fine but he insisted so my already sweet deal got even sweeter.

Here is the original forum thread I found on the topic but if you just google "35-80mm lens hack" there are plenty of results and tutorials. There are 3 versions of the EF35-80mm, it sounds like version 1 is the easiest but I found modifying my version 3 model was pretty easy too. Now there are three ways you can go about doing this, the first and simplest way is to just remove the front lens grouping which are all housed together and use the lens that way. The second way is to punch out the 3 lenses that make up the front element so that you can put the plastic back on, this allows you to use a filter to keep dust out of the lens. The 3rd way is to remove only the first and third lenses from the front element, this reduces magnification by a little but allows you the ability to focus using the focusing ring. The 3rd way is the most difficult, especially on the version 3 lens that I have, however for some this might be the best opotion since it increases focal distance a few inches. At this point I'm thinking if I can find another 35-80mm for $15-20 I'll just have one with the front middle element and one without. Having the middle element with the lower magnification will be better for shooting flowers etc.

Once I got home from work yesterday I spent 2 hours shooting anything I could find in my house that I thought might look cool at this magnification :) While I took a break from the shoot and had a smoke out front of my house I even gathered up some small pine branches, pine cones, and a few dead leaves to shoot. I just used a sheet of white paper as a backdrop, my 580EXII with a noname Stoffen on it (triggered wirelessly) provided my lighting. For most shots I was able to keep the power down at 1/128 but it all depended, for a few shots I was up at half power and was bouncing the light off of my ceiling.


IMG_8777
A dead leaf proved a worthy subject when dramatic top lighting was applied.


IMG_8782
Same leaf but backlit with an LED flashlight


IMG_8720
Pine needle tips just poking into focus

IMG_8588
The inner portion of an orange slice looks like a flavour explosion at this magnification.

For some reason at times I'd wind up with a light spot in the center of the frame, it seemed to happen most if I was shooting a brighter scene. At first I thought maybe I'd gotten some dust on one of the elements since I was shooting with the front piece off. Cleaning didn't seem to help so I'm starting to think that this is due to the lack of "flocking" due to the missing front piece, the flocking prevents unwanted reflections. The only other explanation is that one of the elements has a small scratch or something on it that I simply wasn't seeing with my naked eye. In the photo below you can sort of see what I'm talking about, I had shots that were way worse but I didn't post them anywhere so this is the best I can do to show you.

IMG_8672
In some photos I'd get a lighter spot in the center of the frame, not completely sure of the cause. The subject btw is a weaved cowboy hat my roommate recently bought while in Cuba :)

This proved to be probably the best $15 I've ever spent. Since its winter and there aren't a lot of flowers around to shoot I might actually hit up the flower shop and buy something to shoot, if I do they'll windup in my macro set on flickr so feel free to check back.

Sunday, February 12, 2012

Fuji X100, a dilemma of want vs need

DSCF8221-2
Testing the Fuji X100 with off camera flash - ISO200 f2 1/500s

Disclaimer: This is not a detailed camera review, those have already been done ad nauseum for this camera and better than I could do. Nope this is more along the lines of
Zack Arias's musings on the x100.


Nine days ago the portion of my brain that controls impulse was sleeping on the job and allowed me to drop a significant chunk of change on the Fuji X100. I'd been seeing advertisements here and there and reading the odd review in various photography magazines. I'll admit it, I have a huge softspot for retro items. When I started hearing about how great the image quality was out of the X100 and how it was using an APS-C sized sensor which up till now had only found homes in dSLRs my ears really perked up. By all accounts this was sounding like the camera I thought I'd bought when I picked up my G10. The issue with the G10 was that I always found myself packing a dSLR instead simply because as good as the images were out of the G10 they weren't good enough.

So having picked up the X100 I'm having mixed emotions, sure its cool and the photos it takes are very crisp, the f2.0 lens is sweet and the low light performance is encroaching on my 5DMKII's territory, but on the other hand the cost of it could have bought me a plane ticket to Europe. See I'm possibly going to Scotland this fall and the $1199.99 price tag could have gone a long way towards that trip.

Enter the 14 day return period, my plan is to put the camera through its paces and see if it holds up.

After picking up the camera I had to swing by my folks place to pick up a package I'd had delivered there. I wound up doing the unboxing over at their place so I quickly recruited my mom for a quick portrait shot by the window. I was immediately impressed by the image quality and shallow DOF that could be achieved from the f2.0 Fujinon Lens.

My mother poses for a quick test shot ISO100 f2 1/125s

So far so good. I'm digging the electronic viewfinder, the retro look already had me, but how does it work in the real world?

Its winter right now and honestly there wasn't much outside worth shooting, I did take the camera down to the local farmer's market where they had some ice sculptures on the display. The performance and ease of use was "ok", I'm really used to my Canon dSLRs so having an aperture ring and a horizontal shutter wheel alone were messing me up. I didn't manage to get any real note worthy shots so I'm not including any of those.

Before I knew it my first weekend with the camera was over and I hadn't really had much time or worthy subjects to shoot. During the work week I made plans to go out and shoot with a girl I've known for years and have done multiple shoots with. I chose her because besides being very photogenic I really don't have to think too much when I'm shooting her, we already have that rapport, leaving me able to focus on the camera. Another friend who'd just picked up a sweet vintage Yashica Lynx 14e (48mm 1.4 lens!!!) wanted to try it out too so he came as well.

The initial plan was to shoot downtown and just wander around finding locations as we went, however mother nature decided a cold snap was in order for this weekend and none of us relished an outdoor shoot. I decided the local University had enough locations where natural light was possible and that I'd bring a speedlite + umbrella along just in case.

The night before the shoot I realized I'd better try out my wireless triggers with the X100 just to make sure they worked. To my utter delight I found they not only worked but would sync up to 1/1000s thanks to the in-lens shutter! Apparently 1/4000s sync is possible with a cord as well. Sweet!

I'd already found that the high ISO noise performance was pretty amazing on this camera, producing useable images up to ISO3200. I'm not going to get into that here but this is a great post by someone else showing the low light performance with full res samples.

DSCF8204
Available light shot in a fairly poorly lit stairwell


DSCF8239-2
Trying some funky lighting out we took some shots by the lockers


DSCF8281-2
In the bright catwalk hi-key lighting seemed to work so I ran with it


DSCF8292-3
Strong sunlight provides natural backlighting while a white umbrella re-purposed as a reflector provides fill.

DSCF8302
A colour shot from the X100 since I just realized the rest were BW or cross processed

Once the shoot was done I reflected a little on the pros and cons. Focusing speed and accuracy still doesn't compare with a dSLR, I did find myself second guessing the focus often. I also wish there was a smart mode where the camera would automatically go into macro mode if the subject is just entering that focal length. Its a real pain when doing portraits because it seemed to me the distance I'd most often shoot at was riding the line between normal and macro modes. I did like how the fixed lens made me work a little more to get the composition I wanted.

I realized after the shoot that I'd spent the whole time at f2, I probably should have tried a bit more with a closed down aperture but I'm fairly confident that image clarity could only improve.

After editing the photos and pixel peeping I'm quite happy with the images. Its not going to replace my 5DMKII by any means and I probably won't use it on any paid gigs except maybe to take advantage of the high speed sync here and there. The fact that I won't use it much if at all for paid work is the main thing that I was having trouble with, if I can use a camera to make money its much easier to justify. That being said there isn't really much choice out there for a camera like this, really Leica is the only manufacturer that comes to mind that those are much harder to justify.

All in all I'm happy with this little slice of retro heaven. Sure it has some quirks and some of the settings/menus are awkward but the fact that I can have such great image quality in such a portable form factor makes up for it. I think this is going to be my new traveling companion. I always wind up leaving my 5DMKII at home when I travel just because I'm too paranoid about bringing it anywhere, especially humid climates. For my last number of trips I took my backup dSLR which is a Canon t2i and have been amazed at what its capable of, however lugging my camera bag and laptop around through airports left me wishing I had a more portable option.

For better or worse it looks like I'm going to keep this camera, I just wish I would have had it with me a month ago when I was in Cuba!

Sunday, January 29, 2012

Capturing Cuba

IMG_5007_Edit
Trinidad de Cuba (To see the full Cuba set click here)

Another year begins and another escape from the frigid temperatures of the Canadian prairies. I must admit however our winter here in Saskatchewan has been alarmingly warm. Much to the chagrin of those I left behind my 1 week trip did allow me to dodge the brief cold snap of -40° weather.

From Jan 12th-19th I made my hotel room at the Barcelo Solymar resort in Varadero my base of operations. Traveling with one of my best friends, who is also my roommate, we planned a nice mix of excursions and relaxation (read: partying) during our 1 week vacation.

The day after our arrival we met with our Sunwing rep and booked our tours. We opted for a 1 day Havana excursion and then a 2 day overnight trip through 4 provinces up to the mountains (aka Trinidad + Rambo tour). Prices seemed fair at around $60 and $120 respectively.

We still had the remainder of the day to explore Varadero a little so we paid 5CUC for an all day bus pass on the double-decker bus that cruises up and down the strip. I was leery of taking my 5DMKII along to Cuba so I opted to bring my 2Ti instead which had served me very well in Halifax, Mexico, and Cypress Hills. I also brought along my trusty Canon SD780IS point & shoot and my tiny Golden Half, a diminutive half frame camera put out by Superheadz in Japan.

Like most of the tourists in Varadero we wound up at the various fleamarkets that dot the main drag. While the various tables held treasures for some it was the side streets and photo opportunities that lured me in.

IMG_0360
Street scene in Varadero, Cuba

17 18
Shot from my Golden Half on the main drag in Varadero, Cuba

The next day after an unintentionally late night (hey the drinks are free) we boarded the tour bus for Havana. Just getting to see some of the countryside instead of the very touristy Varadero was nice.

IMG_4294
Scene beside a rest stop on the way to Havana

Throughout Cuba there are people who make their living just posing for tourist photos, the gentleman in the shot below just hung out at this one rest stop where people on their way to Havana would stop.

IMG_4288
A "tourist model" poses for a shot at a reststop on the way to Havana

Havana itself was an impressive sight, you could just imagine how crazy it must have been in the 30's with the mobsters flocking there and setting up casinos and nightclubs. Everywhere you turned there were amazing sights to be seen.

IMG_4426
Amazing architecture is everywhere in Havana

Having never been to Havana before, or Cuba for that matter, we wound up sticking with the tour group the whole time. This limited the shots I was able to get but I still managed to get some good captures. Street photography is a genre I haven't dabbled in too much but I was very happy with some of the shots I was able to get. The photo one below was actually shot out of our bus and was one of my favourite from Havana.

IMG_4605
A Habanero looks down the busy street from his window.

The Havana tour ended with a stop at their Capitol building which looks very similar to another landmark in another country.

[8] Canon t2i, Havana Edits, 16 images, IMG_4557 - IMG_4572 BW 20x30 FIXED Flickr
Capitol Building in Havana, Cuba

Next we had a few days at our resort, initially we were a little worried because we seemed to only be running into Russian or French speaking people. I like meeting new people but if they don't speak any English its hard to break the ice. Eventually though we found there were lots of other English speaking Canadians and after a few Cuba Libres everyone was a friend. We also met lots of cool people from around the world, Sweden, Russia, Albania, Belgium and I even met a female Italian rally driver!

IMG_0389
These group shots are always a big hit, especially with drunk people!

On yet another sleep deprived morning we boarded a bus for our 2 day excursion. Traveling south from Varadero we'd pass through the city of Cardenas, then on to the Che Guevara Museum in Santa Clara. Lunch would be in the city of Sancti Spiritus, followed by a stop in Trinidad de Cuba before heading up to our hotel in the mountains of Topes de Collantes.


IMG_4744
A statue of Che at the Che Guevara memorial in Santa Clara

IMG_4835
Our tour guide explains the ration system at a distribution center in Sancti Spiritus

My favourite city from the trip though was Trinidad de Cuba, this was less touristy than some of the other places we'd been. The town had more of a sleepy laid back vibe and the people were very friendly.

IMG_4904
A street scene in Trinidad de Cuba

IMG_4884
A pretty girl smiles for the camera from inside a building in Trinidad de Cuba

IMG_5032
Two girls hang out in front of their shop in Trinidad de Cuba beckoning people to come in look at their merchandise

After the last rays of daylight had faded we boarded our bus and made our way up the mountain to our hotel. After a nice dinner I had what proved to be my only hot shower during my entire Cuba trip. Feeling human again I went to bed knowing we'd have a full day the next day. Eight hours later I fueled up on a light breakfast and a few cups of coffee before hopping aboard an old Russian army truck which was going to carry us further up the mountain. From there a new tour guide was to take us on a 3km hike down the mountain where we'd see various flora and fauna and see a nice waterfall.

IMG_5051
Lush vegetation covers the mountains in Topes de Collantes

IMG_5101-2
My buddy serves as a human tripod to let me take a slow shutter snap of this waterfall

IMG_5119
A bit further down the trail we stop and those who wanted to were free to swim in this mountain pool.

At the end of the trail we broke for lunch, the restaurant was open air and had some very nice flowers and trees around it. The flower in the shot below reminded me of those cheap fiber-optic wand thingamajigs you used to be able to buy at the circus.

IMG_5144-2
A neat flower from outside the mountain restaurant

After lunch we boarded the Russian army trucks again and headed back to our regular tour bus. From here we'd make our way down the mountain then west to our last stop of Cienfuegos, a port city on the Caribbean side of Cuba.

IMG_5156
The Russian army trucks that transported us up and down the mountain

IMG_5264
An anorexic cow grazes on the side of the road on our way to Cienfuegos

IMG_5304
A windsurfer takes a ride off the shore of Cienfuegos

IMG_5340
School must have just let out in Cienfuegos while we were there because the streets were full of students.

Just before boarding the bus to head back to Varadero one of the many street artists I'd encountered during my stay in Cuba had managed to pen my image. I think the hat and goatee are a magnet for caricature artists :) I actually really liked this one but had just spent my last $1.50 on a container of ice cream to help soothe my now burning throat (I had a nasty cold at this point). My buddy, seeing my predicament, quickly hopped off the bus to pay the gentleman and snag what I thought was one of the best caricatures of me I'd seen during the whole trip.

IMG_5350_Edit 2

From here we left on the 4 hour bus ride back to Varadero for our last night in Cuba. Sick with a cold and thoroughly exhausted I felt as though I'd done my best to see a fair chunk of Cuba over my stay and capture the experience as best I could.