
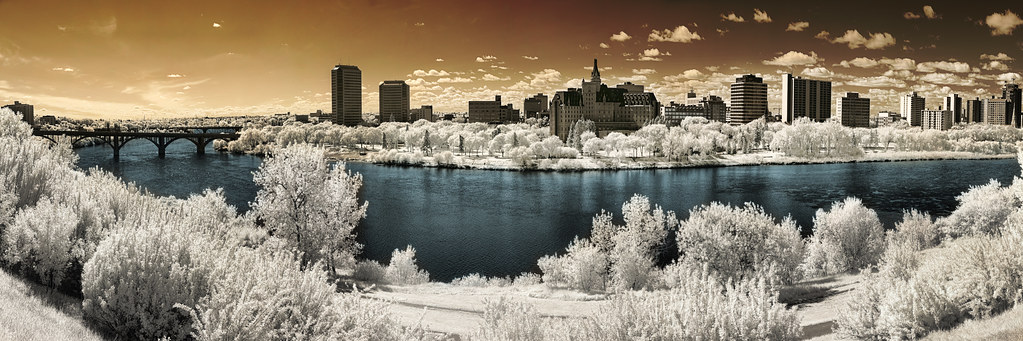
Saskatoon Skyline, though it looks frigid this was shot in 20°C weather :)
Earlier this year I'd seen a body only Canon 10D posted on Kijiji (similar to Craigslist) for $160 CDN, in its day the 10D was a great camera and marketed at pros. I didn't really have a need for the camera but at that price I was thinking I'd pick it up and leave it in my car so I always had a DSLR with me, at that price point if it got damaged or stolen I'd be disappointed but not distraught. I wound up buying it and was pleased to find it was in near mint shape. Despite being older and only 6.3MP it took very nice photos and I was surprised at the lower than expected ISO noise. My first DSLR was the first Canon Digital Rebel (300D) and since it was also 6.3MP I expected it to be the same but was delighted to find it was better.
At this point I started to think more about what I should do with this camera, I did after all already have a Fuji X100 which I'd picked up primarily as my "take anywhere" camera. Maybe my initial plan for this camera wasn't really a good one. Then I stumbled across an IR photo online somewhere and I remembered about the conversion services offered by a few companies and figured I'd look into it again. Previously it seemed way to pricey, first you had to provide a DSLR which weren't cheap and then pay for the conversion which makes it a dedicated IR camera so its not something you'd do to your main body. The more I read up online the more good things I was hearing about Lifepixel.com, in fact I don't think I read anything negative about them at all. The internet is full of horror stories about people sending their cameras into cheaper "fly by night" operations where some guy was doing these conversions in his basement or garage and was simply substituting the IR blocking filter (aka hotmirror) with Rosco or Lee filters. Since I work in electronics manufacturing and am familiar with some of the various standards I was impressed to learn that they use a Class 5 clean room to ensure they do not introduce any dust into your camera when performing the conversion.
Let me backtrack a little, for those who don't know what this conversion entails I'll explain it here, if you know what this is then feel free to skip ahead. In the old days of film all you needed to do to shoot IR was buy a roll of IR film and away you go. Nowadays all digital cameras have a glass filter installed over top of the sensor that is meant to block out infrared light while allowing visible light to pass through. Without this filter your everyday images would have a pinkish cast to them and generally not look right. The places that offer conversion will take apart your camera, remove the IR filter, also known as a "hot mirror" and replace it with a filter that only lets infrared light through. The thickness of the replacement filter must be the same as the filter they removed, even still the cameras focusing system must be re-calibrated because IR does not focus at the same distance as visible light. The fact that the insides of these modern cameras are crammed with enough electronics and mechanical parts to make Swiss watchmakers wince along with the need for an absolute dust-free environment means you should be wary of who does the conversion. There are DIY instructions available on the web but even if you get the filter installed and you manage to get very little dust in your camera your autofocus still won't work properly. If you want to see just what all is involved (minus the recalibration) Lifepixel has DIY guides though they expressly state they should not be attempted and are purely for educational purposes, here's the step-by-step for my Canon 10D.
What to expect when ordering the service:
Right now the price for converting most DSLR's at Lifepixel with a "standard" IR filter with "standard" re-calibration is $250 +$55 for return shipping and handling (keep in mind I'm in Canada) . I considered paying the extra $50 for the Deep IR filter but after talking to others who had the conversion done I stuck with the standard IR filter. Their standard lens calibration calibrates the camera for the "nifty fifty" 50mm 1.8 EF lens, since I had one kicking around after upgrading to the 50mm 1.4 last summer I stuck with this too. The shipping seems steep but this is because they insure the package decently, if I remember correctly their cost for the shipping was around $40 so they aren't skimming too much. You do have to pay to ship the camera to them as well so I think that cost me under $20 and it was insured for the conversion price and camera replacement. When you order the conversion they send you detailed shipping instructions too. When they receive the camera they notify you, the conversion is supposed to take 5-10 business days from the date they receive the camera. I mailed mine out Apr 27th and they received it May 3rd. They shipped it back May 21st and I received it May 25th, all total about 1 month.
What to expect when you get your camera back:
I did have one small gripe and that was concerning their return packaging. It was well protected and padded but all of the materials were types that generate huge static charges. Maybe its just because I work in electronics and jump through all sorts of hoops to avoid static electricity which can cause serious damage to sensitive electronics, the damage may not be immediate either. When I shipped my camera to them I put it in an antistatic bag that I had leftover from some prior electronics purchase. Anyway I don't know if Canon's packaging is entirely ESD safe either. Ok so when you get the camera back before you can start shooting you should set the custom white balance by shooting some green foilage. After that you're good to go!
A quick note about using other lenses, not all of them will work. Some lenses have special coatings inside to reduce reflections but they are made for visible light, sometimes these coatings in IR appear white and can cause blooming. Blooming is a white haze in the center of the image and is most unwanted. Since my 50mm on the cropped sensor of the 10D behaves more like 79mm I thought I'd try my 35mm 1.4 lens, unfortunately this lens suffers from this bloom effect so I'm going to have to trial and error and figure out which lenses will work. All of the images in this post were shot with the 50mm 1.8 type II lens and turned out great. The pano was shot with this lens too and multiple images digitally stitched together.
Considerations for post production:
Straight out of the camera the shot is going to look like the one below, colourwise at least.

Colour untouched, other processing like levels and sharpening/clarity added.
In your favourite photo editing program you can swap the red and blue channels to yield a shot like the one below:
Red and blue channels swapped.
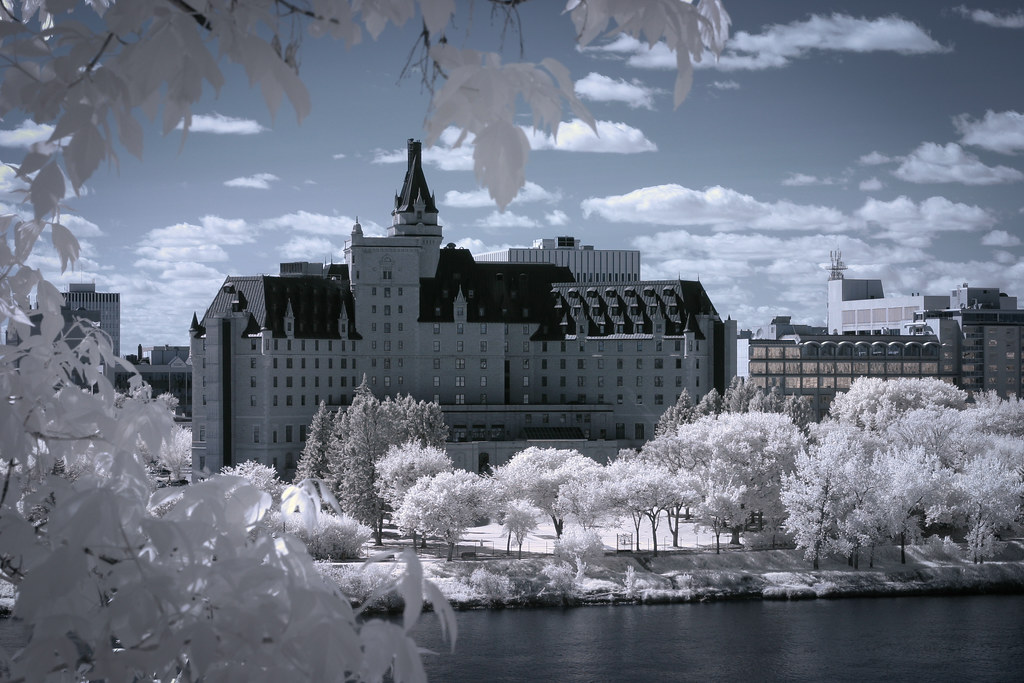
I'm looking forward to heading out and shooting some interesting landscapes this summer with this camera. In the fall hopefully I'll get to go to Scotland where the lush greens will be perfect for IR photography. One added benefit to IR is that there aren't many people shooting it and it can give you an edge especially if you're looking at selling your artwork. The Delta Bessborough Hotel is one of the most photographed landmarks in my city, since everyone and their dog has a photo of it the chances of getting a truly unique shot of it that stands out against the rest is hard, thanks to IR I'm probably one of only a few people in my province that can get this shot digitally.
1 comment:
Love this ^^^^
Post a Comment