Tuesday, April 27, 2010

Ok I bought a dSLR now what?

OK

I bought a digital SLR camera. . .

now what?

A few people have approached me lately with essentially the same question, some were asking about what kind of lenses they should buy others about what kind of software they should use. Thinking that these were probably fairly common questions I decided to write up a little guide outlining a few things you should consider. They are arranged roughly in the order you should consider them too ;)


What attachments/accessories/lenses should I buy?

This all depends on what you plan to do and your budget but here are a few suggestions:

UV Filter

Chances are good that if you bought your camera at any respectable shop they would have tried to sell you one of these right away. No it's not a con by the sales associates (mostly) the idea is that it if something is going to get scratched it'll be a $30 filter instead of a costly lens. If you're just starting out in photography you probably won't need a top of the line brand filter so don't let the sales person get carried away trying to upsell you there.

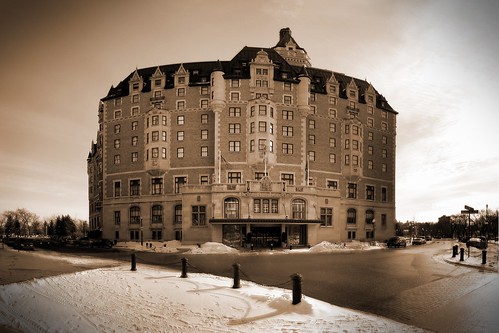
*Tip: One interesting quirk to watch out for is what you see in the image above. It happens if you're using filters when taking long exposures at night of northern lights. I won't get into the physics of it but it has to do with a certain wavelength of light and the two parallel faces of your lens and the filter.

Lenspen

I think that all photographers should have one of these in their bag. At around $10 you'd be crazy not to have one anyway. One one end is a retractable brush that is good for knocking loose dust and debris and on the other side protected by a cap is a slightly concave felt pad for getting more stubborn materials off your glass. Over time (and depending on usage) they should probably be replaced so you have a new felt tip, that being said I've had mine for years and see no need to change it yet.

  • Tip: They also make lenspens for point and shoot cameras, they have a smaller triangular felt pad for cleaning the smaller lenses.

Carrying bag/Camera Backpack

You just dropped a lot of money on your new camera so you should spend a little cash in order to protect it. There is a plethora of options in this department, unfortunately once you're getting into dSLR size bags the price goes up because there is less demand for them.

Above are some choices from LowePro, a company that's been around for decades and is well respected among photographers. There are a variety of choices ranging from simple hip pouches to sling bags and full backpacks which even accommodate laptops.


*Tip: One word of advice is buy a slightly bigger one than you need so that if you pick up a few lenses later on you can still carry them.


Tripod/Monopod

Investing in a decent tripod would probably be next on the list for most people.

Why do I need a tripod? There are a number of reasons but mostly it allows you the luxury of shooting at slower shutter speeds without producing blurry pictures. If you read my guide on understanding lighting you'll already know that you always want to keep your ISO as low as possible (sensitivity to light) in order to get the sharpest photos, however if your available light is already quite low the only options are to increase your aperture and/or lower your shutter speed.


If you're wanting to do any of the following photography you'll need a tripod:
Landscapes, wildlife, macro, sports, lowlight/night photography (lightning, northern lights) and anytime you're using a telephoto zoom lens

The rule of thumb is that 1/60th of a second is the slowest shutter speed you can safely shoot handheld (though this is changing as image stabilization technology improves) but with a tripod you can have exposures lasting as long as minutes or even hours. As I mentioned above any time you're using a zoom lens you should be using a tripod, the reason is when you're zoomed in that far any small movement gets multiplied by your magnification X.

Good brands for tripods are Manfrotto, Slik, Gitzo, Velbon to name a few. Avoid tripod's designed for video cameras, they tend to be sloppier. When you're looking for a tripod you want one that is sturdy and won't allow your camera to move when all the adjustments are tightened up.

Tip: A monopod may be what you're after as well, they are good for sports photography because they don't take up much space . Keep in mind though that you can always use your tripod as a monopod simply by not splaying the legs out. I'd recommend starting with a good tripod and if you think you need a monopod later then go for it.

Extra lenses:

In short the best two lenses you can add to your kit are a zoom that compliments your kit lens and a nice fixed prime lens.

Zoom lenses:

Most dSLR's come with a general purpose standard lens, typically around 18-55mm. For most situations this is the best lens to use however sometimes you need a little extra zoom and that is where the telephoto lenses come into play. A good companion to say an 18-55mm kit lens would be something like a 70-200mm or a 70-300mm, this way you're not missing much range between the upper end of your 18-55mm and the lower end of your telephoto. If you find a good deal on a lens that will leave you with a gap don't rule it out though, it just means you'll have to keep this in mind when shooting and you may have to move back a little to get the same composition in your shot.

Depending on your camera manufacturer you might be able to find older lens used for a fraction of the cost of a new lens. For example Canon's EF lenses will work on their dSLRs but due to the fact most dSLR's have a smaller sensor the magnification factor will be larger and I'll explain this below in a bit. When in doubt call your local camera shop (Don's or Phase II for example) before purchasing a used lens to make sure it will work with your camera and if possible try it out on your camera first to make sure it fits and the auto-focus is compatible.

A note on cropped sensors:

If you have a dSLR camera and paid less than $3000 for it chances are good that your camera's sensor is what's referred to as a “cropped sensor” or “crop sensor”. This goes back to the days of 35mm film cameras, the film was the part that “sensed” the light and was 35mm diagonally across. The sensors in consumer grade dSLR's are smaller than that of the 35mm frame hence the term “cropped sensor”. What this means is that if you find an older used lens that was made for a film camera the zoom rating will not be accurate anymore. For example if you put a Canon 100-300mm EF lens on a Canon Digital Rebel dSLR which uses a 1.6x crop sensor your effective zoom will actually be 160mm-480mm.

1.3x – Canon EOS 1D/1D MkII
1.5x – Nikon D40/D50/D70/D70s/D80/D200/D2XD2Hs Minolta 7D/Fuji S3 Pro Pentax *istDS/K100D/K110D/K10D
1.6x – Canon EOS 300D/400D/20D/30D

Here's a nice little reference table of standard zoom sizes and their effective zoom's on a crop sensor.

Full Frame 1.3 Crop 1.5 Crop 1.6 Crop

Don't let any of this dissuade you from saving some cash by picking up an older telephoto though as there is another advantage besides the extra zoom. All lenses suffer from some inaccuracies due to how the lenses are ground and what materials they are made from etc, this results in the center of the lens being sharper than the outer edges of it. When you put one of these older lenses on a crop sensor camera you dramatically improve the quality of the image because the sensor only uses the central portion of the lens thus discarding most of the area that is degraded.


As mentioned previously if you plan on shooting with a zoom lens you should really consider using a tripod, at higher zoom ranges any vibration or shakiness is multiplied dramatically and will result in blurry images.

One last thing to note is that when buying any lenses you typically pay a lot more if you want a larger aperture (aka a faster lens). Where a 70-300mm F5.6 lens may cost $250 the same lens capable of f2.0 may run in the thousands.

Prime Lenses

Before the days of variable zoom lenses they were all fixed zoom aka prime lenses. Why would anyone even consider a lens so limiting? Below are 3 very good reasons:

1. Image quality
Variable zoom lenses are made up of many more elements than a fixed prime lens, this means any errors in how each of these elements are ground will add up and therefore decrease the total optical quality of the lens. Due to this fixed lenses tend to be sharper across the entire image, not just the center. Other optical issues like barrel distortion, pincushion distortion, and chromatic aberration are reduced in prime lenses.

2. Speed
This term may be new to you but when someone refers to a lens as being “fast” they mean it takes in a lot of light allowing you to use a faster shutter speed. Due to how they are made they often are available with very wide apertures (1.2, 1.4, 1.8 etc) compared to the variable lenses. Why is this important? Photographers always run into the same problem: not having enough light. Say you're shooting indoors and want to avoid the use of a flash (at a wedding for example) and your camera tells you in order to get a proper exposure you need to shoot at 1/4h of a second at ISO 100 at f5.6. 1/4th of a second is going to result in a blurry shot even if you're using a tripod because the people will probably be moving a little. If you have an F1.4 prime lens available that would give you 4 more stops of light to play with letting you shoot at 1/60th of a second instead which is shoot-able handheld. In short it gives you options.

3. Shallow depth of field thanks to wider apertures

By using a very wide aperture (F1.4 or 1.8 etc) a very dreamy effect can be accomplished as backgrounds softly blur away allowing the viewer's eyes to be drawn to what matters.

So which focal length should you buy?

If you're going to pick up a prime lens I suggest going for a 50mm. The reason is that this is a very popular focal length for portraiture and therefore manufacturers make higher volumes resulting in lower prices. For both Canon and Nikon a 50mm prime can be found for under $150 and most likely other manufactures have similar prices to stay competitive.

Keep in mind though you may have to apply that multiplication factor to the focal length that we covered earlier in this article so your 50mm may end up working more like an 80mm if you're shooting a Canon. Don't get hung up on that though as generally “portrait” lenses are regarded as anything between 50-100mm.

Software Options

Here are a few options when it comes to image editing/library management. I highly recommend trying all of the free ones first as well as any trial downloads you can find before spending any cash at all.

Photoshop (CS4 is $1000, Elements Ver 8 is $129.99)

Now for image editing software Adobe Photoshop is the gold standard in the industry (CS4 is the current version), it’s the program that everyone uses. It is also ridiculously expensive which leads to a lot of pirating, there are tons of torrents available if that is the path you choose (I'm not condoning it). Another, more affordable option, is Adobe Photoshop Elements which is a "lite" version that sells for $129.99 as I write this at London Drugs. Check Adobe's website for downloadable trial versions before dropping any cash.

  • Pros: It is the industry standard bar none.

  • Cons: Pricey, A bit of a steep learning curve, I've used it for 8 years and am still learning new things every day.

GIMP (GNU Image Manipulation Program) FREE!

GIMP has been around for years now and has come a long way, it is by far one of the most full featured photography programs second only to Photoshop and maybe a few others. The best part is that since it started out in Linux the software is FREE. I recommend downloading simply because it is free and trying it out, chances are it will do everything you need it to do. Realistically the stuff that Photoshop has that GIMP lacks is more for advanced users anyway. There are parts of GIMP that aren't very user friendly or just outright backwards if you're used to Photoshop but the price kinda makes up for that ;)

  • Pros: Its FREE, full featured, and has an abundance of free tutorials and books online

  • Cons: Steep learning curve, not user friendly in some instances, awkward if you're used to Photoshop

Picasa a FREE program made by Google

I'm a huge fan of FREE and often recommend this program. It's no Photoshop when it comes to features but it is very user friendly and covers all the basics like cropping, resizing, exposure correction, and some nifty filters for spiffing up your photos. Picasa also acts as a photo manager for organizing your pics and has other handy features like "email" that will re-size your photo and automatically place them in a new email for you to send (supports outlook, gmail, and a few others). Personally I don't like the photomanager portion of it but that's just me.

  • Pros: It's FREE, covers most if not all of the “basics”, allows for fun projects like collages and slideshows

  • Cons: Due to its easy to use nature more serious photographers may not like the lack of complete control.

Adobe Lightroom ($369.95)

It takes its name from the film days where photographer's would view their negatives on a light table etc. Essentially it is a workflow tool for organizing your photos and is also a feature rich "digital darkroom". It gives you a plethora of controls for developing your photos and most "pros" use this to import & tweak their images before editing them in Photoshop. This isn't really a tool for beginners but if you're shooting in RAW already you might want to look into it.

  • Pros: Its fast becoming the industry standard for workflow and photo management, offers finer development control and Photoshop, great for processing RAW files

  • Cons: Price, Semi-steep learning curve, really meant for serious photographers


Friday, April 9, 2010

Everyone photographer should have a pocket camera...

Altoids, the curiously strong (and cheap) camera case!!!

It doesn't matter if you have a billion-pixel-best camera in the world-uber-DSLR hopped up on steroids it won't amount to jack squat if you don't have it with you when you need to take a shot. A few times now I've had my shots or videos used in the news simply because I was the only one present with a camera, the shots were not always the best quality but they were often the only ones available. In one instance there was a large accident near where I work, photos I took were used by the local newspaper in an online story and the video was used by a few local stations. One day at work we had some stray moose wander into our parking lot and once again I had some of my footage make it onto the news. Last winter during a -40º C cold snap a spur of the moment experiment let to a video that ended up being used province wide of water freezing before it hit the ground. They played it throughout the winter whenever there was a cold snap ;)

Point and shoot cameras are sometimes looked down upon by us "serious" photographers but there is still a place for them for multiple reasons, the main one being size and portability. Another key advantage is that they don't attract a lot of attention, something very handy for street photography or events where "professional cameras" aren't allowed. A few years back when I visited China I accidentally left my point and shoot back here in Canada. I was so envious of my fellow travellers as they popped candid street photos while I had everyone shying away from the business end of my monstrous 40D. When I first purchased my G10 I read an article of a man who had to cover a university's championship baseball team's trip to the white house, his G10 slipped under the radar because it wasn't an SLR. [On a side note that last link is an interesting read since he accidently snapped his SD card in half whilst trying to dump the shots]

My current camera "family" is like the 3 little bears story, my SD780IS is the baby, my G10 is the middle one, and my 5DMKII is the big one. In this story however the "middle" one isn't necessarily the right one. Each have their place and for this post I'm going to focus on the SD780IS and the G10.

I'll admit I'm a bit biased towards Canon personally but even if you're a die hard fan of brand X it doesn't really matter when it comes to point and shoot cameras. Its not like the SLR world where you have hundreds or thousands of dollars invested in glass that's keeping you loyal to a specific manufacturer. Some of the Nikon cameras coming out are becoming tempting, likewise Pentax has some cool water and weatherproof point and shoots and Panasonic's Lumix series is quite good as well.

Getting the most out of your tiny camera.
CHKD is one of the biggest reasons I'm still going back to Canon for my tiny camera "fix". If you haven't heard of it I recommend clicking the link. Basically its what is referred to as a "firmware extension" that unlocks tons of control in your point and shoot giving you SLR-like features. Shutter speed, aperture, ISO, custom bracketing and even RAW! Using the shutter overrides some people have claimed insanely fast shutter speeds above 1/20000th of a second. But the fun doesn't stop there, you can even run scripts on your camera like a motion detection script that some have used to capture lightning, or an intervalometer script to take cool time-lapse shots. These clever MIT students used a cheap Canon A470 running CHDK to take pictures in SPACE!

Perhaps you're a photographer who is just starting out, say you want to get into using some off camera flash ala strobist well if you're running CHDK you can set your on-camera flash to manual to avoid that nasty pre-flash that is preventing you from using those cheap optical slaves. This summer I'm planning on doing a fashion shoot using only my SD780IS just to prove it can be done. If/when that happens I'll post the results here.

Know your limits, then bend or break them
The image quality of a point and shoot may not rival a full frame SLR but if you wield it correctly and know your limitations amazing things can still be done with these cameras.

Generally the really tiny cameras (like the Canon Elph series) all suffer from the same thing, a small sensor and small optics. The very thing that makes them so nice and portable is their biggest downfall. Small sensors don't work well with low light situations or tolerate high ISO's very well. The small lenses they come with often suffer from barrel distortion and pincushion distortion when they are either zoomed all the way in or all the way out. While the lowlight issues can't always be avoided the optical distortion caused by small lenses can be easily corrected using software like Adobe Photoshop or Lightroom.

One of the frequently overlooked issues with point and shoot cameras that is getting worse with every generation is the mega-pixel race, every year they're cramming more and more photosites into the same size sensor. In more than a few instances its been proven that older version of the same cameras that are lower MP actually produce better images.

For the most part the image quality of most point and shoots aren't going to win any awards but what I told you this doesn't have to be the case? Well one way is to take a bunch of pictures then stitch them into one huge picture. Essentially you fake a large sensor. Confused? Let me explain. Say your point and shoot at full resolution and highest quality takes a really sharp 5x7 but once you start to blow it up to 8x10 or 11x14 it starts to look poor. Now take that same subject but zoom way in (optical zoom only) and take 20 pictures to cover the same area. Now since each of your photos have enough resolution to make great 5x7's when you stitch them together with some software like this you'll have a very large shot that looks sharp. The shot below is an example of trying this technique out, it was taken using a piddly 3.2MP Canon SD200. It was made up of about 50 individual photos and I later printed it sharply at 16x20!


Delta Besborough

What about the middle road?
Ok some of you may say those little cameras are too tiny, I want something a little beefier. No problem, the Canon G series, the Nikon P600, or the Panasonic Lumix LX3 among others might be right up your alley. All 3 bring SLR-like control to the table, are still pocketable (mostly) and have. Once again I'm biased towards the G10 but this time it is attachment based in that I can use my 580EXII on it. That being said the other two have some nice perks of their own, the P600 for example has built in GPS for automatic geotagging and the Panasonic will do HD video. All 3 still suffer a little from the smaller sensors with respect to ISO noise (try to keep it below 200) but the G10 at least in good light could give some dSLR's a run for their money.

I'm not sure about the Nikon or the Panasonic but the G10 has one huge ace up its sleeve, amazingly high speed sync. Using a wired connection the G10 can sync a flash up to 1/4000th of a second thanks to its electronic shutter. This feat can let you do some pretty amazing things like overpowering the midday sun. There are two ways to do this, either use a very high power strobes full blast like an AB1600 or White Lightning 1800 and crank your aperture up to f16 or higher, or use a few speedlights at low power at a very fast shutter speed.

In conclusion
Don't dismiss these diminutive cameras, keep one in your shirt pocket and keep these tips in mind:
  • When possible avoid low light situations
  • Try to keep the ISO below 200
  • Use the low key nature to your advantage (street photography, concerts etc)
  • Get large sharp images by taking a bunch of smaller ones and stitch them together
  • Use the features unique to smaller cameras like the electronic shutter to you advantage
  • Take advantage of the video feature, most point and shoots are near camcorder quality and newer models are

Wednesday, April 7, 2010

Softbox Umbrellas from Steve Kaeser


Two 40" softbox umbrellas from www.skaeser.com

I picked these up a little while ago and have been meaning to write a review for a while but haven't had a chance.

I'll start by saying that I love softboxes, especially ones that I can use my speedlights in. Last summer (or was it the summer before?) I took the plunge and picked up the 28" Westcott Apollo softbox for speedlights after watching the Onelight Workshop DVD. Since then I've almost totally abandoned my umbrellas ;)

Obviously I was quite stoked to come across these softbox umbrellas while surfing the web, at the time of purchase you could get 2 for a measly $29.95 on sale. Unfortunately their site only listed UPS for shipping and living in Canada I've been gouged all too often by UPS's exorbitant brokerage fees. I decided to email the company and see if they'd ship USPS instead, to my delight they said they would and they sent me an invoice. They wanted$25 for USPS shipping ($5 less than UPS) and while I thought that was a little steep for a $30 item I realized the box was probably oversized so there wasn't much I could do. Fast forward a few weeks and UPS knocks on my door, no that was not a typo they still shipped UPS! I ended up getting charged another $20 for brokerage even though I went out of my way to get a USPS quote! So now I've paid $45 for shipping on a $30 item. Not pleased with this I emailed the company and have yet to get a response (about a month ago at time of writing). Thats the end of my rant, I'll get on with my review and sample images now. I just couldn't in good conscience write a review of this product without explaining some of the extenuating circumstances.

On with the review!
IMG_1073 blue w red vignette Levels n Lines
Shot with a 580EXII in Steve Kaeser Softbox Umbrella

The umbrellas came with nice carrying bags for the umbrellas, an extra that I wasn't really expecting for such a low priced item. My next surprise was the build quality which was in fact quite good! I've bought some cheap umbrellas in the past and regretted it when they nearly fell apart in my hands, these however I see sticking around for quite some time.

I couldn't wait to test them out so I arranged a quick test shoot with a girl I had actually just done a shoot with the week prior. Like the previous shoot we just did it in her apartment using a nice large section of blank white wall as a backdrop. Since the area we were shooting in was relatively small I opted to just use a single softbox umbrella.

Initial impressions:
Right off the bat I noticed that there was a lot more spill with these than with my Westcott Apollo, I'm not sure if it was due to the larger surface area or the fact that the Steve Kaeser boxes don't have a recessed panel like the Apollo. If you put a gun to my head I'd say it was probably the lack of recessed panel. This does limit you a little if you're working in a small environment but its definitely not a dealbreaker.

IMG_0967 subdued

One thing I had read on some forums was that light distribution was not equal across the whole umbrella. I really didn't find this to be that much of an issue, if there was a hotspot at the center I didn't notice it very much at all. I found the quality of light to be on par with my Westcott. As you can see from the shots my 580EXII didn't seem to have any problems filling the softbox.

I've yet to try them out with my studio strobes but would imagine they would work pretty well. I would imagine the region blocked by the head might be a little darker but I'd have to see whether it is negligible or not. The nice thing is that you don't have to go out and buy a specific speedring to use them with your equipment.


The breakdown:

Pros:
  • Cheap (provided you don't have the shipping hassles I did)
  • Well built
  • Fairly even light (some sticklers might disaggree)
  • Versatile in that either speedlights or monoblocks can be used
Cons:
  • Diffusion panel is not recessed and results in spill
  • Diffusion panel is not removable for cleaning etc

Conclusion:
For the price you'd be crazy not to have at least one f these in your bag. They're as small and portable as a regular umbrella yet give you the effects of a softbox. I still like my Westcott better but when you think you could get 8 of these for the same price I'd say start with a set of these instead.

Improvements:
If there were ever a rev 2.0 made I'd suggest making this unit convertible so it could be used as a shoot through as well, if they also made the diffusion panel removable it could then also be used as a reflective umbrella making it one of the most versatile pieces of gear ever!

A few parting shots ;)

IMG_1273 red

IMG_1298 blue

Sunday, March 21, 2010

Abandoning PC Sync for 1/8" stereo jacks


After reading David Hobby's recent post regarding his dislike for the antiquated PC Sync socket I sat laughing and saying to myself I couldn't agree more. This poorly designed connector has been around since the 1930's, it doesn't lock in place, and they wear out quickly. If you're unfortunate enough to break one or wear it out to the point it is unusable its next to impossible to find a replacement socket. I've worked in the electronics field for nearly a decade now and pride myself on being able to source obscure parts yet I still can't find a decent source for these.

Anywho as Mr.Strobist himself said its time for the PC Jack To DIE!

I recently picked up some new (to me anyway) White Lightning studio strobes which came with some rather well used cords, one of which was completely ready for retirement. I decided to just make some new cords but thought I'd improve the design. The existing cord was a 1/4" mono jack to a PC sync jack, I opted to make a new set but replace the PC sync end with a readily available 1/8" stereo jack instead.

In for a penny, in for a pound I decided to convert most of the rest of my equipment to 1/8" as well. When you're out shooting a gig the last thing you want is unreliable equipment and to me anything that is connected via PC sync cables is unreliable.

First up is my PT04-TM "poverty wizard" wireless triggers. These were nice and easy to mod because there is quite a lot of room inside. I didn't have any 1/8" sockets lying around but I did happen to have some stereo "Y" adapters that I could part with so I hacked them up.

If you're going to attempt something similar I'd advise you make note of the polarity, some devices work fine either way but I know my triggers are polarity sensitive. Inside the PT04-TM receiver the wire going to the center pin of the hotshoe is positive the the one going to the collar is negative. On the 1/8" jacks the tip is positive and the sleeve is negative. In my case I used stereo jacks because that is all I had lying around so I just tied the ring and sleeve together to make it mono. The photo at the top of the article shows the almost finished product, later I added epoxy where the wire entered the case of the receiver. This ensured the wire couldn't accidentally get yanked out and tear a bunch of the wiring.

Closeup of 1/8" socket mod of the PT04-TM receiver

Here is a zoomed in photo of the internal wiring, these particular PT04-TM receivers already had a PC Sync mod done to them when I got them. The heat shrink on the cables wasn't crucial but its better to play it safe when possible.

Next up was my hotshoe-to-pc sync adapter (shown in top picture), for this one I rummaged around until I found an old Sony Walkman I had lying around and gutted it for the 1/8" headphone socket. Normally I would have just went to one of the local electronic supply companies but it was the weekend and I couldn't bring myself to pay 5 times as much at Radioshack. Luckily the adapter was one of the larger ones so there was ample room inside to fit the socket, unfortunately I didn't take a photo of the internals. The process is the same anyway, center pin is positive and collar is negative.

Two Seagul SYK-3's modded with bypass switches and 1/8" sockets

The final gear to mod were two optical slaves I had purchased here for dirt cheap, when I picked them up I had this mod in mind since they're the cheapest hotshoe housing I could find ($5.55) with the added bonus of being optical slaves. The only issue is that I needed to add a switch to turn off or on the optical slave part. I could have just placed a piece of electrical tape over the sensor eye to disable it however I needed to electrically disconnect the slave circuit if I wanted to use this on my 580EXII. For some reason the 580EXII doesn't like cheap optical slaves and will only fire once, the flash then has to be turned off and on again before it will fire again.

I've finally cast off the shackles of the PC sync socket, all that lay before me is reliability and reasonably priced cables ;)

On a side note I picked up some sweet cases from Don's Photo in Saskatoon, these were in the bargain bin for around $10. They come with customizable foam and are rock solid little cases. I was tired of my triggers getting banged around in my bag so I thought I'd protect them a little.


My PT04-TM's and a few odds & ends housed in a Vanguard Swing 8 hard case.

Hopefully if we shout loud enough about how much the PC sync connector sucks the manufacturers will finally start to include 1/8" sockets in their products. Heck even a mini 2.5mm socket like most cell phones have would be fine, as long as its a connector that is abundantly available. Now if only everything would start using mini-usb connections for charging ports...

Monday, January 25, 2010

Guide to getting into off-camera lighting

**Originally written for the camera club at my work**

So you took the plunge and bought a digital SLR, you've been having fun shooting in available light but you want to start playing around with studio lighting, this is your poor man's guide to getting started. If you're not poor you may want to look into starter studio lighting kits (starting around $600-$700) however this guide only covers speedlights which are cheaper and more portable & versatile than a full studio setup.

Requirements:
Camera with a hotshoe or PC Sync socket
Internet Connection (optional but you'll want to be doing lots of reading)
Budget:$100-400 depending on how far you want to go

1) Flash - $50 and up depending. You'll need a flash to start off with, we'll be using them like studio strobes so we don't need the fancy "auto ttl" style that cost big $$ (I made the mistake of buying the fancy ones and I never use any of those features). Look on ebay or kijiji for older flashes, it doesn't matter which brand because we'll be triggering them wirelessly. I snagged two Nikon SB-26's off kijiji for $100 each which was a good price, I wish I would have just bought these instead of my fancy ones and saved hundreds of dollars. Make sure that have the following features:

  • Manual power settings - most are adjustable from 1/1 (full power) down to 1/64th or 1/128th in 1/2 or 1/3 F-stop increments

  • Adjustable head that tilts and pan

  • PC Sync Socket – Not completely necessary but a very handy feature to have

  • A standard hotshoe - Some older Vivitar flashes as well as others have an oddball hotshoe that require an adapter to fit in a normal hotshoe, its best to simply avoid these ones.

  • TTL trigger voltage -ie 5 or 6V, anything below 12V or so should be safe. Some older flashes can be up to 600V and can fry equipment so never use older flashes directly on your camera. You can check this with a volt meter by charging the flash to fire (set it to the lowest power incase you get zapped) then use the DC setting on the meter to check between the side pin and the center pin. Its kinda hard to describe in text, hopefully this picture makes it clearer. If you're buying on ebay make sure to ask about the trigger voltage if it is not listed, don't risk buying it if you can't be sure. If you're buying it off of kijiji then bring some batteries and a meter along to test it out yourself

Some suggestions on decent older flashes to look for would be Nikon SB-26's or 28's (Nikon flashes are great because they have built in optical slave triggers*), Canon 540EZ, Vivitar 285 (be careful as older model 285's have high trigger voltages). If you want to buy new flashes but don't want to break the bank checkout www.bhphotovideo.com and look at 3rd party brands like Bower or Nissin, $150 will get you a Nissin that is comparable to a $600 Canon EXII and still has all the ETTL-II auto features. *More about Optical Slaves in the next section Triggering Options

2) Triggering Options – Prices vary

Alright so now you have a flash but still no way to trigger it remotely, there are a few options that can be done cheaply:


  • Wireless triggers – Starting at $20-30

    This is the method I'd recommend hands down. The “gold standard” in photography for triggers are Pocket Wizards but they cost around $300 for each transceiver and you need at least 2 to start. Lucky for us our friends in China have made affordable versions for $20-$30 a pair (includes transmitter and receiver). The triggers I recommend are the PT-04 model, some manufacturer makes these and various companies put their logo on them (YongNuo, Jiansi etc). At the time of writing this article you can pick up three (as show in the image below) for $34.99USD with free shipping on ebay. People sometimes jokingly refer to these triggers as “Poverty Wizards”, some say that they're not as reliable as their pricey alternative but I've never had any issues. I have 4 sets and I use them on professional jobs without any worries, I normally only use 2 at a time and the other 2 are backups. With a bit of modification you can even extend the range by adding an antenna to the transmitter although even un-modded you'll get 50-100ft.

Pros:

Cheap, no wires, flashes aren't likely to get accidentally triggered by other photographers, does not need line-of-sight.

Cons:

The cheap “poverty wizards” may have quality issues (though I haven't experience it), batteries will eventually need replacing (but last over a year at least)– AAA's in the receiver are easy to find but the transmitter takes 23A 12V which are harder to find – Here's a link to a 5-pack for $3.48USD http://www.dealextreme.com/details.dx/sku.475

  • Optical Slaves
    I mentioned optical slaves earlier, some flashes come with built in optical slaves but you can also buy little adapters. This is a very cheap method of firing flashes off-camera however they have some big problems with digital cameras!! These triggers were great back in the days before digital however the new flash systems do not work well with them. The reason the flashes on new cameras fire a pre-flash before the main burst of light, this pre-flash lets the camera's sensor determine the proper power required for a good exposure. If you're trying to trigger the slave with your camera's built in flash the pre-flash will trip the slave and by the time the main burst comes the slaved flash will have already fired.

    There are ways around this however. Buy a specially designed optical slave which accounts for this (Wein Digital Peanut) for around $100, OR the cheaper route is to trigger it with another flash that is in manual mode and therefore will not emit this pre-flash. Often I'll use only one wireless trigger on my Canon 580EXII and use it to trigger my Nikon SB26's which I've set to slave mode.


Pros:

Wireless, No batteries (for the basic ones, not sure about the advanced ones), very simple


Cons:

Doesn't play nice with digital flashes using ETTL (pre-flash), needs line-of-sight, will be triggered by any other flashes present (ie other photographers in the area)


  • PC Sync cables (oldschool)

    $5 or less for very short cheap ones to $50+ for longer brand name ones

    Last on the list is the wired solution. Its not a bad idea to have a few of these cables around as a last resort but I wouldn't suggest using them as your primary means of firing your flash. The cables aren't that cheap (even though they should be) and the connector they use is very poorly designed, I don't know why its even still around when a simple headphone jack would work better and is abundant. These cables have a lifespan and become intermittent over time, the connector doesn't lock in place so they often slip out. All in all the worst of the options.

* I'd still recommend buying a few short PC sync cables especially if you get the PT-04 wireless triggers that have the socket, as crappy as they are they can still save your a$$ is a pinch ;)

Pros:

Simple and straightforward


Cons:

Not really that cheap especially for longer cables, connections deteriorate over time and become intermittent, connection is not secure and can fall out while shooting.


3) Light Stands & Adapters

Now that you have a flash or flashes and can trigger them remotely you'll need to put them on something. Investing in at least one proper light stand is recommended but cheap tripods can fill in as well depending on your needs. If you're wanting to special softboxes etc a light stand is the way to go but if you just want to mount the flash or even add an umbrella or two a tripod will suffice. Places like XS cargo or the various liquidation centers often have tripods for around $20. With that said you can find cheap ones at www.bhphotovideo.com starting at $20 USD + S&H as well. Cheap swivels can be found for ~$10 each online, “normal” ones are about $30 each. Post adapters like the 1/4” receiver can actually be pretty pricey so just try to buy a swivel that comes with one ;)

Shown here is an umbrella mounted on a tripod using an umbrella swivel. Note that if you are using a PT-04 wireless trigger it will add more height to the flash and it won't hit the center of the umbrella, this is where a small PC Sync cable between the receiver and flash comes in very handy.

4)Basic Light Modifiers (Umbrellas, Softboxes, Grids, Snoots, “Stoffen”etc)

If you're getting into off camera flash chances are the look you're going for isn't going to be produced with just a bare flash. Flashes emit light from a small source which means harsh shadows. The sun is a small point of light high up in the sky and you see how harsh mid-day shadows can be however on overcast days the whole sky becomes the light source because the clouds are “diffusing” the light. The most common light modifiers are trying to do the same thing, turn a small light source into a larger one.


Umbrellas – Starting around $10 and going way up from there depending on brand/size/type

These are one of the most common and most basic light modifiers, they are simple and they work well.

They come in a few different flavours: Reflective, Shoot-thru, and Reversible

  • Reflective umbrellas are normally white on the inside and black on the other side, you shoot the flash into them and use the reflected light.

  • Shoot-thru is just how it sounds, you shoot the light through the umbrella.

  • Reversible umbrellas are basically a hybrid, they have a covering that can be removed so they can work as reflective or shoot-thru


Softboxes – Starting around $100 and going way up from there depending on brand/size/type

These are similar to umbrellas but give a slightly more even light, in addition they are more directional so you have finer control to avoid spill. If you're shooting with speedlights (ie flashes that are designed to mount onto your camera's hot shoe) your best bet for a softbox would be the 28” Apollo from B&H for $114USD. If you plan on getting one there are two items that B&H sells, for reasons unknown to me one item is cheaper AND it comes with an umbrella swivel for mounting your flash. Look for B&H item #WEASLK


Grids, Snoots, and Gridded Snoots ;)

These modifiers are used for restricting light, they're used various circumstances like back/edge lighting where you want to light up just the back of a person's hair without having the flash produce glare in your lens from spill. Other uses are for lighting backdrops behind a subject to create a spherical gradient. Basically any time you want to light a specific area without having light spill into other regions you'll be reaching for one of these. If you're the crafty type these can be easily made from commonly available items (hint use this as an excuse to go to your local pub to find black straws).


Stoffen aka Omnibounce

Stoffen is actually a company but just like “Kleenex” its become synonymous with this light modifier. For a simple piece of plastic the actual Stoffen Omnibounce is ridiculously over priced, you can find knockoffs that will do just as well or you can find ways to make your own by searching online. If you do buy a knockoff make sure you get the proper one for your flash as they are shaped differently depending on the brand and model.

These are used to simulate a “bare bulb” flash, they produce close to a 360°x360° light source. It is best used in smaller rooms where it bounces around off walls and ceilings to illuminate the whole room. Often you'll see paparazzi and journalists using them in completely the wrong way ;) They'll use them outside where there is nothing to bounce the light off of, in this instance they are just wasting 2-3 stops of light and overworking their flashes.

5)Resources for learning to light better

Having all of this gear means nothing if you don't know what to do with it, in this section I'll outline some great on-line resources for learning how to light.


  • www.strobist.com

    A blog created by former newspaper photographer David Hobby, a few years ago he quit his day job to try his hand at blogging and now has one of the most visited websites for photographers on the internet. To say this site is a goldmine of knowledge is an understatement, David has been kind enough to create FREE course material. TheI suggest starting with his Lighting 101 series and going from there. The lighting 101 material starts off essentially where this guide does, with the equipment you'll need. From there it goes on to cover lighting basics onward to more advanced techniques. Thousands of people have got their start in lighting by visiting this blog.

Strobist DVD Semimar: If you can afford it (or if you can find someone willing to lend you a copy) this 8 DVD set covers all of the Lighting 101 information. If you find the online written material hard to follow then this DVD will help a lot by showing you visually.


Strobist on Flickr (http://www.flickr.com/groups/strobist/) With nearly 70,000 members the strobist group on flickr is a very active cult community of fellow lighting enthusiasts. The group showcases other strobists work, mostly as they progess through the various assignments on the

strobist material, all shots posted are required to include information (settings) on how they took the shots so its a great place to learn and be inspired. There is also a discussion portion where topics range from troubleshooting equipment to “how would you edit this photo” to building your own DIY gear. Everyone is eager to help and seem nice enough (unlike a lot of other online forums) so if you get stuck along the way to learning how to light like a pro you should stop by here and get some help.


  • Onelight DVD Seminar (www.onelightworkshop.com) by Zach Arias

    Inline with the strobist “movement” Zach has put together a 2 disc seminar that follows him through various types of location shoots while explaining lighting concepts. He got his start shooting bands in Atlanta and one day decided to quit his job at Kinkos to got at it full force, the gamble paid off in spades. This seminar doesn't “hold your hand” as much as the Strobist dvds but it has a higher energy to it and he does shoots that are more exciting. Definitely worth a watch if you can afford it or can borrow a copy from someone who has it.

    Zach also has an online blog that is worth checking out at www.zarias.com


  • www.diyphotography.net

    This is a neat little website (or blog rather??) that collects tidbits of great info from around the net. Normally geared towards making your own gear on the cheap this site is worth checking out periodically to see whats new in the DIY world.


Sunday, November 15, 2009

Go Go Gadgets On The Go


I've got a few pieces of gear to share with you that I'm starting to find invaluable, they are all small and easily portable and meant for use on the go.

The main item I wanted to discuss is my new eeePC netbook, its been a few weeks now and I'm convinced that nobody should be without one least of all photographers packing light.

eeePC

When I first heard about the miniaturized laptop movement (OLPC, uMPC, eeePC etc) a lot of people were saying they were severely underpowered and for the price you could get a decent laptop for $100 more. Because of this I kept my distance but decided I'd check in on the technology once in awhile. A few weeks ago I finally took the plunge, my b-day was around the corner and I figured I'd treat myself with a netbook.

I settled on the ASUS eeePC 1005HA model, it seemed to have enough oomph to do basic tasks and have a long enough battery life to get me through any typical shooting jobs. After having it for awhile now I find I underestimated both the power and the battery life (although admittedly I did upgrade to 2GB of RAM). I've had laptops before and they did their jobs however I often hated lugging around all the power adapters etc. Battery life on most laptops was about 2-3hrs but I never trusted that and found myself never bringing it anywhere that I couldn't plug it in anyway. The netbook however gives me 6hrs + of constant heavy use and 8-10hrs of light use and standby, I've yet to even have a low battery warning pop up.

Far from being underpowered I find myself running all sorts of programs on this machine, even crunching through 200MB+ psd files in Photoshop. I just finished a series of art prints that I made almost entirely on the netbook, from vectorizing them in Inkscape to layering/blending/compositing them in PS.

I'm always working on a project of some sort and this netbook lets me take my work wherever I want to go, from whipping up a 3D model in Sketchup to making a quick poster for a friend's charity event in Gimp I have the tools to do it wherever I take my netbook.

For even more versatility I installed Ubuntu 9.04 through Wubi which is an installer that lets you install Linux as if it were a regular program in Windows (good for newbs like me). Provided you have a wired internet connection to start with getting the rest of the eeePC specific drivers and bells & whistles installed was easy, I followed most of this guy's post on how to do it. His article is for installing it as the main OS instead of dual boot which the install through Wubi creates. Also he is using the netbook remix edition of Ubuntu. He lists all of the packages you need to install though to get the wifi working and all the function keys etc, just type them into Synaptic and you'll be good to go.

Here is what makes it great for photographers:

  • Portable Storage - Use it on location to dump memory cards, even if you have enough cards to handle your shoot it still provides a level of redundancy in case a card fails or you accidentally delete the contents.
  • Impromptu Slideshow - Showing your client/model/customer the shots you've just taken on the back of your camera is often cumbersome and doesn't give them a good view, use the netbook instead to give them a better show.
  • Image Editing - While it isn't quite a desktop replacement you can still do quite a bit of editing on this machine. Sometimes doing a quick edit to show the client your concept and make sure you're on the same page can save you wasted time later in post.
  • Internet Access - This assumes you have an available wifi access point, you can upload shots to say Flickr or Picasa etc shortly after you take them or post them on your blog.

iTouch/iPhone
The next piece of gear I wanted to share was a device that almost nobody has heard about ;) Ok fine so they're ridiculously popular, so popular in fact I actually avoided upgrading my 60GB ipod photo purely because I didn't want to jump on the bandwagon. I was foolish to fight progress, the iTouch I picked up is a very versatile piece of gear. Its like a mini computer really, the web browsers I've used on small devices previously (pda's, Sony PSP, etc) were frustrating to use and very slow. The iTouch/iPhone browser experience is lightyears ahead of those and its fairly speedy too, all that remains is for apple to pull their heads out of their a$$es and allow flash to work on them.

Here's what makes it great for photographers.

  • Portfolio in your pocket - Whether you're just showing friends your latest photoshoot or pitching yourself to a prospective client it is handy to have your entire portfolio at your fingertips.
  • Apps galore - While most of the photography apps in the store are geared towards gimicky effects for the iPhone's camera there are some that can be used for serious photographers. Some are simple calculators for Depth Of Field (DOF), some simply tell you sunrise and sunset times by your location, others give suggestions for shooting in certain situations (neon lights, campfire, lightning, aurora etc) but some like the dSLR remote lets you control your camera remotely and even see through the viewfinder (only on certain models).
  • Portable inspiration - When browsing the interwebs keep a folder of photos you find inspiring or of shots you'd like to try, then dump them periodically to your ipod. This is also handy for keeping an album of poses if you're shooting people, often times I'll draw a blank mid-shoot on how to pose the subject only to realize afterwards that I should have tried "this angle" or "done that instead".
  • Maps* - Running late and can't find the location you're supposed to be shooting at? There's an app for that ;) Google maps can be very handy in this instance, this summer while on a roadtrip to BC our car overheated and thanks to the ipod we found a VW dealer only 1.5 kM from where we were. *This assumes you have wifi (or a data plan on the iPhone).
  • Scout Locations (Using iPhone Camera) - See an interesting alleyway or perhaps an alluring spiral staircase that you want to come back to for a shoot? Take a snap of it. Some software even lets you geotag the location so you can even get directions back to where you took the photo.

Digimate III portable HDD and card dumper
This device made the list because of its potential, I truly haven't reached the point of not being able to live without it. Long story short the one I received had some bent pins in the CF card slot so I'm in the process of getting a replacement. Hopefully that doesn't scare you off though, this is the first incident I've had like this in many many orders from this company so they're track record is still good!!!

Essentially this device is an enclosure for a 2.5" laptop hard drive, however unlike most of its kind this one had built in card readers and a chip that lets you plug in a memory card and copy its contents to the hard drive. I really can't believe there aren't more products like it out there, the ones that do exist are often so overpriced they go extinct quickly due to lack of sales.

I was able to test out the one I received using other memory card slots however and found it to work very well, transfer speeds while not blazing fast were more than sufficient.

This device is really just a shell, you need to still purchase a hard drive to stick into it. The price of drives comes down daily so for as little as $50 you can buy a 250GB sata drive. On that note I should point out that there are 2 versions of this item, one for SATA drives and one for IDE drives. IDE drives are starting to reach the end of their lifecycle and are therefore become more expensive than the more abundant SATA drives. Unfortunately I didn't realize there was a SATA version when I ordered mine so I was stuck with IDE and a 160GB size limitation.

I'll try to post a followup on this device once I get my replacement. I can't see myself using it every day (except maybe as just a portable HDD) but I can see it being a great companion while travelling and for an extra layer of redunancy during photoshoots. One final thing to note however, this device requires the HDD to be formatted as FAT32 which is something that Windows has issues with. Windows will limit you to a max of 32GB partition size which can be annoying. You'll need to use a third party software program to format the drive, I used GParted in Ubuntu as a quick method but plenty of tools exist for Windows environments too.

Why it's great for photographers:

  • Large storgage - Even if you get the IDE version which is limited to 160GB thats still a ton of shots. I carry two 16GB cards when shooting RAW with my 5DMKII and don't often worry about space, this would be like having 10 cards.
  • PC Free Transfers - If you're like me you already have enough gear to lug around, being able to travel without a pc (even a netbook) will cut your weight down a lot.
  • Extra Redunancy - Even if you have tons of memory cards and don't require the extra space its still a good idea not to keep all your eggs in one basket. Dumping the cards to this device will help protect you against accidental data loss.