Wednesday, April 7, 2010

Softbox Umbrellas from Steve Kaeser


Two 40" softbox umbrellas from www.skaeser.com

I picked these up a little while ago and have been meaning to write a review for a while but haven't had a chance.

I'll start by saying that I love softboxes, especially ones that I can use my speedlights in. Last summer (or was it the summer before?) I took the plunge and picked up the 28" Westcott Apollo softbox for speedlights after watching the Onelight Workshop DVD. Since then I've almost totally abandoned my umbrellas ;)

Obviously I was quite stoked to come across these softbox umbrellas while surfing the web, at the time of purchase you could get 2 for a measly $29.95 on sale. Unfortunately their site only listed UPS for shipping and living in Canada I've been gouged all too often by UPS's exorbitant brokerage fees. I decided to email the company and see if they'd ship USPS instead, to my delight they said they would and they sent me an invoice. They wanted$25 for USPS shipping ($5 less than UPS) and while I thought that was a little steep for a $30 item I realized the box was probably oversized so there wasn't much I could do. Fast forward a few weeks and UPS knocks on my door, no that was not a typo they still shipped UPS! I ended up getting charged another $20 for brokerage even though I went out of my way to get a USPS quote! So now I've paid $45 for shipping on a $30 item. Not pleased with this I emailed the company and have yet to get a response (about a month ago at time of writing). Thats the end of my rant, I'll get on with my review and sample images now. I just couldn't in good conscience write a review of this product without explaining some of the extenuating circumstances.

On with the review!
IMG_1073 blue w red vignette Levels n Lines
Shot with a 580EXII in Steve Kaeser Softbox Umbrella

The umbrellas came with nice carrying bags for the umbrellas, an extra that I wasn't really expecting for such a low priced item. My next surprise was the build quality which was in fact quite good! I've bought some cheap umbrellas in the past and regretted it when they nearly fell apart in my hands, these however I see sticking around for quite some time.

I couldn't wait to test them out so I arranged a quick test shoot with a girl I had actually just done a shoot with the week prior. Like the previous shoot we just did it in her apartment using a nice large section of blank white wall as a backdrop. Since the area we were shooting in was relatively small I opted to just use a single softbox umbrella.

Initial impressions:
Right off the bat I noticed that there was a lot more spill with these than with my Westcott Apollo, I'm not sure if it was due to the larger surface area or the fact that the Steve Kaeser boxes don't have a recessed panel like the Apollo. If you put a gun to my head I'd say it was probably the lack of recessed panel. This does limit you a little if you're working in a small environment but its definitely not a dealbreaker.

IMG_0967 subdued

One thing I had read on some forums was that light distribution was not equal across the whole umbrella. I really didn't find this to be that much of an issue, if there was a hotspot at the center I didn't notice it very much at all. I found the quality of light to be on par with my Westcott. As you can see from the shots my 580EXII didn't seem to have any problems filling the softbox.

I've yet to try them out with my studio strobes but would imagine they would work pretty well. I would imagine the region blocked by the head might be a little darker but I'd have to see whether it is negligible or not. The nice thing is that you don't have to go out and buy a specific speedring to use them with your equipment.


The breakdown:

Pros:
  • Cheap (provided you don't have the shipping hassles I did)
  • Well built
  • Fairly even light (some sticklers might disaggree)
  • Versatile in that either speedlights or monoblocks can be used
Cons:
  • Diffusion panel is not recessed and results in spill
  • Diffusion panel is not removable for cleaning etc

Conclusion:
For the price you'd be crazy not to have at least one f these in your bag. They're as small and portable as a regular umbrella yet give you the effects of a softbox. I still like my Westcott better but when you think you could get 8 of these for the same price I'd say start with a set of these instead.

Improvements:
If there were ever a rev 2.0 made I'd suggest making this unit convertible so it could be used as a shoot through as well, if they also made the diffusion panel removable it could then also be used as a reflective umbrella making it one of the most versatile pieces of gear ever!

A few parting shots ;)

IMG_1273 red

IMG_1298 blue

Sunday, March 21, 2010

Abandoning PC Sync for 1/8" stereo jacks


After reading David Hobby's recent post regarding his dislike for the antiquated PC Sync socket I sat laughing and saying to myself I couldn't agree more. This poorly designed connector has been around since the 1930's, it doesn't lock in place, and they wear out quickly. If you're unfortunate enough to break one or wear it out to the point it is unusable its next to impossible to find a replacement socket. I've worked in the electronics field for nearly a decade now and pride myself on being able to source obscure parts yet I still can't find a decent source for these.

Anywho as Mr.Strobist himself said its time for the PC Jack To DIE!

I recently picked up some new (to me anyway) White Lightning studio strobes which came with some rather well used cords, one of which was completely ready for retirement. I decided to just make some new cords but thought I'd improve the design. The existing cord was a 1/4" mono jack to a PC sync jack, I opted to make a new set but replace the PC sync end with a readily available 1/8" stereo jack instead.

In for a penny, in for a pound I decided to convert most of the rest of my equipment to 1/8" as well. When you're out shooting a gig the last thing you want is unreliable equipment and to me anything that is connected via PC sync cables is unreliable.

First up is my PT04-TM "poverty wizard" wireless triggers. These were nice and easy to mod because there is quite a lot of room inside. I didn't have any 1/8" sockets lying around but I did happen to have some stereo "Y" adapters that I could part with so I hacked them up.

If you're going to attempt something similar I'd advise you make note of the polarity, some devices work fine either way but I know my triggers are polarity sensitive. Inside the PT04-TM receiver the wire going to the center pin of the hotshoe is positive the the one going to the collar is negative. On the 1/8" jacks the tip is positive and the sleeve is negative. In my case I used stereo jacks because that is all I had lying around so I just tied the ring and sleeve together to make it mono. The photo at the top of the article shows the almost finished product, later I added epoxy where the wire entered the case of the receiver. This ensured the wire couldn't accidentally get yanked out and tear a bunch of the wiring.

Closeup of 1/8" socket mod of the PT04-TM receiver

Here is a zoomed in photo of the internal wiring, these particular PT04-TM receivers already had a PC Sync mod done to them when I got them. The heat shrink on the cables wasn't crucial but its better to play it safe when possible.

Next up was my hotshoe-to-pc sync adapter (shown in top picture), for this one I rummaged around until I found an old Sony Walkman I had lying around and gutted it for the 1/8" headphone socket. Normally I would have just went to one of the local electronic supply companies but it was the weekend and I couldn't bring myself to pay 5 times as much at Radioshack. Luckily the adapter was one of the larger ones so there was ample room inside to fit the socket, unfortunately I didn't take a photo of the internals. The process is the same anyway, center pin is positive and collar is negative.

Two Seagul SYK-3's modded with bypass switches and 1/8" sockets

The final gear to mod were two optical slaves I had purchased here for dirt cheap, when I picked them up I had this mod in mind since they're the cheapest hotshoe housing I could find ($5.55) with the added bonus of being optical slaves. The only issue is that I needed to add a switch to turn off or on the optical slave part. I could have just placed a piece of electrical tape over the sensor eye to disable it however I needed to electrically disconnect the slave circuit if I wanted to use this on my 580EXII. For some reason the 580EXII doesn't like cheap optical slaves and will only fire once, the flash then has to be turned off and on again before it will fire again.

I've finally cast off the shackles of the PC sync socket, all that lay before me is reliability and reasonably priced cables ;)

On a side note I picked up some sweet cases from Don's Photo in Saskatoon, these were in the bargain bin for around $10. They come with customizable foam and are rock solid little cases. I was tired of my triggers getting banged around in my bag so I thought I'd protect them a little.


My PT04-TM's and a few odds & ends housed in a Vanguard Swing 8 hard case.

Hopefully if we shout loud enough about how much the PC sync connector sucks the manufacturers will finally start to include 1/8" sockets in their products. Heck even a mini 2.5mm socket like most cell phones have would be fine, as long as its a connector that is abundantly available. Now if only everything would start using mini-usb connections for charging ports...

Monday, January 25, 2010

Guide to getting into off-camera lighting

**Originally written for the camera club at my work**

So you took the plunge and bought a digital SLR, you've been having fun shooting in available light but you want to start playing around with studio lighting, this is your poor man's guide to getting started. If you're not poor you may want to look into starter studio lighting kits (starting around $600-$700) however this guide only covers speedlights which are cheaper and more portable & versatile than a full studio setup.

Requirements:
Camera with a hotshoe or PC Sync socket
Internet Connection (optional but you'll want to be doing lots of reading)
Budget:$100-400 depending on how far you want to go

1) Flash - $50 and up depending. You'll need a flash to start off with, we'll be using them like studio strobes so we don't need the fancy "auto ttl" style that cost big $$ (I made the mistake of buying the fancy ones and I never use any of those features). Look on ebay or kijiji for older flashes, it doesn't matter which brand because we'll be triggering them wirelessly. I snagged two Nikon SB-26's off kijiji for $100 each which was a good price, I wish I would have just bought these instead of my fancy ones and saved hundreds of dollars. Make sure that have the following features:

  • Manual power settings - most are adjustable from 1/1 (full power) down to 1/64th or 1/128th in 1/2 or 1/3 F-stop increments

  • Adjustable head that tilts and pan

  • PC Sync Socket – Not completely necessary but a very handy feature to have

  • A standard hotshoe - Some older Vivitar flashes as well as others have an oddball hotshoe that require an adapter to fit in a normal hotshoe, its best to simply avoid these ones.

  • TTL trigger voltage -ie 5 or 6V, anything below 12V or so should be safe. Some older flashes can be up to 600V and can fry equipment so never use older flashes directly on your camera. You can check this with a volt meter by charging the flash to fire (set it to the lowest power incase you get zapped) then use the DC setting on the meter to check between the side pin and the center pin. Its kinda hard to describe in text, hopefully this picture makes it clearer. If you're buying on ebay make sure to ask about the trigger voltage if it is not listed, don't risk buying it if you can't be sure. If you're buying it off of kijiji then bring some batteries and a meter along to test it out yourself

Some suggestions on decent older flashes to look for would be Nikon SB-26's or 28's (Nikon flashes are great because they have built in optical slave triggers*), Canon 540EZ, Vivitar 285 (be careful as older model 285's have high trigger voltages). If you want to buy new flashes but don't want to break the bank checkout www.bhphotovideo.com and look at 3rd party brands like Bower or Nissin, $150 will get you a Nissin that is comparable to a $600 Canon EXII and still has all the ETTL-II auto features. *More about Optical Slaves in the next section Triggering Options

2) Triggering Options – Prices vary

Alright so now you have a flash but still no way to trigger it remotely, there are a few options that can be done cheaply:


  • Wireless triggers – Starting at $20-30

    This is the method I'd recommend hands down. The “gold standard” in photography for triggers are Pocket Wizards but they cost around $300 for each transceiver and you need at least 2 to start. Lucky for us our friends in China have made affordable versions for $20-$30 a pair (includes transmitter and receiver). The triggers I recommend are the PT-04 model, some manufacturer makes these and various companies put their logo on them (YongNuo, Jiansi etc). At the time of writing this article you can pick up three (as show in the image below) for $34.99USD with free shipping on ebay. People sometimes jokingly refer to these triggers as “Poverty Wizards”, some say that they're not as reliable as their pricey alternative but I've never had any issues. I have 4 sets and I use them on professional jobs without any worries, I normally only use 2 at a time and the other 2 are backups. With a bit of modification you can even extend the range by adding an antenna to the transmitter although even un-modded you'll get 50-100ft.

Pros:

Cheap, no wires, flashes aren't likely to get accidentally triggered by other photographers, does not need line-of-sight.

Cons:

The cheap “poverty wizards” may have quality issues (though I haven't experience it), batteries will eventually need replacing (but last over a year at least)– AAA's in the receiver are easy to find but the transmitter takes 23A 12V which are harder to find – Here's a link to a 5-pack for $3.48USD http://www.dealextreme.com/details.dx/sku.475

  • Optical Slaves
    I mentioned optical slaves earlier, some flashes come with built in optical slaves but you can also buy little adapters. This is a very cheap method of firing flashes off-camera however they have some big problems with digital cameras!! These triggers were great back in the days before digital however the new flash systems do not work well with them. The reason the flashes on new cameras fire a pre-flash before the main burst of light, this pre-flash lets the camera's sensor determine the proper power required for a good exposure. If you're trying to trigger the slave with your camera's built in flash the pre-flash will trip the slave and by the time the main burst comes the slaved flash will have already fired.

    There are ways around this however. Buy a specially designed optical slave which accounts for this (Wein Digital Peanut) for around $100, OR the cheaper route is to trigger it with another flash that is in manual mode and therefore will not emit this pre-flash. Often I'll use only one wireless trigger on my Canon 580EXII and use it to trigger my Nikon SB26's which I've set to slave mode.


Pros:

Wireless, No batteries (for the basic ones, not sure about the advanced ones), very simple


Cons:

Doesn't play nice with digital flashes using ETTL (pre-flash), needs line-of-sight, will be triggered by any other flashes present (ie other photographers in the area)


  • PC Sync cables (oldschool)

    $5 or less for very short cheap ones to $50+ for longer brand name ones

    Last on the list is the wired solution. Its not a bad idea to have a few of these cables around as a last resort but I wouldn't suggest using them as your primary means of firing your flash. The cables aren't that cheap (even though they should be) and the connector they use is very poorly designed, I don't know why its even still around when a simple headphone jack would work better and is abundant. These cables have a lifespan and become intermittent over time, the connector doesn't lock in place so they often slip out. All in all the worst of the options.

* I'd still recommend buying a few short PC sync cables especially if you get the PT-04 wireless triggers that have the socket, as crappy as they are they can still save your a$$ is a pinch ;)

Pros:

Simple and straightforward


Cons:

Not really that cheap especially for longer cables, connections deteriorate over time and become intermittent, connection is not secure and can fall out while shooting.


3) Light Stands & Adapters

Now that you have a flash or flashes and can trigger them remotely you'll need to put them on something. Investing in at least one proper light stand is recommended but cheap tripods can fill in as well depending on your needs. If you're wanting to special softboxes etc a light stand is the way to go but if you just want to mount the flash or even add an umbrella or two a tripod will suffice. Places like XS cargo or the various liquidation centers often have tripods for around $20. With that said you can find cheap ones at www.bhphotovideo.com starting at $20 USD + S&H as well. Cheap swivels can be found for ~$10 each online, “normal” ones are about $30 each. Post adapters like the 1/4” receiver can actually be pretty pricey so just try to buy a swivel that comes with one ;)

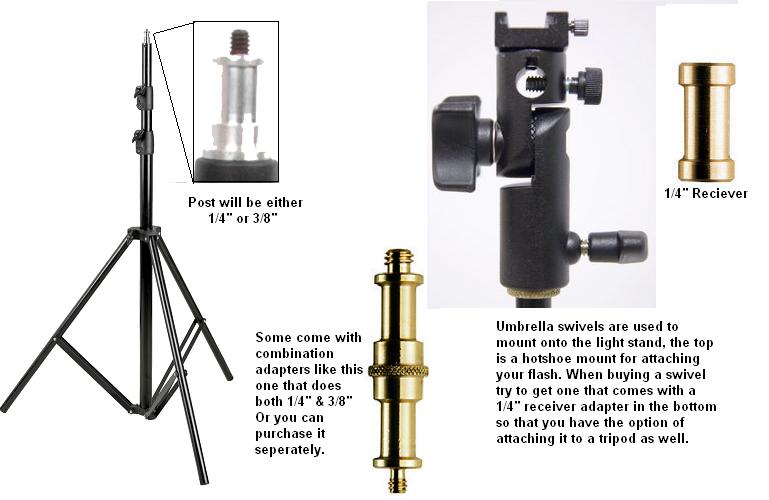
Shown here is an umbrella mounted on a tripod using an umbrella swivel. Note that if you are using a PT-04 wireless trigger it will add more height to the flash and it won't hit the center of the umbrella, this is where a small PC Sync cable between the receiver and flash comes in very handy.

4)Basic Light Modifiers (Umbrellas, Softboxes, Grids, Snoots, “Stoffen”etc)

If you're getting into off camera flash chances are the look you're going for isn't going to be produced with just a bare flash. Flashes emit light from a small source which means harsh shadows. The sun is a small point of light high up in the sky and you see how harsh mid-day shadows can be however on overcast days the whole sky becomes the light source because the clouds are “diffusing” the light. The most common light modifiers are trying to do the same thing, turn a small light source into a larger one.


Umbrellas – Starting around $10 and going way up from there depending on brand/size/type

These are one of the most common and most basic light modifiers, they are simple and they work well.

They come in a few different flavours: Reflective, Shoot-thru, and Reversible

  • Reflective umbrellas are normally white on the inside and black on the other side, you shoot the flash into them and use the reflected light.

  • Shoot-thru is just how it sounds, you shoot the light through the umbrella.

  • Reversible umbrellas are basically a hybrid, they have a covering that can be removed so they can work as reflective or shoot-thru


Softboxes – Starting around $100 and going way up from there depending on brand/size/type

These are similar to umbrellas but give a slightly more even light, in addition they are more directional so you have finer control to avoid spill. If you're shooting with speedlights (ie flashes that are designed to mount onto your camera's hot shoe) your best bet for a softbox would be the 28” Apollo from B&H for $114USD. If you plan on getting one there are two items that B&H sells, for reasons unknown to me one item is cheaper AND it comes with an umbrella swivel for mounting your flash. Look for B&H item #WEASLK


Grids, Snoots, and Gridded Snoots ;)

These modifiers are used for restricting light, they're used various circumstances like back/edge lighting where you want to light up just the back of a person's hair without having the flash produce glare in your lens from spill. Other uses are for lighting backdrops behind a subject to create a spherical gradient. Basically any time you want to light a specific area without having light spill into other regions you'll be reaching for one of these. If you're the crafty type these can be easily made from commonly available items (hint use this as an excuse to go to your local pub to find black straws).


Stoffen aka Omnibounce

Stoffen is actually a company but just like “Kleenex” its become synonymous with this light modifier. For a simple piece of plastic the actual Stoffen Omnibounce is ridiculously over priced, you can find knockoffs that will do just as well or you can find ways to make your own by searching online. If you do buy a knockoff make sure you get the proper one for your flash as they are shaped differently depending on the brand and model.

These are used to simulate a “bare bulb” flash, they produce close to a 360°x360° light source. It is best used in smaller rooms where it bounces around off walls and ceilings to illuminate the whole room. Often you'll see paparazzi and journalists using them in completely the wrong way ;) They'll use them outside where there is nothing to bounce the light off of, in this instance they are just wasting 2-3 stops of light and overworking their flashes.

5)Resources for learning to light better

Having all of this gear means nothing if you don't know what to do with it, in this section I'll outline some great on-line resources for learning how to light.


  • www.strobist.com

    A blog created by former newspaper photographer David Hobby, a few years ago he quit his day job to try his hand at blogging and now has one of the most visited websites for photographers on the internet. To say this site is a goldmine of knowledge is an understatement, David has been kind enough to create FREE course material. TheI suggest starting with his Lighting 101 series and going from there. The lighting 101 material starts off essentially where this guide does, with the equipment you'll need. From there it goes on to cover lighting basics onward to more advanced techniques. Thousands of people have got their start in lighting by visiting this blog.

Strobist DVD Semimar: If you can afford it (or if you can find someone willing to lend you a copy) this 8 DVD set covers all of the Lighting 101 information. If you find the online written material hard to follow then this DVD will help a lot by showing you visually.


Strobist on Flickr (http://www.flickr.com/groups/strobist/) With nearly 70,000 members the strobist group on flickr is a very active cult community of fellow lighting enthusiasts. The group showcases other strobists work, mostly as they progess through the various assignments on the

strobist material, all shots posted are required to include information (settings) on how they took the shots so its a great place to learn and be inspired. There is also a discussion portion where topics range from troubleshooting equipment to “how would you edit this photo” to building your own DIY gear. Everyone is eager to help and seem nice enough (unlike a lot of other online forums) so if you get stuck along the way to learning how to light like a pro you should stop by here and get some help.


  • Onelight DVD Seminar (www.onelightworkshop.com) by Zach Arias

    Inline with the strobist “movement” Zach has put together a 2 disc seminar that follows him through various types of location shoots while explaining lighting concepts. He got his start shooting bands in Atlanta and one day decided to quit his job at Kinkos to got at it full force, the gamble paid off in spades. This seminar doesn't “hold your hand” as much as the Strobist dvds but it has a higher energy to it and he does shoots that are more exciting. Definitely worth a watch if you can afford it or can borrow a copy from someone who has it.

    Zach also has an online blog that is worth checking out at www.zarias.com


  • www.diyphotography.net

    This is a neat little website (or blog rather??) that collects tidbits of great info from around the net. Normally geared towards making your own gear on the cheap this site is worth checking out periodically to see whats new in the DIY world.


Sunday, November 15, 2009

Go Go Gadgets On The Go


I've got a few pieces of gear to share with you that I'm starting to find invaluable, they are all small and easily portable and meant for use on the go.

The main item I wanted to discuss is my new eeePC netbook, its been a few weeks now and I'm convinced that nobody should be without one least of all photographers packing light.

eeePC

When I first heard about the miniaturized laptop movement (OLPC, uMPC, eeePC etc) a lot of people were saying they were severely underpowered and for the price you could get a decent laptop for $100 more. Because of this I kept my distance but decided I'd check in on the technology once in awhile. A few weeks ago I finally took the plunge, my b-day was around the corner and I figured I'd treat myself with a netbook.

I settled on the ASUS eeePC 1005HA model, it seemed to have enough oomph to do basic tasks and have a long enough battery life to get me through any typical shooting jobs. After having it for awhile now I find I underestimated both the power and the battery life (although admittedly I did upgrade to 2GB of RAM). I've had laptops before and they did their jobs however I often hated lugging around all the power adapters etc. Battery life on most laptops was about 2-3hrs but I never trusted that and found myself never bringing it anywhere that I couldn't plug it in anyway. The netbook however gives me 6hrs + of constant heavy use and 8-10hrs of light use and standby, I've yet to even have a low battery warning pop up.

Far from being underpowered I find myself running all sorts of programs on this machine, even crunching through 200MB+ psd files in Photoshop. I just finished a series of art prints that I made almost entirely on the netbook, from vectorizing them in Inkscape to layering/blending/compositing them in PS.

I'm always working on a project of some sort and this netbook lets me take my work wherever I want to go, from whipping up a 3D model in Sketchup to making a quick poster for a friend's charity event in Gimp I have the tools to do it wherever I take my netbook.

For even more versatility I installed Ubuntu 9.04 through Wubi which is an installer that lets you install Linux as if it were a regular program in Windows (good for newbs like me). Provided you have a wired internet connection to start with getting the rest of the eeePC specific drivers and bells & whistles installed was easy, I followed most of this guy's post on how to do it. His article is for installing it as the main OS instead of dual boot which the install through Wubi creates. Also he is using the netbook remix edition of Ubuntu. He lists all of the packages you need to install though to get the wifi working and all the function keys etc, just type them into Synaptic and you'll be good to go.

Here is what makes it great for photographers:

  • Portable Storage - Use it on location to dump memory cards, even if you have enough cards to handle your shoot it still provides a level of redundancy in case a card fails or you accidentally delete the contents.
  • Impromptu Slideshow - Showing your client/model/customer the shots you've just taken on the back of your camera is often cumbersome and doesn't give them a good view, use the netbook instead to give them a better show.
  • Image Editing - While it isn't quite a desktop replacement you can still do quite a bit of editing on this machine. Sometimes doing a quick edit to show the client your concept and make sure you're on the same page can save you wasted time later in post.
  • Internet Access - This assumes you have an available wifi access point, you can upload shots to say Flickr or Picasa etc shortly after you take them or post them on your blog.

iTouch/iPhone
The next piece of gear I wanted to share was a device that almost nobody has heard about ;) Ok fine so they're ridiculously popular, so popular in fact I actually avoided upgrading my 60GB ipod photo purely because I didn't want to jump on the bandwagon. I was foolish to fight progress, the iTouch I picked up is a very versatile piece of gear. Its like a mini computer really, the web browsers I've used on small devices previously (pda's, Sony PSP, etc) were frustrating to use and very slow. The iTouch/iPhone browser experience is lightyears ahead of those and its fairly speedy too, all that remains is for apple to pull their heads out of their a$$es and allow flash to work on them.

Here's what makes it great for photographers.

  • Portfolio in your pocket - Whether you're just showing friends your latest photoshoot or pitching yourself to a prospective client it is handy to have your entire portfolio at your fingertips.
  • Apps galore - While most of the photography apps in the store are geared towards gimicky effects for the iPhone's camera there are some that can be used for serious photographers. Some are simple calculators for Depth Of Field (DOF), some simply tell you sunrise and sunset times by your location, others give suggestions for shooting in certain situations (neon lights, campfire, lightning, aurora etc) but some like the dSLR remote lets you control your camera remotely and even see through the viewfinder (only on certain models).
  • Portable inspiration - When browsing the interwebs keep a folder of photos you find inspiring or of shots you'd like to try, then dump them periodically to your ipod. This is also handy for keeping an album of poses if you're shooting people, often times I'll draw a blank mid-shoot on how to pose the subject only to realize afterwards that I should have tried "this angle" or "done that instead".
  • Maps* - Running late and can't find the location you're supposed to be shooting at? There's an app for that ;) Google maps can be very handy in this instance, this summer while on a roadtrip to BC our car overheated and thanks to the ipod we found a VW dealer only 1.5 kM from where we were. *This assumes you have wifi (or a data plan on the iPhone).
  • Scout Locations (Using iPhone Camera) - See an interesting alleyway or perhaps an alluring spiral staircase that you want to come back to for a shoot? Take a snap of it. Some software even lets you geotag the location so you can even get directions back to where you took the photo.

Digimate III portable HDD and card dumper
This device made the list because of its potential, I truly haven't reached the point of not being able to live without it. Long story short the one I received had some bent pins in the CF card slot so I'm in the process of getting a replacement. Hopefully that doesn't scare you off though, this is the first incident I've had like this in many many orders from this company so they're track record is still good!!!

Essentially this device is an enclosure for a 2.5" laptop hard drive, however unlike most of its kind this one had built in card readers and a chip that lets you plug in a memory card and copy its contents to the hard drive. I really can't believe there aren't more products like it out there, the ones that do exist are often so overpriced they go extinct quickly due to lack of sales.

I was able to test out the one I received using other memory card slots however and found it to work very well, transfer speeds while not blazing fast were more than sufficient.

This device is really just a shell, you need to still purchase a hard drive to stick into it. The price of drives comes down daily so for as little as $50 you can buy a 250GB sata drive. On that note I should point out that there are 2 versions of this item, one for SATA drives and one for IDE drives. IDE drives are starting to reach the end of their lifecycle and are therefore become more expensive than the more abundant SATA drives. Unfortunately I didn't realize there was a SATA version when I ordered mine so I was stuck with IDE and a 160GB size limitation.

I'll try to post a followup on this device once I get my replacement. I can't see myself using it every day (except maybe as just a portable HDD) but I can see it being a great companion while travelling and for an extra layer of redunancy during photoshoots. One final thing to note however, this device requires the HDD to be formatted as FAT32 which is something that Windows has issues with. Windows will limit you to a max of 32GB partition size which can be annoying. You'll need to use a third party software program to format the drive, I used GParted in Ubuntu as a quick method but plenty of tools exist for Windows environments too.

Why it's great for photographers:

  • Large storgage - Even if you get the IDE version which is limited to 160GB thats still a ton of shots. I carry two 16GB cards when shooting RAW with my 5DMKII and don't often worry about space, this would be like having 10 cards.
  • PC Free Transfers - If you're like me you already have enough gear to lug around, being able to travel without a pc (even a netbook) will cut your weight down a lot.
  • Extra Redunancy - Even if you have tons of memory cards and don't require the extra space its still a good idea not to keep all your eggs in one basket. Dumping the cards to this device will help protect you against accidental data loss.

Tuesday, September 15, 2009

Photo Archiving Pt 1 - Learn along with me

There is a word that can make almost any photographer cringe... "archiving" or alternatively "backups". It just seems like one big Monday, lots of tedious repeditive work thats boring. Well all it takes is one harddrive crash and you'll realize just how important it all is. I've been lucky so far (knock on wood) in that I haven't had any HDDs fail but a few friends have recently experienced it and that was enough to light a fire under my butt.

This post may turn out to be a series, at least thats my current intent. As I go about backing up and archiving I'll share with you what I've learned in hopes that it saves you time. Everyone has different needs so what I do may not work for you.

First things first, what types of backups are available.

1) CD's and DVD's
2) Harddrives (HDD)
3) Online

I have over 400GB of photos and now that I'm slinging a 5DMKII each trigger press means a 30MB+ RAW file. CD's and DVD's aren't going to cut it except for maybe the finished edits from each shoot. Harddrives are getting cheaper by the minute, a 1TB drive is around $100 right now, this will definitely be one of the options I go with. Online backups, this is a viable option but it depends how much you shoot and how much you're willing to spend on storage space. Another downside is that its one of the slowest of the 3 methods since most service providers limit upload speeds.

Conclusion: A nice mix of all 3.
After I'm done editing a shoot I'll burn DVD copies of the top pics as well as upload them to my flickr pro account (full size of course). I'll use HDDs for the main backup possibly in a RAID 1 configuration or multiple external HDDs that all contain the same data incase one fails. We'll go more indepth into this later.

Staying Organized
This is the most important aspect of archiving, I'm no saint when it comes to this but I'm turning over a new leaf ;) Last week I had my photos scattered across 5 harddrives, some internal and some external, none in what any sane person could all an organized fashion. I've spent the last 3 or 4 days, a few hours at a time, copying them all to a 1TB external drive.

First I created folders on the 1TB drive to classify the photos in the root of the drive

People
Places
Personal

From there I can make more specific folders
People
>Modelling
>Family Portraits
>Weddings

Places
>Travel
>Nature
>Animals
>Urban

Personal
>Family
>Parties
>Other

These are just examples, I may change or add or remove folders and sub-folders as I see fit. The point is there is rhyme and reason to the folder layout. Keep the sub-folders fairly generalized or else you'll just end up with another maze of folders to navigate through.

Importing your photos properly
Taking a little extra time when you're dumping your memory card will save you lots of time later. If you're not already using some form of photo management software its time that you started. I highly recommend Adobe Lightroom 2 but another (and free) alternative is Google's Picasa. Both will catalogue your photos and give you options when importing. Both programs have the ability to detect when you plug in a memory card and will ask you if you want to import. Choose the appropriate folder to import to and name the folder with a descriptive title like "Crooked trees with Sarah", then be sure to add keywords that will help you search out the photo later. For example my the previously mentioned import was a modelling portfolio shoot I did out at the crooked trees so I keyworded it as follows: people, modelling, fashion, portrait, female, girl, location shoot, crooked trees, trees, 40D, autumn, fall. With these tags I should easily be able to search my catalogue and find them quickly by only entering one or two of those keywords in my search. Another option during importing is to replace the generic "Image_001.jpg" filenames with something more descriptive. Again in this case I might use "Crooked Trees Sarah" as my prefix so that my files come out Crooked Trees Sara 001.jpg, Crooked Trees Sarah 002.jpg etc.

Off-site Backups
Another thing I should note is the importance of an off-site backups. You never know when disaster could strike and either your house gets broken into or you have a house fire or flood etc. This is where backup option #3 the online backup is handy but most of the time you don't have all of your photos online. When you're burning off a DVD take another 10 minutes and burn a second one off to store at your parents place or in a safety deposit box at the bank. The same can be done with a second external HDD, the only issue with this is having to go pick it up periodically and update the new files on it. It all comes down to that cliche of "don't put all your eggs in one basket".

A quick note on HDDs and RAID
I'm ashamed to admit, being a tech and all, that I didn't really keep up to date with what exactly RAID is. RAID stands for Redundant Array of Inexpensive Discs

There are various RAID configurations, here is an excerpt from Wikipedia
  • RAID 0 (striped disks) distributes data across several disks in a way that gives improved speed at any given instant. If one disk fails, however, all of the data on the array will be lost, as there is neither parity nor mirroring.
  • RAID 1 mirrors the contents of the disks, making a form of 1:1 ratio realtime backup. The contents of each disk in the array are identical to that of every other disk in the array.
  • RAID 5 (striped disks with parity) combines three or more disks in a way that protects data against loss of any one disk. The storage capacity of the array is reduced by one disk.
  • RAID 6 (striped disks with dual parity) combines four or more disks in a way that protects data against loss of any two disks.
  • RAID 10 (or 1+0) uses both striping and mirroring. "01" or "0+1" is sometimes distinguished from "10" or "1+0": a striped set of mirrored subsets and a mirrored set of striped subsets are both valid, but distinct, configurations.
The most common ones you'll probably see is RAID 0 & 1 and possibly 5. RAID 0 is useless to us and I'd actually recommend everyone stay away from it period, basically it makes 2 HDDs into one big one, the problem is that if either HDD fails ALL the data is lost!

For us either RAID 1 or RAID 5 is what we need, with RAID 1 you essentially have two mirrored HDD's that can be used to repair or recover the other HDD in the event that it fails or becomes corrupted. With RAID 5 its similar to RAID 1 except it uses 3 or more HDD's and protects against any 1 failing.

Redundancy costs money, for the HDDs it'll cost you double since you need twice the space. To have 1TB with a RAID 1 setup you'll need to buy two 1TB drives. You'll also need special hardware to manage the RAID setup, either a RAID controller in your PC or an external HDD enclosure that has a RAID controller built in. These are not cheap. As I write this the cost to put together an external HDD enclosure with two 1TB HDDs configured as RAID 1 its about $400CAN.

Based on the price tag the RAID solution may not be for you, this solution is more for the advanced hobbyist and professionals who earn money from their photography and can't afford to lose any photos.

In closing...
As I researched more and more about archiving in the digital era the more I realized that no one method is foolproof or permanent. With film the negatives can last for years, they may yellow or have colour shift but the image integrity is fairly good. With digital, when failure or corruption does occur, the results are normally catastrophic. CD's and DVD's degrade over time, the initial promises of 100years is definitely rubbish, HDD's are mechanical and fail over time and the platters lose their magnetism. Online backups can suffer server failures, though specialized online backup sites would probably have redundancy to protect from this. In the end you may want to make hardcopy prints of your most treasured photos as they will probably last the longest ;)

Hopefully this post wasn't too boring, I know it is a little lengthy and there were no pictures ;)

I'll post more as I go further with my archiving and learn more.

Tuesday, August 11, 2009

Digital Adventures In Infrared

IR Test (River Pano 50%)
Test image taken with my Canon G10 using an 850nm IR filter, coloured in PS during post.

Infrared photography has always intrigued me, there is something about white trees and dark skies that brings a surreal nature to the images. With the dawn of digital cameras came the apparent dusk of IR photography, IR blocking filters that are installed on the sensors almost rule out IR photography entirely. There are still a few methods left and that is what this post is about.

The IR blocking filters, sometimes referred to as "hot mirrors" apparently are not all created equal. Here is a website that lists various camera's sensitivity to the infrared spectrum, unfortunately it appears to be a little dated but you can see the variance between cameras.

One quick way to see how sensitive your camera is to IR is to point your TV remote at the lens and see if you can see the IR LED light up when you press buttons on your remote. This is only the first step however, even if you see some light it still may not be sensitive enough but its a good start!

Assuming your camera has some sensitivity to the IR spectrum you can try what I did, purchase an IR pass filter for your camera. This filter blocks the visible spectrum and lets the IR light in. Filters are available in various wavelengths, in my case I used an 850nm IR pass filter.


Since we're blocking out quite a bit of the spectrum with the IR pass filter and since our internal filter is blocking a lot of the IR our exposure times will suffer. The image at the top of this article took 4 seconds at F2.8 with an ISO of 200 in the midday sun. Other cameras and filter combinations may yield different results but you should bank on having to bring a tripod, hand holding is simply not an option.

Another, more dramatic option, exists to enable your camera to take IR photos. There are companies which will take your camera and remove the IR filter or hot mirror from the digital sensor. This method has its pros and cons, it will reduce your exposure times greatly but can also limit your camera to only being able to take IR photos. It has also been noted that most cameras will have problems with their auto focus mechanisms due to the change in thickness of the filter over the sensor. Personally I'm not that big an enthusiast that I'll be sending in my 5DMKII any time soon.

Bez Infrared Cropped small
IR image faked in Photoshop

If you don't like either of these options you can always try to fake it using an image editing program like Photoshop or Gimp etc. While the results vary as much as the methods and the fact that it can be very time intensive it can yield some interesting images and give you another avenue if other options are not possible.

My Gear
I've been buying more and more stuff from this great Hong Kong based site, the other day I read an article that claimed people had success using IR filters on their G10 by use of a special adapter. I quickly checked out my Hong Kong connection and sure enough I found a 58mm filter adapter for $8 and a cheap IR filter for $19. So for approx $30 I was willing to take a gamble and it appears to have paid off!

Good luck!

Sunday, July 19, 2009

Everyone should have a pocket camera...

It doesn't matter if you have the most amazing whiz bang billion mega pixel uber-DSLR on the planet, it won't mean a lick if you don't have it with you when you need it. I don't know about you but my pockets aren't big enough to carry my 5DMKII around with me wherever I go and I probably wouldn't feel safe carrying it around everywhere anyway.

Enter the point and shoot camera, the much laughed at kid brother to our "serious" cameras. With technology getting better by the nano-second it might be time to re-evaluate the pint size light digitizer. There are a number of reasons to have a decent P&S around, the biggest is obviously size and portability.

Point and shoots are often relegated to candid snapshots at birthdays and drunken party picks etc but they don't have to be. In this post I'll speak out for the little guy and pitch it's story and hopefully sell you on the ideas and views I've arrived at.

1)Size - Obviously this is one of the biggest advantages that P&S camera have over their bulkier brothers. Small enough to fit into a shirt pocket, there is no reason why you can't have a camera on you at all times.
My SD780IS in a slightly modified Altoids Mint Tin - a nice cheap protective case

2) Video - While some video cameras moonlight as still cameras, often with very poor results, point & shoots do a marvelous job as video cameras for the average person's needs. The trend now is going towards HD video which makes them all the more attractive. There has been a few times when I've sent photos or video clips into the local news simply because I was the only one who captured a spur of the moment event. Case in point, a few weeks ago two moose wandered into our parking lot, on a whim I took a clip and sent it in. They ran it the next day and I then had the newspaper calling me to see if they could use it on their website. Did I get paid, no, but it got my name out there and maybe my website got a little boost in traffic.
Little clip from my SD780IS of two moose wandering into our parking lot at work

3) Macro - With their small lenses and sensors P&S cameras have an advantage when it comes to taking macro photographs. Its not unheard of to have a 1cm minimum focal distance when the camera is placed into macro mode.
<span class= <span class=
Shot with my G10 at the Mendel Conservatory

4) Photo-stitching - OK so maybe the little point and shoot is a little light on resolution, don't let that stop you from capturing a nice landscape shot. Instead of taking the shot in just one image zoom in and take 30 photos, once stitched together it could easily eclipse your DSLR.

Delta <span class=
Taken way back with my 3.2MP Canon SD200 this shot is made up of over 50 images stitched together.
Link to larger version which is still reduced by 50% or more

5) High-end P&S cameras- Don't want to leave the manual controls and external flash capabilities of your DSLR behind? Well there is still a market of high-end point and shoot cameras available. The Canon G series cameras for example are almost the go-to standard for reporters and journalists. Nikon and Panasonic also make models in this category as well so there are options even if you're not a Canon fellow like myself.

It's even possible to do a full fledged modeling shoot using one of these as is shown in this video.

6) Bells & Whistles - Lastly there are some new technologies emerging that can make your P&S even more versatile. Geo-tagging is just starting to catch on, companies like Eye-Fi are offering the ability to geo-tag your photos on the fly and upload them wirelessly to your PC or various photo sharing sites, all built into a little SD card. Nikon's P6000 is comparable to the Canon G10 but also comes with built in GPS for geotagging anywhere you can get a signal, this was enough to have my second guessing my G10 purchase.

In conclusion most people nowadays probably got their start in digital photography via a simple point and shoot, I know I did way back 2001 with a 2MP HP P&S. Often though people tend to overlook these cameras later on once they enter the DSLR world, hopefully this shows some reasons why you may want to reconsider them as viable photographic tools.