
 Example using border created in this tutorial.
Parchment texture overlayed**
A polaroid transfer is made when the normal development process of the polaroid is interrupted and the image is instead placed on a different medium (normally paper). Normally heat and pressure is applied to encourage the image to bond to the new medium. This is all what I'm told, I've never had the pleasure of actually doing this, unfortunately Polaroid announced that they are no longer going to be making film so I may never get the chance. Lucky for me (and you) there are still ways to keep the look alive through the modern wonders of photoshop.
I was recently working on a shoot where the editing was leading me down a path that made the photo look a little "grungy" and I thought a polaroid border would suit it well. I knew at one time there was some nice soul who had posted up a psd template that was an actual scan of a blank polaroid transfer so I started looking. After 2hrs and many stock photo sites that were selling exactly what I was looking for I decided photographer/graphic designer/photoshop fiend would I be if I simply purchased this file. Luckily I stumbed across a post that mentioned using ink and some watercolour paper, thats all I needed to read and I was off to find the box with my drawing stuff.
This process is quite simple, there are probably a multitude of ways to do this and I encourage you to tailor this process to your own style.
Materials
- 1 or more sheets of watercolour paper - others may work but watercolour paper has a nice texture
- Ink of some sort. I used fountain pen ink but you could probably use all sorts of other stuff like food colouring or maybe even fabric dye just make sure it is dark. Get creative. It doesn't have to be black, we can fix that in photoshop.
- 1 or more popsicle sticks - again other stuff could work, just get someting with a flat edge that you can use to transfer the ink.
- Scanner - If you don't have one see if you can scan documents to file using the copier at work. If all else fails I don't think Office Depot or Staples charge that much for this service.
- Image editing software that supports layers. Photoshop is preferred but GIMP (which is free) will work too. This tutorial however will be citing photoshop tools/commands only.
Making The Raw Border
Step 1
Prepare your work surface. Lay down some newspaper so you don't get ink on your table. It may also be a good idea to wear some old clothes just incase you splatter yourself.
Step 2
Prepare your palette. Just like an artist has a palette we need one too, something to put the ink onto. Use a separate piece of paper or an old margerine container lid, the margerine lid is better since it won't soak up the ink on you. Spread the ink out in a line on your makeshift palette.
Step 3
Run the edge of your popsicle stick lengthwise along the line of ink so that the whole edge is saturated.
Step 4
Place the ink onto your watercolour paper and gently rub it lengthwise back and forth while slowly pulling it towards you then slowly pushing it away from you. The idea is that as there is less ink it will start to leave voids and you'll get that "rough" look.
Step 5
Repeat for the remaining sides of your border. You may want to take another popsicle stick and break 1/3 of it off to use the remaining 2/3 section for the short sides of your border, this will give you a proper aspect ratio for your border. When I did it I wasn't that fussy, I knew I could correct the aspect ratio and more in photoshop. In the example below I didn't care that my "short sides" extended past the corners because I knew I would be erasing away the parts I didn't like.
 Raw scan of a border.
 Post Processing
Step 4Step 1
Scan your raw border(s) at as high a dpi as you can, if you're taking the time to do this right you'll want quality borders that you can use with future cameras that may be higher resolutions.
Step 2
Open the scan in Photoshop. Perform any straigtening/rotating you may need to. If your ink wasn't black press shft-ctrl-U to turn it black and white, or you may want to see how it looks as is first.
Step 3
Cleaning up the image. Use the eraser tool and first select a large brush with a hard edge, then start erasing away the unwanted areas. You may want to try one of the brushes that looks like spraypaint, this will give you a more irregular shape.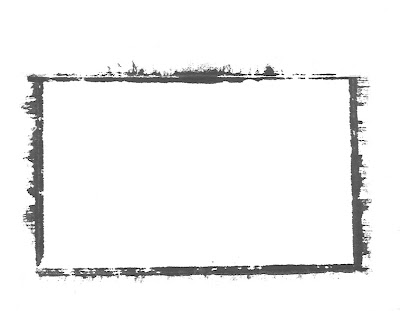 Border cleaned up using eraser tool
 Border cleaned up using eraser tool
Crop the image down to get rid of the excess white border (the border around our border ;)
How much you crop is up to you, maybe you only want the inner border left or maybe not. Its up to you.
 Border Cleaned & Cropped
Step 5
We now need to see how this is going to look. Duplicate your layer and name it "Polaroid Border Black". Set the blend mode to "Multiply". Then select your old background and delete the contents leaving a blank layer (click on background layer, then CTR-A, then delete). Now fill that layer in with a beige colour just so we can see how our blending will work.
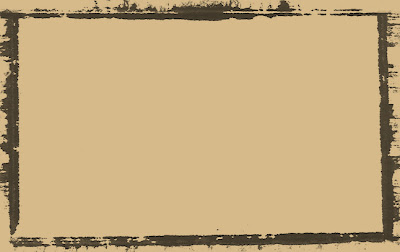 You should now have something like this
Step 6
Some people might stop here and you're welcome to if you'd like however I want to add a little more realism to the border. If you're with me, click on the Polaroid Border Black Layer and duplicate it, name it Polaroid Border White.
Step 7
Invert the colors of the new border by holding Ctr then "i", now change the layer blending mode to "Screen". Don't worry it's going to look a little strange at this point.
Step 8
With the "white" layer still selected press Ctr-A to selecte the entire canvas, then under the edit menu at the top of the screen choose Transform>Rotate 180°
Step 9
This looks better but the layer order is wrong. Drag the "Polaroid Border White" layer between the black border and the background layer.
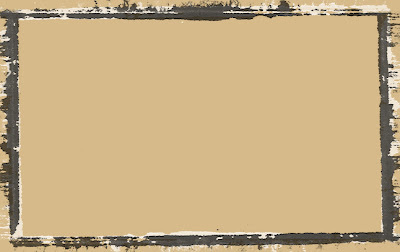 This is what you should now have roughly
Step 10
At this point the border is pretty much finished, if you want you can erase away different sections of the layers to "tweak" it a little more and you can play with opacity. When I do this I like to have an actual image under the frame so I can see what to tweak. Once the adjustments are done save this as a PSD file so that you can always change the different layers if you want to.
At this point the border is pretty much finished, if you want you can erase away different sections of the layers to "tweak" it a little more and you can play with opacity. When I do this I like to have an actual image under the frame so I can see what to tweak. Once the adjustments are done save this as a PSD file so that you can always change the different layers if you want to.
Using The Border
Step 1
Open up an image that you want to apply the border to and note the dimensions. For this example I'm using the full resolution of my Canon 40D which is 3888x2592.
Step 2
Now we're going to try to match your border to the image size your camera takes, however we want to make it just a little bigger so that the border isn't encroaching on your photo too much.
Open your Polaroid transfer border and select Image Size front he Image menu at the top of the screen. Determining the right size is tricky and may take a few attempts, start with your the dimensions from step 1 then add an extra 10% to the width and about 6% to the height. Make sure you uncheck "Constrain Proportions" box. Paste your camera image into the border and make sure the border overlaps it but that the image doesn't extend past the border. If it doesn't just "undo" back to the re size and try again. For me a good number worked out to be roughly 4120x2860 which is where I got the 10% and 6% from. Once you have it right, delete the image layer leaving only the borders and the background, change the background colour back to white, and save it as a psd file.
Step 3
Now you're ready to use it with any photo however every time you use it you will have to paste your desired image into the Polaroid frame. Make sure when you paste the photo in that you move the layer so that it is just above the background layer.
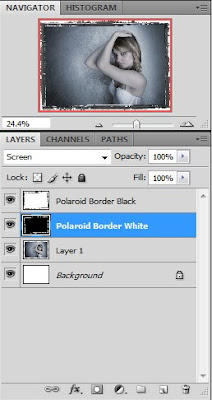 Here "Layer 1" is the photo placed correctly in the layer orders.
Step 4
Once you have it lined up right choose the SAVE AS command to save so that you don't overwrite your template file.
Once you have it lined up right choose the SAVE AS command to save so that you don't overwrite your template file.
Troubleshooting
There are 2 main things that can go wrong, both are easily fixed.
1) Your black border is too transparent even though the opacity is set to 100. If this happened its because your ink wasn't dark enough, to fix this select the black border layer and press Ctr-L to bring up the levels tool. Adjust the black slider to bring it up to a true black.
2) Your photo extends past your border but only in a few spots. Easy, just erase it away.
** The example at the top follows all the steps to the end with the added step of using additional layer containing stained parchment. This is a texture layer that was blended using multiply, opacity set to 50, and masked off to avoid contaminating the model's skin.
No comments:
Post a Comment