Showing posts with label strobist. Show all posts

Monday, May 21, 2012

Urban Guerrilla Shooting Take 3


IMG_9384_Edit
 A dilapidated cage elevator proved an amazing backdrop during my latest shoot

Who needs a studio anyway?
Eventually my basement renos will be done and I will have a proper studio to work in but chances are I'll try to avoid using it in favour of location shoots as much as I can anyway. For my latest shoot I once again set out on an urban exploring mission, shooting wherever the backdrop looked interesting, ducking into cool old buildings and busting off shots until asked to leave. Despite leaving my innocuous X100 in my camera bag this time and touting my 5DMKII in its stead I wasn't hassled once about shooting anywhere. In fact people were apologizing for getting in my way. 

Let me backtrack a little. May 1st my gallbladder decided it was going to throw a temper tantrum, it started becoming unruly about a week after my Cuba trip and landed me in the ER a few times. This time however it really outdid itself and a simple trip to the ER turned into a 3 night stay and date with a scalpel. I then had an unexpected two week holiday to recover. After going stir crazy for a week and a half I was feeling pretty good and since my camera was under my 10lb weight lifting limit I figured I'd set out on a shoot. The very pretty and incredibly photogenic model, Deanna Alyse, had just contacted me through model mayhem wanting to work with me sometime. The timing was perfect so I contacted her and made plans to shoot that upcoming weekend.

I had just had lunch that week with a photographer buddy of mine, Krystian Olszanski, and since our last co-shoot was such a blast I invited him along as well. Shooting with another photographer is great for two reasons: one you have a knowledgeable lighting assistant two: while you're lighting and they're shooting you get to see how another photographer approaches the same subject.

We all met up at a mall downtown and set off without really having a set destination in mind. We happened along a small patio beside a coffeeshop/bistro so I snapped a few quick portraits there just using available light.

Shooting as we go

At this point Krystian mentions that a pub on the next corner actually has a seldom-used (or known about) patio out back and that it might be an interesting location.

As we turn into the back alley  we both notice a nicely painted brick wall with some pallets stacked up which are screaming to be used as a backdrop.


Cutest hobo ever

Lucky for us our model was willing to get a little dirty in order for us to get our shots. Even before we busted out the flash and umbrella the subdued light of the alley was great to shoot under. It was also quite windy that day but it worked and gave some of the shots a nice dynamic.

Below is one of my favourite shots from the whole shoot, something about it just has that vintage pinup vibe to it and her innocent yet coquettish smile just completes the pose. This one was lit with off camera flash, a 580EXII triggered with Cactus V5's shooting through a 48" white umbrella. Krystian acted as my voice activated lightstand.


IMG_9212_Edit
  A definite fave from the shoot.

We probably shot at this location for a good hour, exploring every idea we could think of. While one of us was shooting the other was lighting and constantly coming up with new ideas for when it was their turn again. Often one of us would pose the model in a certain way or shoot from the a unique angle and the other would groan and say "ahhh I was going to do that on my turn". Ultimately though we both have our own style, especially once the images have been processed, so I don't think we overlapped too much.

As I stated this alley was a goldmine, turning 180 degrees the opposing wall was interesting too as you can see below.
 Every part of this alley was dripping with character.

Having tapped this alley for every angle we did eventually make our way to the back patio we'd initially set out for only to find it quite lame photowise.  Just across the street was a building I'd shot in during my last outing, since we had off-camera lighting with us this time I figured we should check it out.

Right off the bat I wanted to try a shot I'd done last time but felt I could improve upon with some added backlighting.

 Krystian lit this from behind while thinking thin thoughts.

I always love shooting in stairwells when I have the chance, there's just something about them that always yields a good shot. In the photo below we had to resort to some rather crazy lighting since we only had the one flash. Krystian stood behind the model at the top of the landing on the camera right, I held a reflector below and left out of frame which he then aimed at. The result actually looks naturally lit as if window light is providing the rimlight with ambient fill. 


IMG_9291_Edit
Strobist Trick Shot. 
While shooting on the main floor I had lamented that it would have been awesome if the elevators were the old-school style ones with the cage and attendant. At one point between poses Krystian disappeared down the stairwell and when he finally resurfaced he had a big grin.  

This is what he'd found:
IMG_9384_Edit
Looks like a scene straight out of Silent Hill

What a cool find! Not only was it a cage style elevator but it had the most amazing grunge texture on the walls from the stripped paint. Shooting with ambient left a little to be desired though, two CFL bulbs lit the elevator, one regular and one daylight balanced. For the above shot I only had to push the ISO to 400 since I was shooting my 50mm at f1.4 but for other shots I pushed the ISO to 1600. Its for this reason that I love the full frame goodness of the 5DMKII though I have to give props to my X100 that handles high ISO nicely too. Its amazing how far cameras have come with respect to ISO noise and in 10 years I'll probably look back and wonder how I ever managed with only being able to push it to 1600 :)


IMG_9481_Edit_Cast
Love cage elevators


The last photo I'm including proved very tricky, I knew I wanted to light through the cage but it was extremely difficult to light the whole face. Initially we were shooting bare flash from a distance to get those nice crisp shadows but eventually wound up using and umbrella quite close to the cage.

I apologize for the extra long blog post (which I tend to do often) but I felt this shoot warranted a full walk through. This was my third "guerrilla shoot" this year and I'm finding them to be an excellent way to shoot. By wandering around and exploring you find new cool locations, push yourself creatively to adapt to each new location, and ultimately wind up with a diverse range of photos from a single shoot. You simply can't do the same thing in the studio.

Monday, May 23, 2011

The Photographer Never Gets Photographed...


Krystian is up to bat with me and Mary as the subjects

A few months ago while talking with some photography buddies this topic came up. As a photographer you're constantly taking photos of other people and never have any photos of yourself. In an effort to combat this and give ourselves an excuse to indulge in 3 vices at once (eating, drinking, and shooting) we decided to have a portrait party. My girlfriend and I invited a few friends and two other couples over for drinks and appetizers in with photo-shoots throughout.

In total we had 3 photographers there, Krystian, Conrad, and myself. Since me and my girlfriend were hosting it I provided the bulk of the equipment just so that everyone else didn't have to lug tons of gear over.

Doing free for all shoots is a great way to play with lighting and try new things without the pressure of having to deliver. Doing so with a bunch of friends along with food and booze is even better! On a funny side note we determined that when faced with a long wine aisle at the liquor store 2 out of 3 photographers will end up buying this brand just because of the label ;)

As the night progressed and more booze was consumed people relaxed a little more and some extravagant props like a bright pink feather boa made appearances ;)

We all had a blast and finally had some decent photos of ourselves for a change. So if you're in the same boat just throw portrait party of your own!


Women and their wine...
What's a feather boa between friends?


Some highlights from the portrait party

Tuesday, July 6, 2010

Grad Portraits - On Location Shoot

Another instalment in the "why do I do this to myself series" ;) The first was the hair salon shoot where I shot 20+ models in a very short space of time. This round it was 16 grad portrait sessions at 20 min each. Ironically I scored this job because one of the hair salon shoot models referred me ;)

All joking aside it was a fun shoot, the photos turned out well and by pushing myself I learnt a thing or two.

My main concern when I accepted the job was what happens if it rains? We were shooting at an acreage an hour from where I live. I drive a Mini Cooper, not exactly the most roomy vehicle ;) I arranged to have an SUV available so I could bring out my 9ft backdrop roll. The plan was to get there an hour early and setup an indoor studio in the large garage attached to the house, this way if it did suddenly rain we could just pop in and switch to studio shots.

As the shoot approached the forecast turned from sunny to thunderstorms and rain, the night before the shoot we had the worst storm in 3 decades according to the news. Also the night before the shoot there was some issues and I was not able to use the SUV. After tossing and turning for a few hours I devised a plan to use my 5ft wide backdrop role for single shots of the grads and then use my new foldout 5x7 backdrop, something I had just received in the mail a few days prior.

Here is the setup I envisioned and in the end it was exactly how I shot.

The backdrop roll was just wide enough for some 3/4 length shots as well as some with two subjects standing close. The main light was a White Lightning Ultra 1200 fired into a 40" Steve Kaeser softbox umbrella with a second Ultra 1200 gridded and pointing at the backdrop. Every once in awhile I'd turn the gridded strobe around to rimlight the subject from the back.


After the individual and two-person shots I'd move the grad over to the horizontally placed collapsible backdrop, then I'd bring in the parents on either side for some close up portraits. The collapsible backdrop was 7ft wide (in this position) but its got rounded corners so I still struggled to shoot a group of 3 at times.

It didn't end up raining at all that day though it was quite windy earlier on in the morning, since the studio portraits were already working well I decided to shoot half outdoors and half indoors for everyone.

The outdoor photos were quite a bit easier though I did have some issues earlier on with direct sunlight. When I had scouted the location it had been overcast so I couldn't quite tell where the sun would be. All of the key locations around the yard were situated so that afternoon sunlight worked best, for the earlier shots I had to use a few alternate locations or when possible just turn the subjects so they were backlit by the sun. Fill flash was pretty much mandatory so I put my 580EXII to work.


One thing that surprised me quite a bit was the longevity of the LP-E6 battery the 5D MK II uses. I already had a 2nd battery as a backup but since Canon spec'd the LP-E6 at around 550 shots I figured I should get a 3rd spare (16 grads x 100 photos each = 1600). After going out of my way to find a store that had any in stock I didn't end up needing it at all! I shot the whole day on one battery (~1600 photos!) and still had 1/4 battery left. There aren't many devices nowadays that even live up to their specified battery performance let alone triple them! Just another reason why I'm sticking with Canon. Oh and the 580EXII lasted on just one set of Sanyo Eneloop batteries too!

Summary

Would I do it again if asked? Yes but my bid would be at least 50% higher, I realized later I had undercut myself when I gave the initial quote.

What did I do wrong? All in all not much, see "what would I do differently"

What did I do right? Brought backup gear (though it was not needed) for just about every piece of equipment. Bringing tons of bottled water to keep hydrated, when you're talking all day long directing people for 8 hrs you need lots of water. Making a trip out to the location ahead of time so I knew exactly what I was up against. Shot in RAW, due to the lighting outdoors changing minute to minute the extra exposure latitude that RAW gave me helped immensely. Gear checklists so I didn't forget anything (except a posing stool).

What would I do differently? Secure a rock-solid method of transport for my 9ft backdrop paper. I also would have brought a posing stool, I had thought of it the night before but didn't write it down on my checklist (luckily the acreage had one for me).

What did I learn? Planning for the worst case scenario is always the way to go, weather can change and helpers might bail, always have a backup plan.

Gear used:
Canon 5DMKII, 24-105mm EFIS L lens, 580EXII, White Lightning Ultra 1200 x 2, Cameron portable backdrop stand, 5ft roll of studio grey paper, 5x7 Impact Collapsible Backdrop, Yong Nuo PT04-TM wireless triggers, ASUS 1005HA netbook for dumping files.

Backup gear I took but was unneeded: Canon T2i w 18-55mm IS kit lens, Canon G10, Interfit 42" dual reflector, Cameron 400W studio strobes x 2, 3 YN460 MKII speedlights, 2 Nikon SB-26 speedlights, 6 sets of Sanyo eneloop AA batteries.

Sunday, May 16, 2010

Car Photoshoot Round 1

My '03 Mini Cooper S
The final image comprised of 8 composite shots.

Just a quick post about my first real attempt at lighting a car using off camera flash and a list of do's and don'ts from the experience.

I did this shoot with a fellow photographer friend of mine, we took turns between pressing the shutter and being human tripods holding the flashes. All in all I was quite happy with the final product. I would have liked to had a few more variations from different angles but since it was our first time we just tried to keep it simple.

My initial idea was to head out after sunset so that we didn't have much ambient to worry about, the intent was a finished image much like the one above with the car surrounded by darkness. My buddy Perry wanted to go around sunset so we could try shooting both ways and since we had plenty of time that is what we did.

Here's a shot that Perry took while it was still quite light out so no flashes were used. It shows a little more of the location we were using, we did the shoot behind one of my company's buildings since it backs a field and we know the place is quite dead on the weekends.
Image courtesy of Perry VanDongen


Gear:
Canon 5DMKII
Tripod
50mm f1.8 Prime Lens
Yong Nuo PT-104TM wireless transmitter and two receivers
Two Yong Nuo YN460MKII flashes

Do
... lock down your tripod to avoid any movement.
... keep the camera in one spot then light each aspect of the car shot by shot.
... bring fresh batteries ;)
... pick a place that is out of the way.
... use a softbox if possible to avoid bright reflections
... bring a wireless shutter release if you have one
... take the time to light the ground all the way around the car
... take lots of photos in each "pose" it only gives you more options in post
... bring a few rags to wipe down the car

Don't
... pick a spot with a lot of lights around, they'll get reflected on the car.
... shoot a dirty car, the flash lights up dust quite well ;)
... leave your aperture too wide open making the DOF less than the car's length
... forget that leaving your lights on with the car off will kill your battery
... bother trying to shoot before dusk if you want to use speedlights
... light the car at angles that will yield harsh reflections (when possible)


In the end the shots where we tried to mix ambient and strobes didn't work out too well and thinking back on it I now why. What we should have done is taken a few shots that just exposed ambient then shot faster shutter speeds to light the car with the strobes. Instead we were trying to do both at once and simply didn't have enough watt-seconds in my dinky speedlights to pull it off. Some of the "don'ts" listed were learnt the hard way, for example I accidentally left the aperture at 2.2 so the front of the car is a little soft. Also despite having detailed my car that afternoon by the time we got to the location it covered in a thin layer of dust.

The final image at the top of the post was comprised of 8 different car shots (plus a few texture/logo layers). Using the "lighten" blend mode in PS I stacked each photo and masked out the areas I didn't want to show up. This gives you amazing control and allows you to create a finished image that would most likely have been impossible to light in a single exposure.

Composites for Mini shot

For the interior shots I actually had the seat laid all the way back and sat inside moving the speedlights around while my friend snapped away. A nice surprise about the interior shots was that they hid all of the smears/fingerprints on the windows.

All in all I think we accomplished what I had in mind when we set out to do the shoot. Next time out I'll definitely do a few things differently but we did pretty good for a first attempt. In the end this was a great learning experience and since it was my own car there was no pressure, we could just play around and have fun.

Wednesday, April 7, 2010

Softbox Umbrellas from Steve Kaeser


Two 40" softbox umbrellas from www.skaeser.com

I picked these up a little while ago and have been meaning to write a review for a while but haven't had a chance.

I'll start by saying that I love softboxes, especially ones that I can use my speedlights in. Last summer (or was it the summer before?) I took the plunge and picked up the 28" Westcott Apollo softbox for speedlights after watching the Onelight Workshop DVD. Since then I've almost totally abandoned my umbrellas ;)

Obviously I was quite stoked to come across these softbox umbrellas while surfing the web, at the time of purchase you could get 2 for a measly $29.95 on sale. Unfortunately their site only listed UPS for shipping and living in Canada I've been gouged all too often by UPS's exorbitant brokerage fees. I decided to email the company and see if they'd ship USPS instead, to my delight they said they would and they sent me an invoice. They wanted$25 for USPS shipping ($5 less than UPS) and while I thought that was a little steep for a $30 item I realized the box was probably oversized so there wasn't much I could do. Fast forward a few weeks and UPS knocks on my door, no that was not a typo they still shipped UPS! I ended up getting charged another $20 for brokerage even though I went out of my way to get a USPS quote! So now I've paid $45 for shipping on a $30 item. Not pleased with this I emailed the company and have yet to get a response (about a month ago at time of writing). Thats the end of my rant, I'll get on with my review and sample images now. I just couldn't in good conscience write a review of this product without explaining some of the extenuating circumstances.

On with the review!
IMG_1073 blue w red vignette Levels n Lines
Shot with a 580EXII in Steve Kaeser Softbox Umbrella

The umbrellas came with nice carrying bags for the umbrellas, an extra that I wasn't really expecting for such a low priced item. My next surprise was the build quality which was in fact quite good! I've bought some cheap umbrellas in the past and regretted it when they nearly fell apart in my hands, these however I see sticking around for quite some time.

I couldn't wait to test them out so I arranged a quick test shoot with a girl I had actually just done a shoot with the week prior. Like the previous shoot we just did it in her apartment using a nice large section of blank white wall as a backdrop. Since the area we were shooting in was relatively small I opted to just use a single softbox umbrella.

Initial impressions:
Right off the bat I noticed that there was a lot more spill with these than with my Westcott Apollo, I'm not sure if it was due to the larger surface area or the fact that the Steve Kaeser boxes don't have a recessed panel like the Apollo. If you put a gun to my head I'd say it was probably the lack of recessed panel. This does limit you a little if you're working in a small environment but its definitely not a dealbreaker.

IMG_0967 subdued

One thing I had read on some forums was that light distribution was not equal across the whole umbrella. I really didn't find this to be that much of an issue, if there was a hotspot at the center I didn't notice it very much at all. I found the quality of light to be on par with my Westcott. As you can see from the shots my 580EXII didn't seem to have any problems filling the softbox.

I've yet to try them out with my studio strobes but would imagine they would work pretty well. I would imagine the region blocked by the head might be a little darker but I'd have to see whether it is negligible or not. The nice thing is that you don't have to go out and buy a specific speedring to use them with your equipment.


The breakdown:

Pros:
  • Cheap (provided you don't have the shipping hassles I did)
  • Well built
  • Fairly even light (some sticklers might disaggree)
  • Versatile in that either speedlights or monoblocks can be used
Cons:
  • Diffusion panel is not recessed and results in spill
  • Diffusion panel is not removable for cleaning etc

Conclusion:
For the price you'd be crazy not to have at least one f these in your bag. They're as small and portable as a regular umbrella yet give you the effects of a softbox. I still like my Westcott better but when you think you could get 8 of these for the same price I'd say start with a set of these instead.

Improvements:
If there were ever a rev 2.0 made I'd suggest making this unit convertible so it could be used as a shoot through as well, if they also made the diffusion panel removable it could then also be used as a reflective umbrella making it one of the most versatile pieces of gear ever!

A few parting shots ;)

IMG_1273 red

IMG_1298 blue

Sunday, March 21, 2010

Abandoning PC Sync for 1/8" stereo jacks


After reading David Hobby's recent post regarding his dislike for the antiquated PC Sync socket I sat laughing and saying to myself I couldn't agree more. This poorly designed connector has been around since the 1930's, it doesn't lock in place, and they wear out quickly. If you're unfortunate enough to break one or wear it out to the point it is unusable its next to impossible to find a replacement socket. I've worked in the electronics field for nearly a decade now and pride myself on being able to source obscure parts yet I still can't find a decent source for these.

Anywho as Mr.Strobist himself said its time for the PC Jack To DIE!

I recently picked up some new (to me anyway) White Lightning studio strobes which came with some rather well used cords, one of which was completely ready for retirement. I decided to just make some new cords but thought I'd improve the design. The existing cord was a 1/4" mono jack to a PC sync jack, I opted to make a new set but replace the PC sync end with a readily available 1/8" stereo jack instead.

In for a penny, in for a pound I decided to convert most of the rest of my equipment to 1/8" as well. When you're out shooting a gig the last thing you want is unreliable equipment and to me anything that is connected via PC sync cables is unreliable.

First up is my PT04-TM "poverty wizard" wireless triggers. These were nice and easy to mod because there is quite a lot of room inside. I didn't have any 1/8" sockets lying around but I did happen to have some stereo "Y" adapters that I could part with so I hacked them up.

If you're going to attempt something similar I'd advise you make note of the polarity, some devices work fine either way but I know my triggers are polarity sensitive. Inside the PT04-TM receiver the wire going to the center pin of the hotshoe is positive the the one going to the collar is negative. On the 1/8" jacks the tip is positive and the sleeve is negative. In my case I used stereo jacks because that is all I had lying around so I just tied the ring and sleeve together to make it mono. The photo at the top of the article shows the almost finished product, later I added epoxy where the wire entered the case of the receiver. This ensured the wire couldn't accidentally get yanked out and tear a bunch of the wiring.

Closeup of 1/8" socket mod of the PT04-TM receiver

Here is a zoomed in photo of the internal wiring, these particular PT04-TM receivers already had a PC Sync mod done to them when I got them. The heat shrink on the cables wasn't crucial but its better to play it safe when possible.

Next up was my hotshoe-to-pc sync adapter (shown in top picture), for this one I rummaged around until I found an old Sony Walkman I had lying around and gutted it for the 1/8" headphone socket. Normally I would have just went to one of the local electronic supply companies but it was the weekend and I couldn't bring myself to pay 5 times as much at Radioshack. Luckily the adapter was one of the larger ones so there was ample room inside to fit the socket, unfortunately I didn't take a photo of the internals. The process is the same anyway, center pin is positive and collar is negative.

Two Seagul SYK-3's modded with bypass switches and 1/8" sockets

The final gear to mod were two optical slaves I had purchased here for dirt cheap, when I picked them up I had this mod in mind since they're the cheapest hotshoe housing I could find ($5.55) with the added bonus of being optical slaves. The only issue is that I needed to add a switch to turn off or on the optical slave part. I could have just placed a piece of electrical tape over the sensor eye to disable it however I needed to electrically disconnect the slave circuit if I wanted to use this on my 580EXII. For some reason the 580EXII doesn't like cheap optical slaves and will only fire once, the flash then has to be turned off and on again before it will fire again.

I've finally cast off the shackles of the PC sync socket, all that lay before me is reliability and reasonably priced cables ;)

On a side note I picked up some sweet cases from Don's Photo in Saskatoon, these were in the bargain bin for around $10. They come with customizable foam and are rock solid little cases. I was tired of my triggers getting banged around in my bag so I thought I'd protect them a little.


My PT04-TM's and a few odds & ends housed in a Vanguard Swing 8 hard case.

Hopefully if we shout loud enough about how much the PC sync connector sucks the manufacturers will finally start to include 1/8" sockets in their products. Heck even a mini 2.5mm socket like most cell phones have would be fine, as long as its a connector that is abundantly available. Now if only everything would start using mini-usb connections for charging ports...

Monday, January 25, 2010

Guide to getting into off-camera lighting

**Originally written for the camera club at my work**

So you took the plunge and bought a digital SLR, you've been having fun shooting in available light but you want to start playing around with studio lighting, this is your poor man's guide to getting started. If you're not poor you may want to look into starter studio lighting kits (starting around $600-$700) however this guide only covers speedlights which are cheaper and more portable & versatile than a full studio setup.

Requirements:
Camera with a hotshoe or PC Sync socket
Internet Connection (optional but you'll want to be doing lots of reading)
Budget:$100-400 depending on how far you want to go

1) Flash - $50 and up depending. You'll need a flash to start off with, we'll be using them like studio strobes so we don't need the fancy "auto ttl" style that cost big $$ (I made the mistake of buying the fancy ones and I never use any of those features). Look on ebay or kijiji for older flashes, it doesn't matter which brand because we'll be triggering them wirelessly. I snagged two Nikon SB-26's off kijiji for $100 each which was a good price, I wish I would have just bought these instead of my fancy ones and saved hundreds of dollars. Make sure that have the following features:

  • Manual power settings - most are adjustable from 1/1 (full power) down to 1/64th or 1/128th in 1/2 or 1/3 F-stop increments

  • Adjustable head that tilts and pan

  • PC Sync Socket – Not completely necessary but a very handy feature to have

  • A standard hotshoe - Some older Vivitar flashes as well as others have an oddball hotshoe that require an adapter to fit in a normal hotshoe, its best to simply avoid these ones.

  • TTL trigger voltage -ie 5 or 6V, anything below 12V or so should be safe. Some older flashes can be up to 600V and can fry equipment so never use older flashes directly on your camera. You can check this with a volt meter by charging the flash to fire (set it to the lowest power incase you get zapped) then use the DC setting on the meter to check between the side pin and the center pin. Its kinda hard to describe in text, hopefully this picture makes it clearer. If you're buying on ebay make sure to ask about the trigger voltage if it is not listed, don't risk buying it if you can't be sure. If you're buying it off of kijiji then bring some batteries and a meter along to test it out yourself

Some suggestions on decent older flashes to look for would be Nikon SB-26's or 28's (Nikon flashes are great because they have built in optical slave triggers*), Canon 540EZ, Vivitar 285 (be careful as older model 285's have high trigger voltages). If you want to buy new flashes but don't want to break the bank checkout www.bhphotovideo.com and look at 3rd party brands like Bower or Nissin, $150 will get you a Nissin that is comparable to a $600 Canon EXII and still has all the ETTL-II auto features. *More about Optical Slaves in the next section Triggering Options

2) Triggering Options – Prices vary

Alright so now you have a flash but still no way to trigger it remotely, there are a few options that can be done cheaply:


  • Wireless triggers – Starting at $20-30

    This is the method I'd recommend hands down. The “gold standard” in photography for triggers are Pocket Wizards but they cost around $300 for each transceiver and you need at least 2 to start. Lucky for us our friends in China have made affordable versions for $20-$30 a pair (includes transmitter and receiver). The triggers I recommend are the PT-04 model, some manufacturer makes these and various companies put their logo on them (YongNuo, Jiansi etc). At the time of writing this article you can pick up three (as show in the image below) for $34.99USD with free shipping on ebay. People sometimes jokingly refer to these triggers as “Poverty Wizards”, some say that they're not as reliable as their pricey alternative but I've never had any issues. I have 4 sets and I use them on professional jobs without any worries, I normally only use 2 at a time and the other 2 are backups. With a bit of modification you can even extend the range by adding an antenna to the transmitter although even un-modded you'll get 50-100ft.

Pros:

Cheap, no wires, flashes aren't likely to get accidentally triggered by other photographers, does not need line-of-sight.

Cons:

The cheap “poverty wizards” may have quality issues (though I haven't experience it), batteries will eventually need replacing (but last over a year at least)– AAA's in the receiver are easy to find but the transmitter takes 23A 12V which are harder to find – Here's a link to a 5-pack for $3.48USD http://www.dealextreme.com/details.dx/sku.475

  • Optical Slaves
    I mentioned optical slaves earlier, some flashes come with built in optical slaves but you can also buy little adapters. This is a very cheap method of firing flashes off-camera however they have some big problems with digital cameras!! These triggers were great back in the days before digital however the new flash systems do not work well with them. The reason the flashes on new cameras fire a pre-flash before the main burst of light, this pre-flash lets the camera's sensor determine the proper power required for a good exposure. If you're trying to trigger the slave with your camera's built in flash the pre-flash will trip the slave and by the time the main burst comes the slaved flash will have already fired.

    There are ways around this however. Buy a specially designed optical slave which accounts for this (Wein Digital Peanut) for around $100, OR the cheaper route is to trigger it with another flash that is in manual mode and therefore will not emit this pre-flash. Often I'll use only one wireless trigger on my Canon 580EXII and use it to trigger my Nikon SB26's which I've set to slave mode.


Pros:

Wireless, No batteries (for the basic ones, not sure about the advanced ones), very simple


Cons:

Doesn't play nice with digital flashes using ETTL (pre-flash), needs line-of-sight, will be triggered by any other flashes present (ie other photographers in the area)


  • PC Sync cables (oldschool)

    $5 or less for very short cheap ones to $50+ for longer brand name ones

    Last on the list is the wired solution. Its not a bad idea to have a few of these cables around as a last resort but I wouldn't suggest using them as your primary means of firing your flash. The cables aren't that cheap (even though they should be) and the connector they use is very poorly designed, I don't know why its even still around when a simple headphone jack would work better and is abundant. These cables have a lifespan and become intermittent over time, the connector doesn't lock in place so they often slip out. All in all the worst of the options.

* I'd still recommend buying a few short PC sync cables especially if you get the PT-04 wireless triggers that have the socket, as crappy as they are they can still save your a$$ is a pinch ;)

Pros:

Simple and straightforward


Cons:

Not really that cheap especially for longer cables, connections deteriorate over time and become intermittent, connection is not secure and can fall out while shooting.


3) Light Stands & Adapters

Now that you have a flash or flashes and can trigger them remotely you'll need to put them on something. Investing in at least one proper light stand is recommended but cheap tripods can fill in as well depending on your needs. If you're wanting to special softboxes etc a light stand is the way to go but if you just want to mount the flash or even add an umbrella or two a tripod will suffice. Places like XS cargo or the various liquidation centers often have tripods for around $20. With that said you can find cheap ones at www.bhphotovideo.com starting at $20 USD + S&H as well. Cheap swivels can be found for ~$10 each online, “normal” ones are about $30 each. Post adapters like the 1/4” receiver can actually be pretty pricey so just try to buy a swivel that comes with one ;)
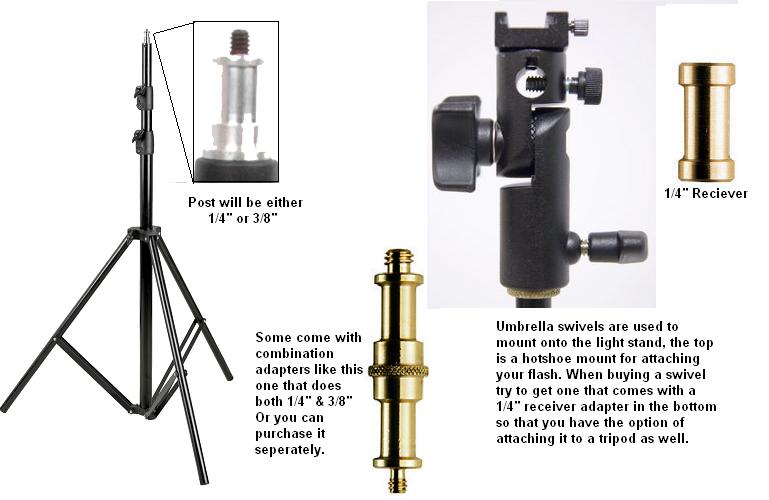
Shown here is an umbrella mounted on a tripod using an umbrella swivel. Note that if you are using a PT-04 wireless trigger it will add more height to the flash and it won't hit the center of the umbrella, this is where a small PC Sync cable between the receiver and flash comes in very handy.

4)Basic Light Modifiers (Umbrellas, Softboxes, Grids, Snoots, “Stoffen”etc)

If you're getting into off camera flash chances are the look you're going for isn't going to be produced with just a bare flash. Flashes emit light from a small source which means harsh shadows. The sun is a small point of light high up in the sky and you see how harsh mid-day shadows can be however on overcast days the whole sky becomes the light source because the clouds are “diffusing” the light. The most common light modifiers are trying to do the same thing, turn a small light source into a larger one.


Umbrellas – Starting around $10 and going way up from there depending on brand/size/type

These are one of the most common and most basic light modifiers, they are simple and they work well.

They come in a few different flavours: Reflective, Shoot-thru, and Reversible

  • Reflective umbrellas are normally white on the inside and black on the other side, you shoot the flash into them and use the reflected light.

  • Shoot-thru is just how it sounds, you shoot the light through the umbrella.

  • Reversible umbrellas are basically a hybrid, they have a covering that can be removed so they can work as reflective or shoot-thru


Softboxes – Starting around $100 and going way up from there depending on brand/size/type

These are similar to umbrellas but give a slightly more even light, in addition they are more directional so you have finer control to avoid spill. If you're shooting with speedlights (ie flashes that are designed to mount onto your camera's hot shoe) your best bet for a softbox would be the 28” Apollo from B&H for $114USD. If you plan on getting one there are two items that B&H sells, for reasons unknown to me one item is cheaper AND it comes with an umbrella swivel for mounting your flash. Look for B&H item #WEASLK


Grids, Snoots, and Gridded Snoots ;)

These modifiers are used for restricting light, they're used various circumstances like back/edge lighting where you want to light up just the back of a person's hair without having the flash produce glare in your lens from spill. Other uses are for lighting backdrops behind a subject to create a spherical gradient. Basically any time you want to light a specific area without having light spill into other regions you'll be reaching for one of these. If you're the crafty type these can be easily made from commonly available items (hint use this as an excuse to go to your local pub to find black straws).


Stoffen aka Omnibounce

Stoffen is actually a company but just like “Kleenex” its become synonymous with this light modifier. For a simple piece of plastic the actual Stoffen Omnibounce is ridiculously over priced, you can find knockoffs that will do just as well or you can find ways to make your own by searching online. If you do buy a knockoff make sure you get the proper one for your flash as they are shaped differently depending on the brand and model.

These are used to simulate a “bare bulb” flash, they produce close to a 360°x360° light source. It is best used in smaller rooms where it bounces around off walls and ceilings to illuminate the whole room. Often you'll see paparazzi and journalists using them in completely the wrong way ;) They'll use them outside where there is nothing to bounce the light off of, in this instance they are just wasting 2-3 stops of light and overworking their flashes.

5)Resources for learning to light better

Having all of this gear means nothing if you don't know what to do with it, in this section I'll outline some great on-line resources for learning how to light.


  • www.strobist.com

    A blog created by former newspaper photographer David Hobby, a few years ago he quit his day job to try his hand at blogging and now has one of the most visited websites for photographers on the internet. To say this site is a goldmine of knowledge is an understatement, David has been kind enough to create FREE course material. TheI suggest starting with his Lighting 101 series and going from there. The lighting 101 material starts off essentially where this guide does, with the equipment you'll need. From there it goes on to cover lighting basics onward to more advanced techniques. Thousands of people have got their start in lighting by visiting this blog.

Strobist DVD Semimar: If you can afford it (or if you can find someone willing to lend you a copy) this 8 DVD set covers all of the Lighting 101 information. If you find the online written material hard to follow then this DVD will help a lot by showing you visually.


Strobist on Flickr (http://www.flickr.com/groups/strobist/) With nearly 70,000 members the strobist group on flickr is a very active cult community of fellow lighting enthusiasts. The group showcases other strobists work, mostly as they progess through the various assignments on the

strobist material, all shots posted are required to include information (settings) on how they took the shots so its a great place to learn and be inspired. There is also a discussion portion where topics range from troubleshooting equipment to “how would you edit this photo” to building your own DIY gear. Everyone is eager to help and seem nice enough (unlike a lot of other online forums) so if you get stuck along the way to learning how to light like a pro you should stop by here and get some help.


  • Onelight DVD Seminar (www.onelightworkshop.com) by Zach Arias

    Inline with the strobist “movement” Zach has put together a 2 disc seminar that follows him through various types of location shoots while explaining lighting concepts. He got his start shooting bands in Atlanta and one day decided to quit his job at Kinkos to got at it full force, the gamble paid off in spades. This seminar doesn't “hold your hand” as much as the Strobist dvds but it has a higher energy to it and he does shoots that are more exciting. Definitely worth a watch if you can afford it or can borrow a copy from someone who has it.

    Zach also has an online blog that is worth checking out at www.zarias.com


  • www.diyphotography.net

    This is a neat little website (or blog rather??) that collects tidbits of great info from around the net. Normally geared towards making your own gear on the cheap this site is worth checking out periodically to see whats new in the DIY world.


Friday, May 22, 2009

Hair Salon Shoot

27 Models. 3 Days. 90 ft sq workspace on location. 20"x30" prints required.

Ad mock up showcasing some of the finished photos


I had been getting my hair cut at this place since highschool and after 6 years and countless business cards I finally landed the job. I'll admit that I was a little nervous but I new I had the technical skills and (most of) the equipment necessary to accomplish it.

Prep Work

What are the major considerations for showcasing hair and hairstyles?
  • Adequate back lighting to bring out the hair
  • Small apertures to ensure all the hair is tack sharp
  • Low ISO to preserve sharpness in poster size enlargements
  • Enough overall light to allow for the previously mentioned aperture and ISO
Considerations for this shoot in particular?
  • Long days full of shooting, will batteries hold up (both cameras and flashes)?
  • Do I need more memory cards?
  • Can the 40D handle 20x30 enlargements of portraits?
I am a worry wart by nature, because of this I often over plan things. In this case it proved to make things much much easier. The worry over batteries: I have 3 for my 40D which should suffice. Rechargeable AA's for the flashes? I don't know since I've never shot for 8hrs straight before, to be safe I picked up an extra 4 sets of 4 and 2 chargers (bringing my total to 8 sets). Memory cards: I should be good with two 4GB, a 2GB, and two 1GB cards plus my laptop to dump them if I need to. My Canon 40D handling enlargements: At first I wasn't sure, I had done landscapes that size but portraits seem to need to retain more sharpness. I decide to do a test print from a recent shoot and am content with the results, its on the upper limits of this camera but doable. Prior to the test print I was thinking about using my Yashica 635 medium format TLR, luckily I didn't have to (the film costs would have added up).

Over the last year I've been following the Strobist blog which really helped take some of the edge off regarding the lighting since I've learned quite a bit. Also as a result of that blog I have a pretty portable setup to draw on should I need it.

I realized that since I would be shooting on location I would need a suitable backdrop, initially I thought since the photos will be primarily head and shoulders I wouldn't need much for a backdrop. I figured that I'd just bring a white sheet and do the rest in post. Further thinking raised two questions: how professional is this going to look if I show up with a bedsheet backdrop and since I'm shooting at small apertures aren't all the wrinkles going to be in focus too? I could nuke it but I don't want risk to burn away the edges of the hair. OK so no bedsheet, I need a better solution. $215 later I'm a proud owner of a Cameron portable backdrop kit, with a 3 section crossbar it can accommodate a full 9ft roll or by taking a section out a half roll of seamless background paper. In addition I was pleasantly surprised to find that the two side poles were essentially lightstands, that was a bonus because I'd been wanting to pick up more. I've since found cheaper versions (i.e. less expensive, not quality) of this backdrop kit online at B&H and other places, I needed mine quick so I didn't have a choice.

Choosing a lighting setup

Now I've got the gear that I need to shoot this, I can start thinking more about the lighting configuration I will need. I've got two 400W studio strobes if I need them, however they are entry level ones and do not allow much control (full, 1/2, 1/4 that's it). I've also accumulated a number of flashes (damn strobist addiction) so I have a Canon 580EXII, 430EXII, 540EZ, and two Nikon SB-26's. For triggering I have 4 sets of YongNuo PT04TM "poverty wizards" and if I need to use it both of the Nikons have built in optical slaves.

Having not worked with the battery powered speedlights too much I really have no idea how fast the batteries drain. Because of this I start thinking it might be wise to bring in at least one of my studio strobes.

I decide to do a test shoot using one 400W strobe in a softbox directly above the camera and then a speedlight with a gridspot on it to kick up the hair. This allows nice soft lighting yet still allowing shadows to keep it interesting and three dimensional. A close friend of mine, and frequent guinea pig of mine, was nice enough to come over for a quick test shoot.

Test shoot to showcase hair 1
Lighting Test - Two Light Sources

Within a few attempts I managed to get the lighting roughly how I wanted it, there was nice a nice sheen to the hair and with the seamless background I could remove frizz if necessary.

At this point I can breath a little easier, I know my lighting setup now and should be ready to go.

The Shoot

A week later it was time for the main event, I was asked to come setup a day in advance. As it turned out due to a stylist going away on holidays the next day I was asked to shoot one model as well. This worked out to be a good test shoot to make sure everything was working, also since there was only one person there wasn't a rush. The shots turned out decent, I had highlights in the hair and the face was pleasantly lit. My stress level dropped significantly at this point.

That night as I was laying in bed I started to stress again for no reason. I figured I should put another speedlight on the other side to balance it out, if I found my batteries were depleting quickly I could get rid of it.

Revised setup: 1 Softbox above camera @1/2 power, 2 gridded speedlights behind model on opposite sides @1/8

This turned out to work better, the 2nd speedlight added more dimension to the photo. As you can see in the photo above I did not have much space to work with ;)

We had slated 30min per model which at first I thought was going to be pushing it, as it turned out each sitting only took 10-15min and I was getting 50-70 shots of each model. My fears regarding battery life turned out to be unwarranted. I could shoot most of the day at 1/8 power before my recycle time started to become an issue, at which point I simply tossed them in the charger and plugged in a new set. I only really needed the 4 sets I already had. Better safe than sorry. I should also point out that I had zero misfires with the cheap $20 per set wireless triggers I was using. Twice in three days I had them fire when I wasn't shooting but I'll take that over a missed trigger anyday, I highly recommend them. If you click the link it will take you to dealextreme, I should point out though I ordered my last 2 sets off ebay because dealextreme ran out. I was pleasantly suprised to find the ebay ones had pc sockets on the recievers which my earlier onese did not, these however were $30/set but worth it for the sockets.

Post Production
Minor adjustments in lightroom to correct the exposure and bring up any lost detail in the hair. The real work began in photoshop, aside from the standard "airbrushing" of blemishes etc the most challenging aspect was frizz removal. No matter how careful the hairstylist is there will always be some frizz, for these shots though I wanted them to look perfect. In the end I found going in by hand with the heal brush set to replace worked the best, it was tedious but it yielded great results. For the background I just made some arcs in white, blurred them out, then masked around the model. I actually made a variety of backgrounds but in the end the client decided to go with the "swoosh" for all of the shots. I was left to choose what background colour I thought would match the best. I tried to keep it subtle so as not to overpower the model, sticking to complimentary and analogous hues using the colour wheel.

Conclusion
When the dust finally settled I was quite happy with how everything turned out, most importantly however my client liked the photos and was happy with the outcome. The previous photos that were up in the salon I found to be a little too "safe", the background was pure white and the lighting too even. Coming into this job I wanted to set myself apart, use slightly more dramatic lighting to give dimension as well as kicking up the backgrounds a little. Hopefully in a few years I'll be asked to do it again, until then I never want to shoot 27 models in such a short period of time ;)

Friday, April 17, 2009

DIY Ringflash for approx $20


I actually made this tutorial by taking stills from sketchup google's free 3d rendering program. Its very handy for designing projects like this, it lets you see how everything is going to fit together first. Hope you like it, I'll hopefully post some sample images soon.