**Originally written for the camera club at my work**
o you took the plunge and bought a digital SLR, you've been having fun shooting in available light but you want to start playing around with studio lighting, this is your poor man's guide to getting started. If you're not poor you may want to look into starter studio lighting kits (starting around $600-$700) however this guide only covers speedlights which are cheaper and more portable & versatile than a full studio setup.
Requirements:
Camera with a hotshoe or PC Sync socket
Internet Connection (optional but you'll want to be doing lots of reading)
Budget:$100-400 depending on how far you want to go
1) Flash - $50 and up depending. You'll need a flash to start off with, we'll be using them like studio strobes so we don't need the fancy "auto ttl" style that cost big $$ (I made the mistake of buying the fancy ones and I never use any of those features). Look on ebay or kijiji for older flashes, it doesn't matter which brand because we'll be triggering them wirelessly. I snagged two Nikon SB-26's off kijiji for $100 each which was a good price, I wish I would have just bought these instead of my fancy ones and saved hundreds of dollars. Make sure that have the following features:
Manual power settings - most are adjustable from 1/1 (full power) down to 1/64th or 1/128th in 1/2 or 1/3 F-stop increments
Adjustable head that tilts and pan
PC Sync Socket – Not completely necessary but a very handy feature to have
A standard hotshoe - Some older Vivitar flashes as well as others have an oddball hotshoe that require an adapter to fit in a normal hotshoe, its best to simply avoid these ones.
TTL trigger voltage -ie 5 or 6V, anything below 12V or so should be safe. Some older flashes can be up to 600V and can fry equipment so never use older flashes directly on your camera. You can check this with a volt meter by charging the flash to fire (set it to the lowest power incase you get zapped) then use the DC setting on the meter to check between the side pin and the center pin. Its kinda hard to describe in text, hopefully this picture makes it clearer. If you're buying on ebay make sure to ask about the trigger voltage if it is not listed, don't risk buying it if you can't be sure. If you're buying it off of kijiji then bring some batteries and a meter along to test it out yourself

Some suggestions on decent older flashes to look for would be Nikon SB-26's or 28's (Nikon flashes are great because they have built in optical slave triggers*), Canon 540EZ, Vivitar 285 (be careful as older model 285's have high trigger voltages). If you want to buy new flashes but don't want to break the bank checkout www.bhphotovideo.com and look at 3rd party brands like Bower or Nissin, $150 will get you a Nissin that is comparable to a $600 Canon EXII and still has all the ETTL-II auto features. *More about Optical Slaves in the next section Triggering Options
2) Triggering Options – Prices vary
Alright so now you have a flash but still no way to trigger it remotely, there are a few options that can be done cheaply:
Wireless triggers – Starting at $20-30
This is the method I'd recommend hands down. The “gold standard” in photography for triggers are Pocket Wizards but they cost around $300 for each transceiver and you need at least 2 to start. Lucky for us our friends in China have made affordable versions for $20-$30 a pair (includes transmitter and receiver). The triggers I recommend are the PT-04 model, some manufacturer makes these and various companies put their logo on them (YongNuo, Jiansi etc). At the time of writing this article you can pick up three (as show in the image below) for $34.99USD with free shipping on ebay. People sometimes jokingly refer to these triggers as “Poverty Wizards”, some say that they're not as reliable as their pricey alternative but I've never had any issues. I have 4 sets and I use them on professional jobs without any worries, I normally only use 2 at a time and the other 2 are backups. With a bit of modification you can even extend the range by adding an antenna to the transmitter although even un-modded you'll get 50-100ft.

Pros:
Cheap, no wires, flashes aren't likely to get accidentally triggered by other photographers, does not need line-of-sight.
Cons:
The cheap “poverty wizards” may have quality issues (though I haven't experience it), batteries will eventually need replacing (but last over a year at least)– AAA's in the receiver are easy to find but the transmitter takes 23A 12V which are harder to find – Here's a link to a 5-pack for $3.48USD http://www.dealextreme.com/details.dx/sku.475
- Optical Slaves
I mentioned optical slaves earlier, some flashes come with built in optical slaves but you can also buy little adapters. This is a very cheap method of firing flashes off-camera however they have some big problems with digital cameras!! These triggers were great back in the days before digital however the new flash systems do not work well with them. The reason the flashes on new cameras fire a pre-flash before the main burst of light, this pre-flash lets the camera's sensor determine the proper power required for a good exposure. If you're trying to trigger the slave with your camera's built in flash the pre-flash will trip the slave and by the time the main burst comes the slaved flash will have already fired.
There are ways around this however. Buy a specially designed optical slave which accounts for this (Wein Digital Peanut) for around $100, OR the cheaper route is to trigger it with another flash that is in manual mode and therefore will not emit this pre-flash. Often I'll use only one wireless trigger on my Canon 580EXII and use it to trigger my Nikon SB26's which I've set to slave mode.

Pros:
Wireless, No batteries (for the basic ones, not sure about the advanced ones), very simple
Cons:
Doesn't play nice with digital flashes using ETTL (pre-flash), needs line-of-sight, will be triggered by any other flashes present (ie other photographers in the area)
PC Sync cables (oldschool)
$5 or less for very short cheap ones to $50+ for longer brand name ones
Last on the list is the wired solution. Its not a bad idea to have a few of these cables around as a last resort but I wouldn't suggest using them as your primary means of firing your flash. The cables aren't that cheap (even though they should be) and the connector they use is very poorly designed, I don't know why its even still around when a simple headphone jack would work better and is abundant. These cables have a lifespan and become intermittent over time, the connector doesn't lock in place so they often slip out. All in all the worst of the options.
* I'd still recommend buying a few short PC sync cables especially if you get the PT-04 wireless triggers that have the socket, as crappy as they are they can still save your a$$ is a pinch ;)
 Pros:
Simple and straightforward
Cons:
Not really that cheap especially for longer cables, connections deteriorate over time and become intermittent, connection is not secure and can fall out while shooting.
3) Light Stands & Adapters
Now that you have a flash or flashes and can trigger them remotely you'll need to put them on something. Investing in at least one proper light stand is recommended but cheap tripods can fill in as well depending on your needs. If you're wanting to special softboxes etc a light stand is the way to go but if you just want to mount the flash or even add an umbrella or two a tripod will suffice. Places like XS cargo or the various liquidation centers often have tripods for around $20. With that said you can find cheap ones at www.bhphotovideo.com starting at $20 USD + S&H as well. Cheap swivels can be found for ~$10 each online, “normal” ones are about $30 each. Post adapters like the 1/4” receiver can actually be pretty pricey so just try to buy a swivel that comes with one ;)
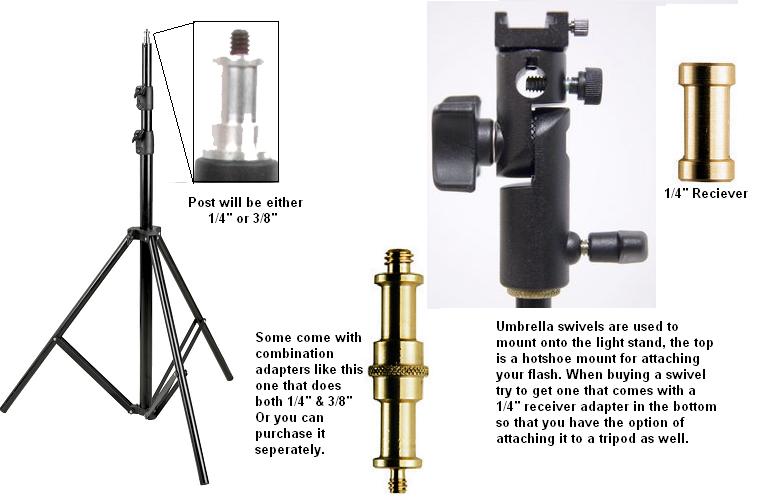
Shown here is an umbrella mounted on a tripod using an umbrella swivel. Note that if you are using a PT-04 wireless trigger it will add more height to the flash and it won't hit the center of the umbrella, this is where a small PC Sync cable between the receiver and flash comes in very handy.

4)Basic Light Modifiers (Umbrellas, Softboxes, Grids, Snoots, “Stoffen”etc)
If you're getting into off camera flash chances are the look you're going for isn't going to be produced with just a bare flash. Flashes emit light from a small source which means harsh shadows. The sun is a small point of light high up in the sky and you see how harsh mid-day shadows can be however on overcast days the whole sky becomes the light source because the clouds are “diffusing” the light. The most common light modifiers are trying to do the same thing, turn a small light source into a larger one.
Umbrellas – Starting around $10 and going way up from there depending on brand/size/type

These are one of the most common and most basic light modifiers, they are simple and they work well.
They come in a few different flavours: Reflective, Shoot-thru, and Reversible
Reflective umbrellas are normally white on the inside and black on the other side, you shoot the flash into them and use the reflected light.
Shoot-thru is just how it sounds, you shoot the light through the umbrella.
Reversible umbrellas are basically a hybrid, they have a covering that can be removed so they can work as reflective or shoot-thru
Softboxes – Starting around $100 and going way up from there depending on brand/size/type
 These are similar to umbrellas but give a slightly more even light, in addition they are more directional so you have finer control to avoid spill. If you're shooting with speedlights (ie flashes that are designed to mount onto your camera's hot shoe) your best bet for a softbox would be the 28” Apollo from B&H for $114USD. If you plan on getting one there are two items that B&H sells, for reasons unknown to me one item is cheaper AND it comes with an umbrella swivel for mounting your flash. Look for B&H item #WEASLK
Grids, Snoots, and Gridded Snoots ;)
 These modifiers are used for restricting light, they're used various circumstances like back/edge lighting where you want to light up just the back of a person's hair without having the flash produce glare in your lens from spill. Other uses are for lighting backdrops behind a subject to create a spherical gradient. Basically any time you want to light a specific area without having light spill into other regions you'll be reaching for one of these. If you're the crafty type these can be easily made from commonly available items (hint use this as an excuse to go to your local pub to find black straws).
Stoffen aka Omnibounce
 Stoffen is actually a company but just like “Kleenex” its become synonymous with this light modifier. For a simple piece of plastic the actual Stoffen Omnibounce is ridiculously over priced, you can find knockoffs that will do just as well or you can find ways to make your own by searching online. If you do buy a knockoff make sure you get the proper one for your flash as they are shaped differently depending on the brand and model.
These are used to simulate a “bare bulb” flash, they produce close to a 360°x360° light source. It is best used in smaller rooms where it bounces around off walls and ceilings to illuminate the whole room. Often you'll see paparazzi and journalists using them in completely the wrong way ;) They'll use them outside where there is nothing to bounce the light off of, in this instance they are just wasting 2-3 stops of light and overworking their flashes.

5)Resources for learning to light better Having all of this gear means nothing if you don't know what to do with it, in this section I'll outline some great on-line resources for learning how to light.
www.strobist.com
A blog created by former newspaper photographer David Hobby, a few years ago he quit his day job to try his hand at blogging and now has one of the most visited websites for photographers on the internet. To say this site is a goldmine of knowledge is an understatement, David has been kind enough to create FREE course material. TheI suggest starting with his Lighting 101 series and going from there. The lighting 101 material starts off essentially where this guide does, with the equipment you'll need. From there it goes on to cover lighting basics onward to more advanced techniques. Thousands of people have got their start in lighting by visiting this blog.
Strobist DVD Semimar: If you can afford it (or if you can find someone willing to lend you a copy) this 8 DVD set covers all of the Lighting 101 information. If you find the online written material hard to follow then this DVD will help a lot by showing you visually.
Strobist on Flickr (http://www.flickr.com/groups/strobist/) With nearly 70,000 members the strobist group on flickr is a very active cult community of fellow lighting enthusiasts. The group showcases other strobists work, mostly as they progess through the various assignments on the
strobist material, all shots posted are required to include information (settings) on how they took the shots so its a great place to learn and be inspired. There is also a discussion portion where topics range from troubleshooting equipment to “how would you edit this photo” to building your own DIY gear. Everyone is eager to help and seem nice enough (unlike a lot of other online forums) so if you get stuck along the way to learning how to light like a pro you should stop by here and get some help.
Onelight DVD Seminar (www.onelightworkshop.com) by Zach Arias
Inline with the strobist “movement” Zach has put together a 2 disc seminar that follows him through various types of location shoots while explaining lighting concepts. He got his start shooting bands in Atlanta and one day decided to quit his job at Kinkos to got at it full force, the gamble paid off in spades. This seminar doesn't “hold your hand” as much as the Strobist dvds but it has a higher energy to it and he does shoots that are more exciting. Definitely worth a watch if you can afford it or can borrow a copy from someone who has it.
Zach also has an online blog that is worth checking out at www.zarias.com