Sunday, July 19, 2009

Everyone should have a pocket camera...

It doesn't matter if you have the most amazing whiz bang billion mega pixel uber-DSLR on the planet, it won't mean a lick if you don't have it with you when you need it. I don't know about you but my pockets aren't big enough to carry my 5DMKII around with me wherever I go and I probably wouldn't feel safe carrying it around everywhere anyway.

Enter the point and shoot camera, the much laughed at kid brother to our "serious" cameras. With technology getting better by the nano-second it might be time to re-evaluate the pint size light digitizer. There are a number of reasons to have a decent P&S around, the biggest is obviously size and portability.

Point and shoots are often relegated to candid snapshots at birthdays and drunken party picks etc but they don't have to be. In this post I'll speak out for the little guy and pitch it's story and hopefully sell you on the ideas and views I've arrived at.

1)Size - Obviously this is one of the biggest advantages that P&S camera have over their bulkier brothers. Small enough to fit into a shirt pocket, there is no reason why you can't have a camera on you at all times.
My SD780IS in a slightly modified Altoids Mint Tin - a nice cheap protective case

2) Video - While some video cameras moonlight as still cameras, often with very poor results, point & shoots do a marvelous job as video cameras for the average person's needs. The trend now is going towards HD video which makes them all the more attractive. There has been a few times when I've sent photos or video clips into the local news simply because I was the only one who captured a spur of the moment event. Case in point, a few weeks ago two moose wandered into our parking lot, on a whim I took a clip and sent it in. They ran it the next day and I then had the newspaper calling me to see if they could use it on their website. Did I get paid, no, but it got my name out there and maybe my website got a little boost in traffic.
Little clip from my SD780IS of two moose wandering into our parking lot at work

3) Macro - With their small lenses and sensors P&S cameras have an advantage when it comes to taking macro photographs. Its not unheard of to have a 1cm minimum focal distance when the camera is placed into macro mode.
<span class= <span class=
Shot with my G10 at the Mendel Conservatory

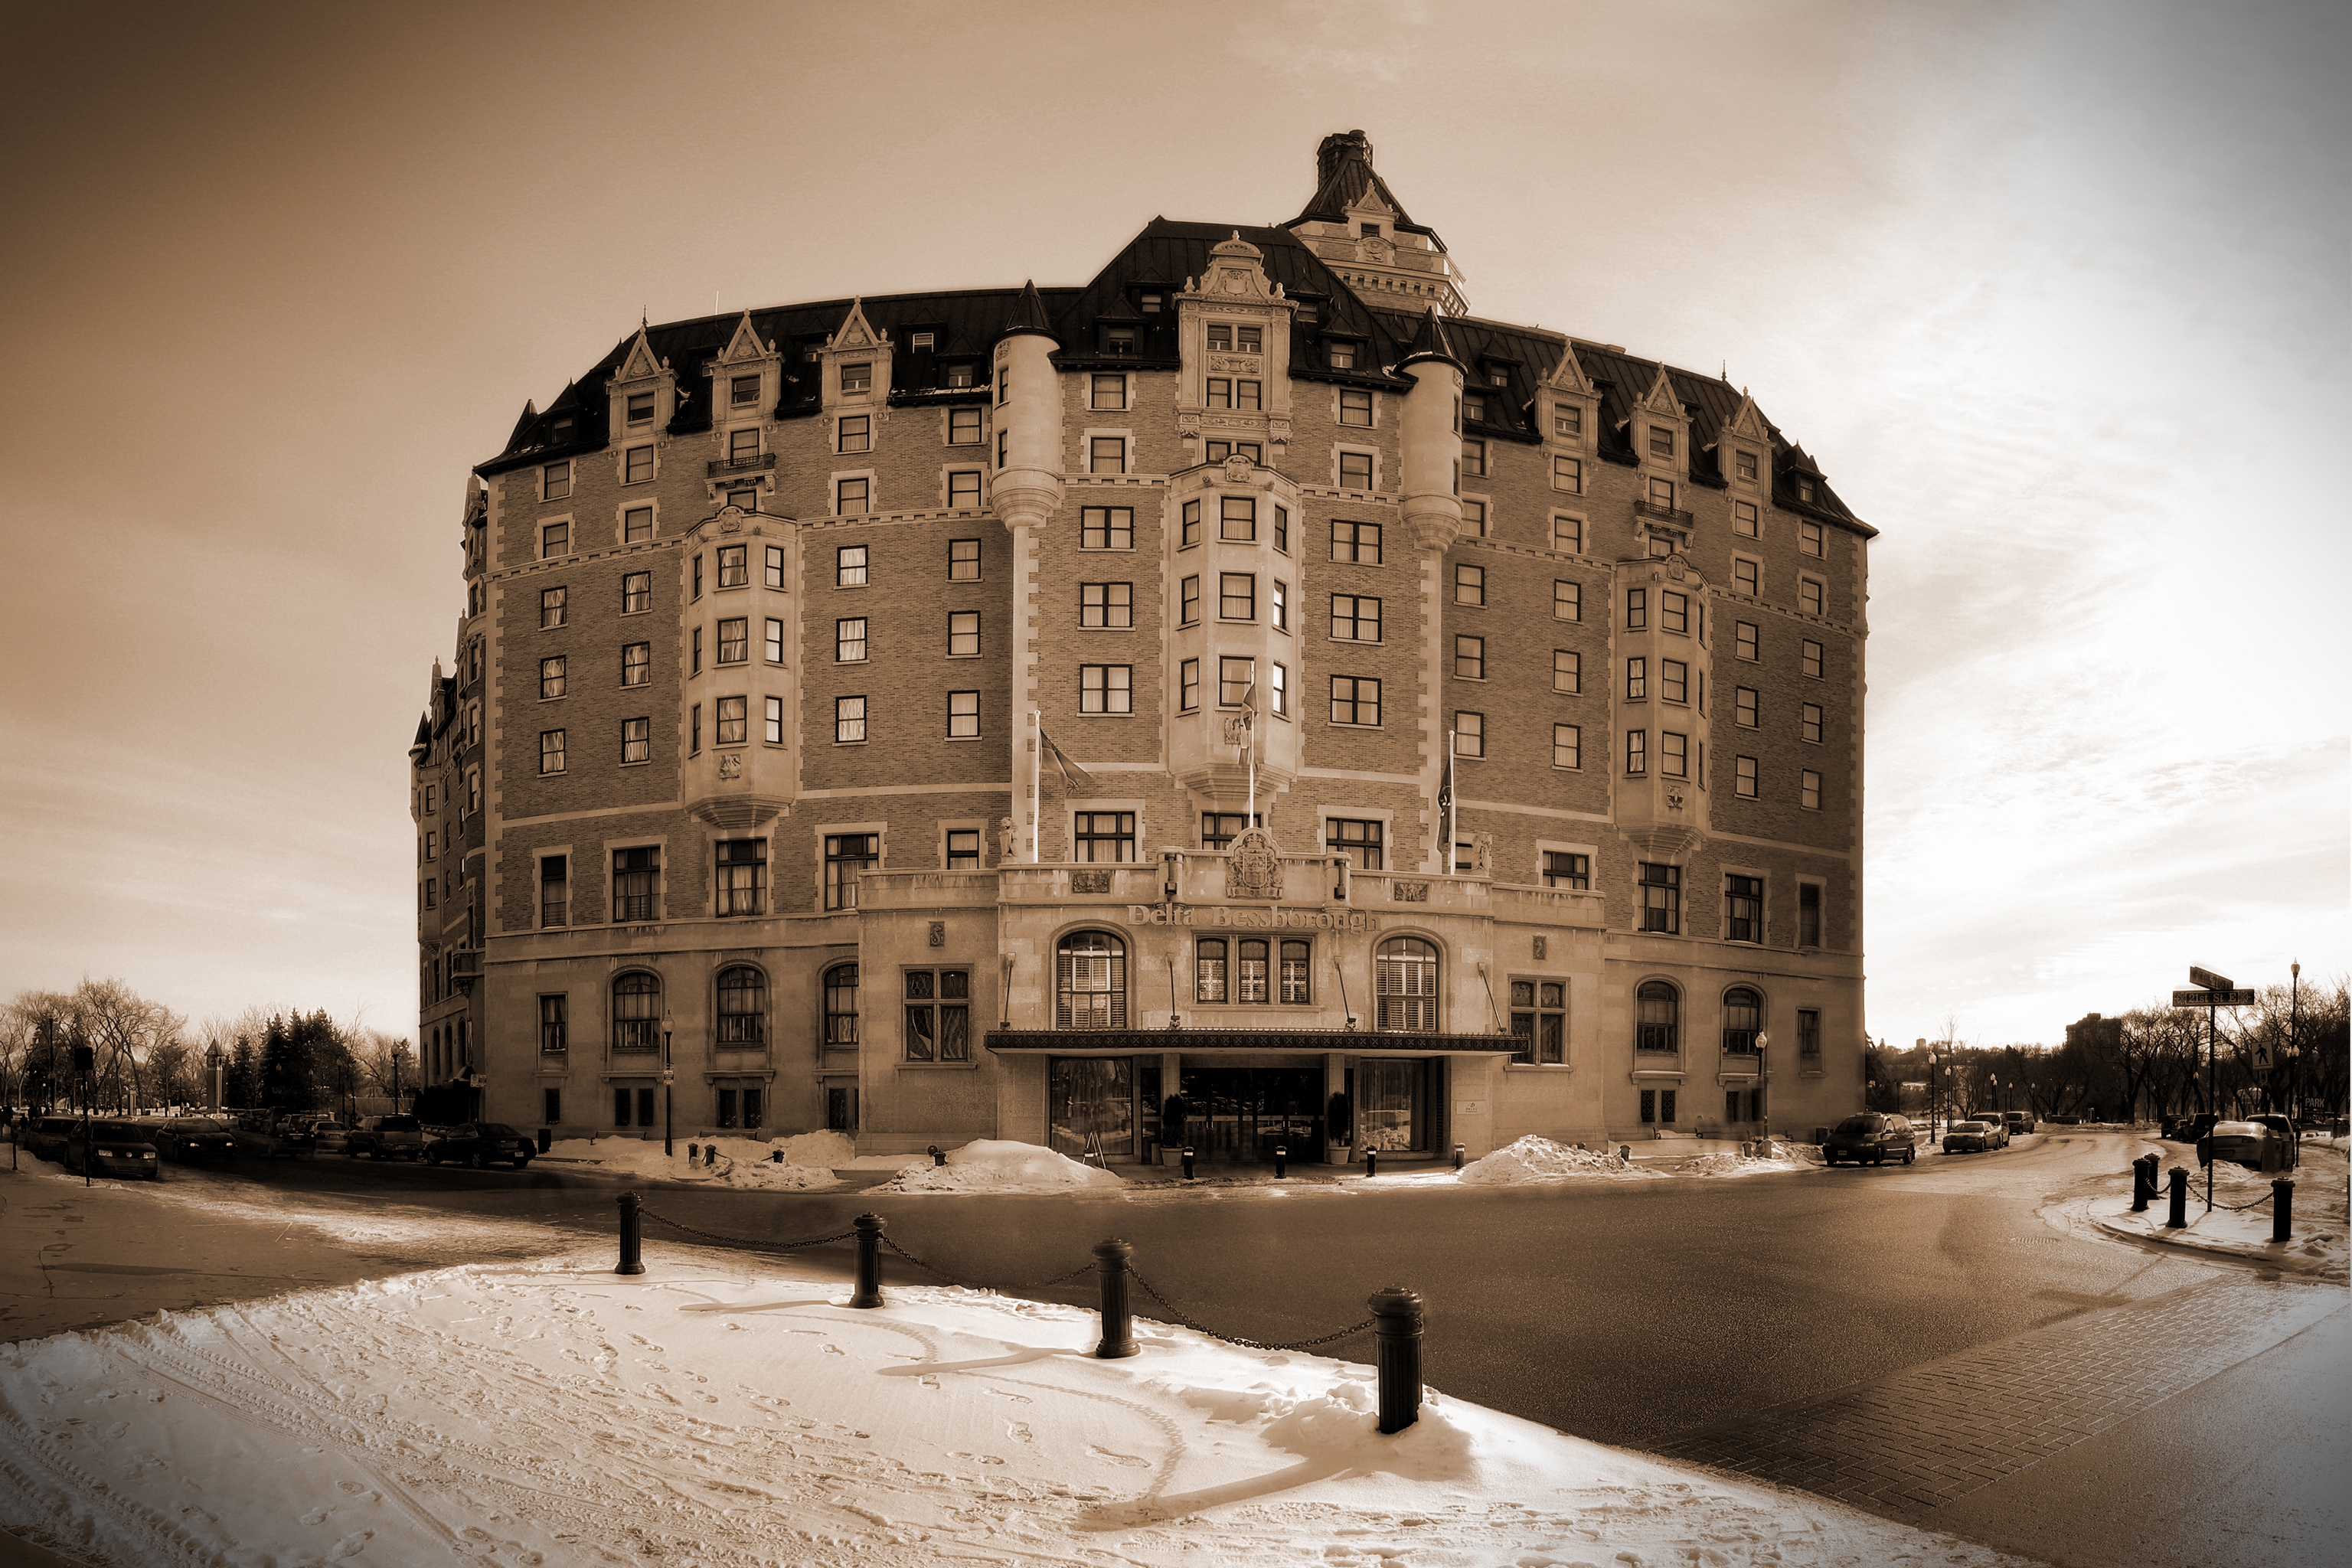
4) Photo-stitching - OK so maybe the little point and shoot is a little light on resolution, don't let that stop you from capturing a nice landscape shot. Instead of taking the shot in just one image zoom in and take 30 photos, once stitched together it could easily eclipse your DSLR.

Delta <span class=
Taken way back with my 3.2MP Canon SD200 this shot is made up of over 50 images stitched together.
Link to larger version which is still reduced by 50% or more

5) High-end P&S cameras- Don't want to leave the manual controls and external flash capabilities of your DSLR behind? Well there is still a market of high-end point and shoot cameras available. The Canon G series cameras for example are almost the go-to standard for reporters and journalists. Nikon and Panasonic also make models in this category as well so there are options even if you're not a Canon fellow like myself.

It's even possible to do a full fledged modeling shoot using one of these as is shown in this video.

6) Bells & Whistles - Lastly there are some new technologies emerging that can make your P&S even more versatile. Geo-tagging is just starting to catch on, companies like Eye-Fi are offering the ability to geo-tag your photos on the fly and upload them wirelessly to your PC or various photo sharing sites, all built into a little SD card. Nikon's P6000 is comparable to the Canon G10 but also comes with built in GPS for geotagging anywhere you can get a signal, this was enough to have my second guessing my G10 purchase.

In conclusion most people nowadays probably got their start in digital photography via a simple point and shoot, I know I did way back 2001 with a 2MP HP P&S. Often though people tend to overlook these cameras later on once they enter the DSLR world, hopefully this shows some reasons why you may want to reconsider them as viable photographic tools.

Sunday, June 28, 2009

Simple way to digitize slides

Old Slide Digitized Using A Canon 5DMKII DSLR

Growing up it was always fun when my Dad would break out his big box of old slides and show them when we had company over. Years have passed since the last time that happened and with my parent's 50th wedding anniversary around the corner I starting thinking about digitizing them for a DVD slide show. To my surprise (and horror lol) I found that my father has 1200 slides in total, much too many to scan one at a time in a flatbed scanner. After asking one of the local photo stores about the costs of bulk scanning slides and finding this was relatively costly I decided to try and find an alternative.

The answer, it ended up, was laying in my camera bag. The simplest solution is to just set up the projector and screen and take photos of the screen. The results will not be as high quality as scanning them but for viewing on a TV and making 4x6 prints the quality is acceptable.

*Note: I've since viewed the images on my 46" HDTV using my PS3 and the results don't look that different from watching them on the projector screen itself ;)

What you'll need:
1) Tripod - This is a must
2) Cable Release - While not absolutely necessary it can reduce camera shake and result in a clearer picture
3) A camera capable of long shutter speeds (even most point and shoot cameras allow this now)
4) Projector, Slides, and a Screen
5) A darkened room

Things to keep in mind:
This will be a little advanced so most camera's "auto" or "program" modes aren't going to cut it or will need some tweaking, you're probably going to have to dust off your camera's manual and give it a good read. Because we're shooting in low light you'd normally want to use a high ISO setting, however that degrades the quality of the image, since the subject isn't moving we can use a long shutter speed instead allowing us to keep our ISO low to preserve quality. Also you should try to limit any changes in camera position or projector position shot to shot, this will help you later if you have a means of automating your post production (via Lightroom or Photoshop).

Tips for point and shoot cameras:

  • Set your camera to the lowest ISO setting available (normally 80 or 100)
  • Turn your camera flash OFF
  • Use the self-timer function on your camera if you don't have a cable release, this will ensure your camera doesn't shake when the photo is taken. Some cameras have a 2sec setting as well as a 10sec setting, this is essentially the type of thing that the 2 sec setting is meant for.
  • If your camera allows for exposure adjustment (usually indicated by EV±) you can use this to tweak the exposure brighter or darker, use trial and error to get it right.
  • Limit the amount of zoom you use, the more zoomed in you are the more amplified any camera shake will be.

Tips for DSLR cameras:

  • Set the camera to the lowest ISO
  • Use an aperture that is big enough to let in a decent amount of light but small enough to ensure a depth-of-field wide enough so your image is still sharp and in focus.
  • Use a cable release or self timer to limit camera shake, also if your camera allows mirror lockup you should enable that to further reduce shake.
  • Limit the amount of zoom you use, the more zoomed in you are the more amplified any camera shake will be.
  • Adjust your shutter speed to control overall exposure, again this will probably be trial and error.
Tips for post production work:
The first 100 slides I did manually one at a time, cropping them and then adjusting colour levels to correct for the colour shift over the years. I quickly realized that this was very time consuming and was defeating the point which was to get a "quick and dirty" copy of the slides while maintaining an acceptable level of quality.

A program such as Adobe Lightroom allows you to copy and paste develop settings from one picture to others. Basically you spend the time doing it right on one picture and then you highlight the rest and apply the same settings. You'll have to do this twice though, once for portrait orientation photos and then again for landscape orientation. Instead of spending 2hrs on 100 slides I was able to process 500 slides in 1hr. You'll still have to go in to manually fix a few of them if the colour correction or levels are funky but its a great time saver.

The same (or better) results can also be achieved with photoshop by setting up custom actions and then running them as a batch, this method is more time intensive but will also allow you to correct for perspective distortion (not available in Lightroom) since your camera will be shooting up towards the screen instead of perfectly perpendicular to the screen.

Using this method I was able to capture 300 slides in a little over 1 hour (not including cropping them on the computer and correcting colour etc).

Have fun and good luck

Friday, May 22, 2009

Hair Salon Shoot

27 Models. 3 Days. 90 ft sq workspace on location. 20"x30" prints required.

Ad mock up showcasing some of the finished photos


I had been getting my hair cut at this place since highschool and after 6 years and countless business cards I finally landed the job. I'll admit that I was a little nervous but I new I had the technical skills and (most of) the equipment necessary to accomplish it.

Prep Work

What are the major considerations for showcasing hair and hairstyles?
  • Adequate back lighting to bring out the hair
  • Small apertures to ensure all the hair is tack sharp
  • Low ISO to preserve sharpness in poster size enlargements
  • Enough overall light to allow for the previously mentioned aperture and ISO
Considerations for this shoot in particular?
  • Long days full of shooting, will batteries hold up (both cameras and flashes)?
  • Do I need more memory cards?
  • Can the 40D handle 20x30 enlargements of portraits?
I am a worry wart by nature, because of this I often over plan things. In this case it proved to make things much much easier. The worry over batteries: I have 3 for my 40D which should suffice. Rechargeable AA's for the flashes? I don't know since I've never shot for 8hrs straight before, to be safe I picked up an extra 4 sets of 4 and 2 chargers (bringing my total to 8 sets). Memory cards: I should be good with two 4GB, a 2GB, and two 1GB cards plus my laptop to dump them if I need to. My Canon 40D handling enlargements: At first I wasn't sure, I had done landscapes that size but portraits seem to need to retain more sharpness. I decide to do a test print from a recent shoot and am content with the results, its on the upper limits of this camera but doable. Prior to the test print I was thinking about using my Yashica 635 medium format TLR, luckily I didn't have to (the film costs would have added up).

Over the last year I've been following the Strobist blog which really helped take some of the edge off regarding the lighting since I've learned quite a bit. Also as a result of that blog I have a pretty portable setup to draw on should I need it.

I realized that since I would be shooting on location I would need a suitable backdrop, initially I thought since the photos will be primarily head and shoulders I wouldn't need much for a backdrop. I figured that I'd just bring a white sheet and do the rest in post. Further thinking raised two questions: how professional is this going to look if I show up with a bedsheet backdrop and since I'm shooting at small apertures aren't all the wrinkles going to be in focus too? I could nuke it but I don't want risk to burn away the edges of the hair. OK so no bedsheet, I need a better solution. $215 later I'm a proud owner of a Cameron portable backdrop kit, with a 3 section crossbar it can accommodate a full 9ft roll or by taking a section out a half roll of seamless background paper. In addition I was pleasantly surprised to find that the two side poles were essentially lightstands, that was a bonus because I'd been wanting to pick up more. I've since found cheaper versions (i.e. less expensive, not quality) of this backdrop kit online at B&H and other places, I needed mine quick so I didn't have a choice.

Choosing a lighting setup

Now I've got the gear that I need to shoot this, I can start thinking more about the lighting configuration I will need. I've got two 400W studio strobes if I need them, however they are entry level ones and do not allow much control (full, 1/2, 1/4 that's it). I've also accumulated a number of flashes (damn strobist addiction) so I have a Canon 580EXII, 430EXII, 540EZ, and two Nikon SB-26's. For triggering I have 4 sets of YongNuo PT04TM "poverty wizards" and if I need to use it both of the Nikons have built in optical slaves.

Having not worked with the battery powered speedlights too much I really have no idea how fast the batteries drain. Because of this I start thinking it might be wise to bring in at least one of my studio strobes.

I decide to do a test shoot using one 400W strobe in a softbox directly above the camera and then a speedlight with a gridspot on it to kick up the hair. This allows nice soft lighting yet still allowing shadows to keep it interesting and three dimensional. A close friend of mine, and frequent guinea pig of mine, was nice enough to come over for a quick test shoot.

Test shoot to showcase hair 1
Lighting Test - Two Light Sources

Within a few attempts I managed to get the lighting roughly how I wanted it, there was nice a nice sheen to the hair and with the seamless background I could remove frizz if necessary.

At this point I can breath a little easier, I know my lighting setup now and should be ready to go.

The Shoot

A week later it was time for the main event, I was asked to come setup a day in advance. As it turned out due to a stylist going away on holidays the next day I was asked to shoot one model as well. This worked out to be a good test shoot to make sure everything was working, also since there was only one person there wasn't a rush. The shots turned out decent, I had highlights in the hair and the face was pleasantly lit. My stress level dropped significantly at this point.

That night as I was laying in bed I started to stress again for no reason. I figured I should put another speedlight on the other side to balance it out, if I found my batteries were depleting quickly I could get rid of it.

Revised setup: 1 Softbox above camera @1/2 power, 2 gridded speedlights behind model on opposite sides @1/8

This turned out to work better, the 2nd speedlight added more dimension to the photo. As you can see in the photo above I did not have much space to work with ;)

We had slated 30min per model which at first I thought was going to be pushing it, as it turned out each sitting only took 10-15min and I was getting 50-70 shots of each model. My fears regarding battery life turned out to be unwarranted. I could shoot most of the day at 1/8 power before my recycle time started to become an issue, at which point I simply tossed them in the charger and plugged in a new set. I only really needed the 4 sets I already had. Better safe than sorry. I should also point out that I had zero misfires with the cheap $20 per set wireless triggers I was using. Twice in three days I had them fire when I wasn't shooting but I'll take that over a missed trigger anyday, I highly recommend them. If you click the link it will take you to dealextreme, I should point out though I ordered my last 2 sets off ebay because dealextreme ran out. I was pleasantly suprised to find the ebay ones had pc sockets on the recievers which my earlier onese did not, these however were $30/set but worth it for the sockets.

Post Production
Minor adjustments in lightroom to correct the exposure and bring up any lost detail in the hair. The real work began in photoshop, aside from the standard "airbrushing" of blemishes etc the most challenging aspect was frizz removal. No matter how careful the hairstylist is there will always be some frizz, for these shots though I wanted them to look perfect. In the end I found going in by hand with the heal brush set to replace worked the best, it was tedious but it yielded great results. For the background I just made some arcs in white, blurred them out, then masked around the model. I actually made a variety of backgrounds but in the end the client decided to go with the "swoosh" for all of the shots. I was left to choose what background colour I thought would match the best. I tried to keep it subtle so as not to overpower the model, sticking to complimentary and analogous hues using the colour wheel.

Conclusion
When the dust finally settled I was quite happy with how everything turned out, most importantly however my client liked the photos and was happy with the outcome. The previous photos that were up in the salon I found to be a little too "safe", the background was pure white and the lighting too even. Coming into this job I wanted to set myself apart, use slightly more dramatic lighting to give dimension as well as kicking up the backgrounds a little. Hopefully in a few years I'll be asked to do it again, until then I never want to shoot 27 models in such a short period of time ;)

Wednesday, April 22, 2009

Camera bag of holding?


If you caught the joke in the title you're a geek ;)
I figured it was time to upgrade camera bags today, its not that my old one was necessarily too small but I knew for some gigs I'd need more than it could handle. My old bag was a Lowepro Slingshot 200AW, a phenomenal camera bag by any standards and probably one of the most popular ever. Its been halfway around the world with me, seen the heights of the Great Wall, survived airports and security checks, and never broke my back. I've decided rather than sell it I'm going to keep it for times I need a decently spacious bag that is still fairly lightweight and feels good on my back.

Ok, onto the new bag, like a kid in a candy store I was awestruck and the sheer selection in Don's Photo today. I gotta hand it to the staff there, they are nice and patient, helping me critique each of the many bags I looked through. I finally decided to go with the Lowepro Fastpack 350 because it fit my criteria which were:

A larger bag that could accommodate everything my current bag could plus 2 flashes & accessories
Hold a laptop
Still be comfortable to wear

I was amazed at all the crap stuff I could fit into this bag. Here's a list of what I managed to fit inside:

Canon 40D w 17-85mm lens attached
Canon G10
70-300mm zoom lens
50mm 1.8 prime lens
Lens Hood
Lensbaby 2.0
Loreo Beamsplitter (Lens for 3D photography)
Macro extension tube kit
4 YongNuo PT-04 wireless transmitters and receivers
3 DIY gridspots
2 Stoffen Omnibounce (3rd party $2 versions, I'm not paying $30 for a piece of plastic)
580EXII inside its fabric case
430EXII inside its fabric case
Off camera TTL cord
2 BP-511A batteries & charger
Manuals for both the 40D and 580EXII
Cable release
4 CF cards
Card Reader
Laptop w power connections
Rosco Gels sample pack
Lenspen
Misc cables & adapters
Bag of homemade Bongo Ties
Plastic rain sleeve
1 Roll of electrical tape

All of that and some room to spare. Man I hope I never get mugged carrying all of this ;)

Had I been thinking I would have taken some pictures as I was doing this, now that its all done I really don't want to unpack everything and take shots. I will try to update this post sometime in the future with photos.

Even with all this stuff its pretty comfortable on the back, the straps are well padded and so is the part that rests against your back.

Are there things I'd change about it? Sure, nothing is perfect, however they are all very minor (who decided two memory card slots were enough?) and can be worked around. One feature the Slingshot that is missing in the Fastpack is the rain cover, though I've never used it I found it reassuring to know it was there. Also, for some reason the model down from mine has a cell phone holder on the left shoulder strap, why is this missing on the next model up.

All in all I have very few gripes about this bag, its my 4th Lowepro bag and like all the rest the quality is superb. I don't think people buy new ones because they break, its either because of new features or just to upgrade size.

For tons of user reviews on both my new and old bags Amazon.com has tons, you can check them out by clicking on these links:
Fastpack 350
Slingshot 200AW

Friday, April 17, 2009

DIY Ringflash for approx $20


I actually made this tutorial by taking stills from sketchup google's free 3d rendering program. Its very handy for designing projects like this, it lets you see how everything is going to fit together first. Hope you like it, I'll hopefully post some sample images soon.

Tuesday, April 14, 2009

Blitzkrieg Shoot

So what do you do when a friend calls you up and says they need promo photos ASAP, you're working until midnight, and you don't have any gear with you? You say I'll meet you at 12:30am ;)

Luckily there wasn't really much pressure, they just needed 2 shots evenly lit at 300dpi so they could send them off to the event organizers for posters. I didn't even have to edit any of them.

Thank god I discovered the Strobist blog, if I hadn't I would not have had a portable rig to pull this off with let alone the lighting skills to setup, shoot, and tear down in 30min. After work I sped home and grabbed two light stands, my 580EXII and 430EXII, my "poverty wizards" and two shoot thru umbrellas. All stuff I could carry on my own and load into the car in one trip. Portability rocks!

My friend had mentioned the gym is in a basement but that it was really well lit. Never trust the client's ability to guage lighting conditions. It was plenty bright enough for training etc but not for photos if I wanted to shoot at a high enough fstop to get detail and low enough ISO for tight grain.

I new they wanted these for promo posters so I wanted to keep the fighters fairly evenly lit so that they could be removed from the background if need be. I decided to go with my new-found favorite lighting setup "the clamshell" configuration. With this setup you have two umbrellas stacked vertically and you shoot through the gap in between. It essentially makes it look like the person was standing infront of a 9'x3' softbox.

The shots they needed were pretty dull as far as lighting goes so after burning the disc off I decided I'd edit two quickly just for the fun of it.

Since fighting is a harsh and violent sport I decided to pump up the clarity slider in Lightroom, something I normally don't do (too many amatures are trying to fake the "Dave Hill look" that way) however I felt in this circumstance it would work.

Once I got them into photoshop I needed to do something more dramatic with the lighting. Awhile back I read an article about the light renderer in PS and how it could actually be useful. I finally tried it on a few photos and it actually works pretty decently. For these I set a spotlight up on the top right shining down diagonally across the photo.

At this point I pretty much had the shot where I wanted it but I thought I'd try for a little more of an edge. I duplicated the layer and added a high pass filter to it dialed in just to enhance some of the fine edges, then set the layer blend to overlay. Its important to desaturate the hipass filter layer too because it tends to greatly amplify colour noise.

Voila, 2 poster quality shots with minimal editing all from a shoot that was 30min from setup to tear down. I know I could have done much better given more time and a licence to edit but it wasn't what the customer wanted. These two shots were just a fun bonus I later emailed to him incase they could use them.


Fight Pics-11-Edit BW
Dave from "Way of the Dragon Martial Arts" based in Saskatoon

Fight Pics-27-Edit BW Crop
Elmer also from "Way of the Dragon Martial Arts" based in Saskatoon

Monday, April 13, 2009

DIY Ringflash - My Experience

Here is the version I made. Link to step-by-step instructions coming soon.


Ringflashes, they always produce such a cool look. With a lure of nice even wrap-around lighting beginners to "off camera lighting" are often disappointed to find out how much these can cost.

Enter the realm of the do-it-yourselfer, a quick google search will yield all sorts of ringlight contraptions. Recently two products have emerged to fill the niche for budget ringflashes, the Rayflash and the Orbis Ringflash, both seem to be derived from DIY projects. Both of these, like so many of the DIY versions rely on light from a Speedlight style flash, because of this they still aren't a genuine replacement for a real pro ringflash.

Last week I walked into the local photo store and saw that they had some Rayflash units in, I was immediately intrigued. After asking the salesperson to grab one for me I opened the box to see what all the fuss was about. There was no chorus of angelic voices, no warm soft glow emanating from the box lighting up my face, there was only a cheap feeling plastic ring. Now I'll admit the that it looks like it will do the job but really $300 CND? All it is is plastic, plastic that bends the light from your flash at 90° then channels it around your lens via lightpipes. Maybe I'm too critical, I just think this could be priced more reasonably at $100-$150 and this Ray guy would still be rich ;)

I haven't yet seen one of the Orbis Ringflash units up close and personal, from what I can gather its priced pretty close to the Rayflash. The Orbis design is more like the one I made, a ring with a hole at the bottom to shoot your flash into. It also appears to have some "trick" for bending the light around your lens. Regardless both are overpriced in my opinion but if you aren't much of a tinkerer or just don't have the time to try making your own they might be right for you.

Setting out to make a ringflash

I'm not going to go into full instruction mode in this post, instead I'll save that for my post on www.instructables.com and just update this post with a link to it.

Over the last 6 months or so I've been infected with Strobisitis a condition that afflicts photographers that accidentally stray to strobist.com and see the world of portable off-camera lighting. I went into a flurry of DIY mayhem putting together snoots and grids, bounce cards, and finally stumbling upon the beauty dish. The light from a beauty dish is similar to a ringflash but its still not "on axis" since you're not shooting through it. I did not know how big to make the beauty dish so I had made up 3 variations using different bowls I had picked up at the local $1 store. For months this former Halloween treat dish sat nicely painted just waiting to be used or tossed away. This was its chance.

Inspired by this guy's rig that was posted here at strobist.com I decided to make my own attempt. For my version I decided I wanted to use a diffuser on the front to try and even out the light a little more, I also wanted to include a bracket like this guy did.

I had the bowl, I had spray paint, I still had white nylon leftover from a semi-successful softbox attempt. I even had the aluminum stock from a previous project, now all that I needed to do was mash the stuff together.

For the center whole I ended up using a plastic peanut butter jar that I cut the ends off of. The fabric diffuser actually worked out without a hitch (had to bring it to my mother to sew though ;) and I managed to get the brackets bent properly on the first try.

Front and side view of the DIY ringflash. The bracket still had to be painted black.

Quick test shot of my nephew as he walked in the door.

I'll put up some real test shots later but this showed me that the light distribution was pretty even. The non-flash side is a little darker but there are a few things I've still yet to try to even it up. For around $20 of material I'm pretty happy with the results.