
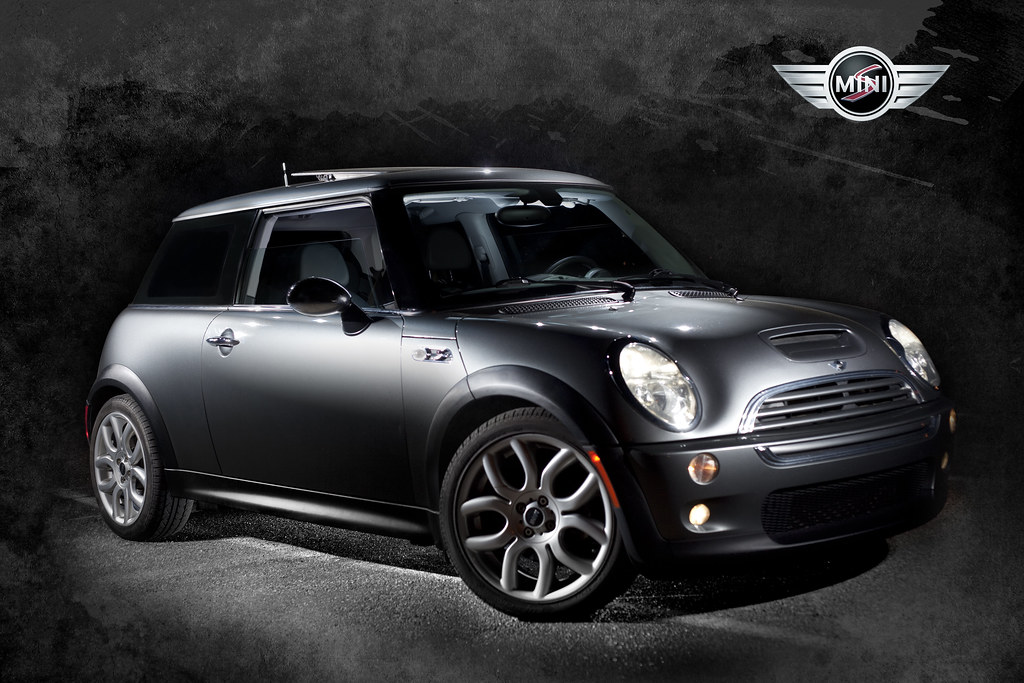
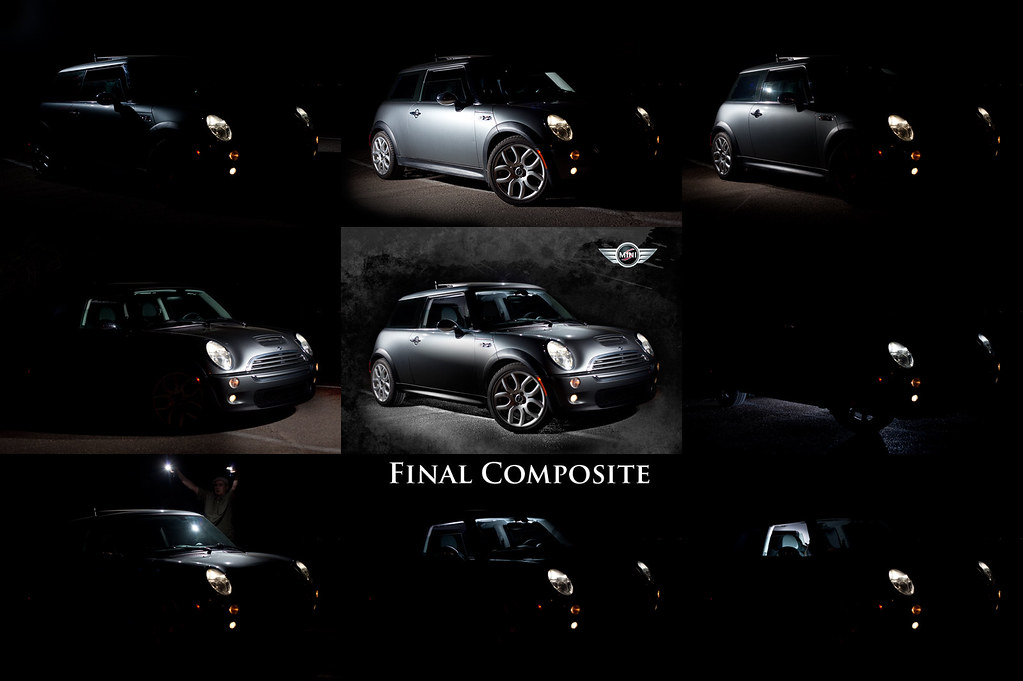
The final image comprised of 8 composite shots.
Just a quick post about my first real attempt at lighting a car using off camera flash and a list of do's and don'ts from the experience.
I did this shoot with a fellow photographer friend of mine, we took turns between pressing the shutter and being human tripods holding the flashes. All in all I was quite happy with the final product. I would have liked to had a few more variations from different angles but since it was our first time we just tried to keep it simple.
My initial idea was to head out after sunset so that we didn't have much ambient to worry about, the intent was a finished image much like the one above with the car surrounded by darkness. My buddy Perry wanted to go around sunset so we could try shooting both ways and since we had plenty of time that is what we did.
Here's a shot that Perry took while it was still quite light out so no flashes were used. It shows a little more of the location we were using, we did the shoot behind one of my company's buildings since it backs a field and we know the place is quite dead on the weekends.

Gear:
Canon 5DMKII
Tripod
50mm f1.8 Prime Lens
Yong Nuo PT-104TM wireless transmitter and two receivers
Two Yong Nuo YN460MKII flashes
Do
... lock down your tripod to avoid any movement.
... keep the camera in one spot then light each aspect of the car shot by shot.
... bring fresh batteries ;)
... pick a place that is out of the way.
... use a softbox if possible to avoid bright reflections
... bring a wireless shutter release if you have one
... take the time to light the ground all the way around the car
... take lots of photos in each "pose" it only gives you more options in post
... bring a few rags to wipe down the car
Don't
... pick a spot with a lot of lights around, they'll get reflected on the car.
... shoot a dirty car, the flash lights up dust quite well ;)
... leave your aperture too wide open making the DOF less than the car's length
... forget that leaving your lights on with the car off will kill your battery
... bother trying to shoot before dusk if you want to use speedlights
... light the car at angles that will yield harsh reflections (when possible)
In the end the shots where we tried to mix ambient and strobes didn't work out too well and thinking back on it I now why. What we should have done is taken a few shots that just exposed ambient then shot faster shutter speeds to light the car with the strobes. Instead we were trying to do both at once and simply didn't have enough watt-seconds in my dinky speedlights to pull it off. Some of the "don'ts" listed were learnt the hard way, for example I accidentally left the aperture at 2.2 so the front of the car is a little soft. Also despite having detailed my car that afternoon by the time we got to the location it covered in a thin layer of dust.
The final image at the top of the post was comprised of 8 different car shots (plus a few texture/logo layers). Using the "lighten" blend mode in PS I stacked each photo and masked out the areas I didn't want to show up. This gives you amazing control and allows you to create a finished image that would most likely have been impossible to light in a single exposure.
For the interior shots I actually had the seat laid all the way back and sat inside moving the speedlights around while my friend snapped away. A nice surprise about the interior shots was that they hid all of the smears/fingerprints on the windows.
All in all I think we accomplished what I had in mind when we set out to do the shoot. Next time out I'll definitely do a few things differently but we did pretty good for a first attempt. In the end this was a great learning experience and since it was my own car there was no pressure, we could just play around and have fun.